

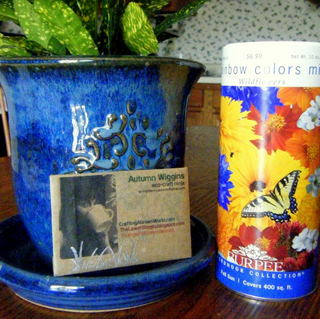
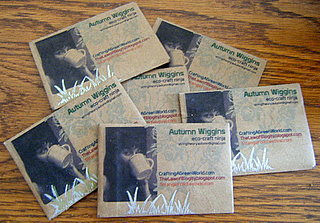
 We all forget our reusable shopping totes from time to time. Instead of putting yourself on a green guilt trip, pick paper over plastic (ask your friends and relatives to also!), and upcycle those bags into some not-so-shiny seed packet business cards. Since I focus on the environmental impact of crafting, I decided any self-promotion should reflect my agenda. Plus, I’m ever enthusiastic about combining gardening with crafting. This is what I came up with, and they’ve gotten rave reviews. The process involves some unorthodox methods, but such is the way of the eco-craft ninja…
Gather your materials and ideas. Here’s what’s involved:
- An inkjet printer
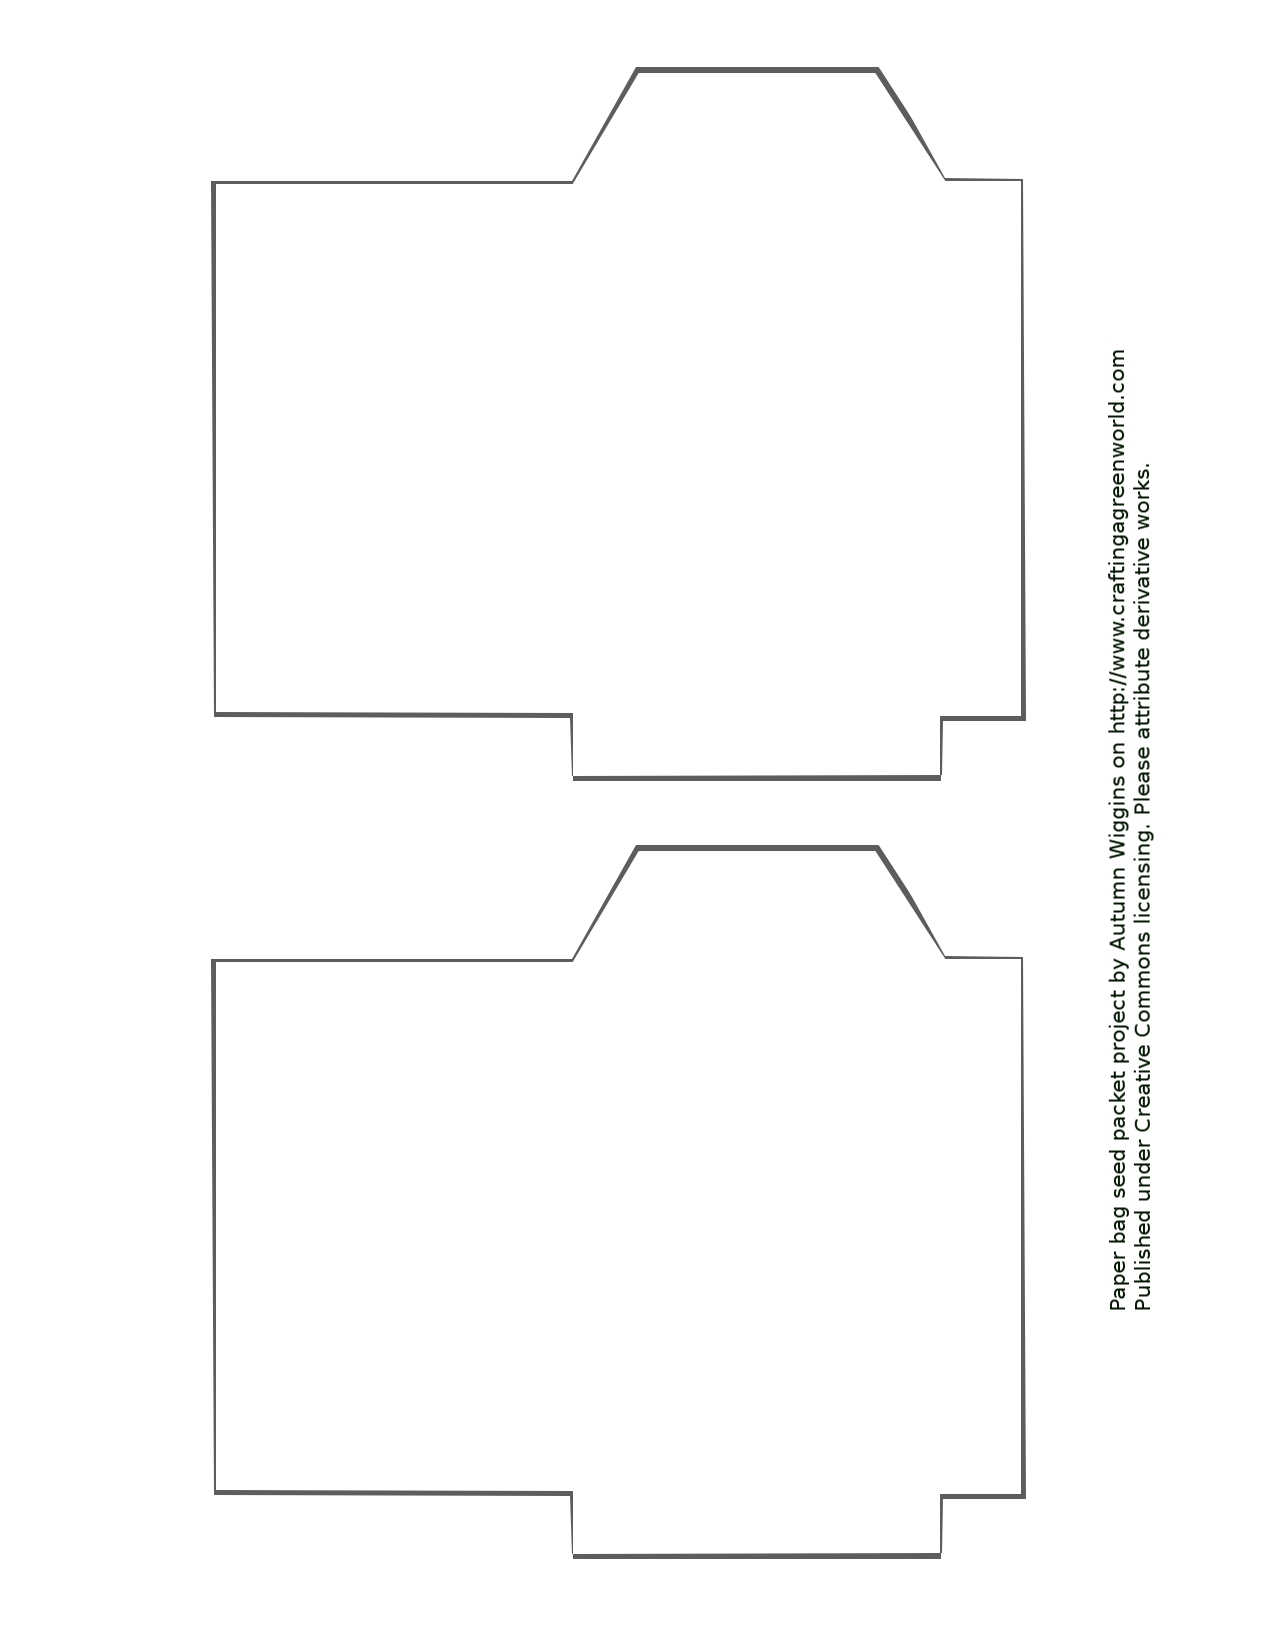
- The seed packet outline template (download here in JPG or PDF file formats)
- Embellishment option 1: A graphics program such as Adobe Photoshop or GIMP (free open-source software)
- Embellishment option 2: Decorate the packet post-printing by hand
- Embellishment option 3: Do both!
- Paper grocery bags
- Iron and scrap fabric
- Scissors
- Ruler
- Pencil
- Glue stick
- Paper creaser or popsicle stick
- 1 can of wildflower seeds
- Optional: rotary cutter with dedicated blade
- Optional: stamps, stickers or other embellishments(as long as they don’t poke holes in the paper)
Create your design
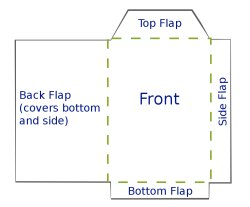 You need only a basic knowledge of manipulating graphics to create a design with the template. Don’t fret over acquiring Photoshop if you don’t own it. I have been singing the praises of open-source options like GIMP and Inkscape for years now. If you are not adept to using this type of software, no worries! You can simply print the PDF file, then write, collage, stamp, or glue to your heart’s content. Here is a brief description of the steps I take using GIMP(for all you rookies): Open the template in your program. It’s 150dpi, and is sized to print at 8.5″x11″. You’ll want to work in layers for manipulating different elements. Create your design within one of the outlines. When you are done, save it in the native format(.psd for Photoshop or .svg in GIMP), so you can adjust later if needed. Now, simply merge down those layers, leaving the background free. Copy/paste the text and images, and align them on to the second packet outline (or do different designs, it’s your party!). Keep in mind that printing on brown paper means that white will not be a factor in your colors. They will be duller than what appears on the screen. That said, I have an inexpensive multi-function HP printer, and even light blue showed up nicely. Important text should be in bold or dark colors though, and keep it about 1/4″ from the fold lines as well. When you print, make sure to check the options for margins. If you can, set the printer to ignore them.
Turn bags into printer paper
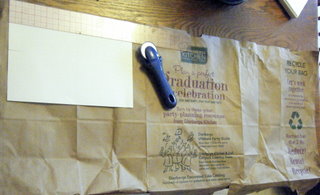 All paper grocery bags that I’ve encountered have a single seam along the length of one side. You don’t want to print on seams, so rip or cut it open along that line. You won’t be using the bottom. Cut it out, or tear it apart so that the bag lays flat in a single layer. The point is to have as much surface area as possible to divide into 8.5″x11″ pieces. Using a scrap piece of printer paper as a template, place a ruler around the edges and trace/cut or rotary cut out individual pages. Yes, it’s against all convention to use your sewing cutlery on paper, but buy a dedicated blade for your rotary cutter, and I promise you’ll find it enormously useful for this and other projects. I made 3o Japanese stab bound books for Christmas presents last year, and opted to make this tool multi-use rather than buying a dedicated paper cutter. This also allows you to stack up to 3 layers of bags that you can cut through in one pass. For a standard size bag, you’ll get about 6 sheets of paper(12 packets). Once you have your sheets cut out, they will probably be somewhat wrinkly. So, we’re going to crossover to our sewing supplies again, and using a piece of scrap fabric as a buffer, iron out the sheets on med-high heat one at a time. This will help them to go through the printer smoothly, and make a nicer finished product.
Tips on printing
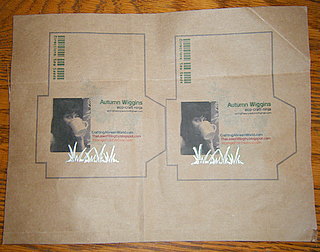 I think buying packaged specialty papers is to your printer as packaged patterns are to your sewing machine. It creates a predictable finished product, but both of these machines are potential avenues for experimentation. I have had no problem sewing through cardboard. Likewise, I’ve had no problem printing on regular fabric. More on that later, but let’s stick with the program. Load your paper bag paper with the blank side in the correct direction to be printed on in the paper tray. Keep the cleanest edge (one with the least folds or wrinkles) on the feed side. If you are printing your design, set your printer properties to a high-quality setting, and adjust the ink volume to medium-heavy or heavy. I got over 75 cards printed without putting too much of a dent in my notably puny cartidges. Print a sample or two, and adjust as needed. When trying this, I was pleasantly surprised by the sharpness of the images on the seemingly rough surface. I had one or two jams, but they were because I was messing around with the loading tray. No big deal. Again, I have a run-of-the-mill, front loading HP, any inkjet should work similarly. If you try, this and have any particular issues or tips for your model, please leave them in comments.
Cut, paste, and plant!
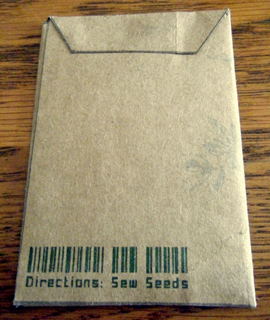
 Cut out the individual packets along the lines. If you want to add additional decoration or hand drawings, now is the time. With the right side down, fold all the flaps in towards the middle, and crease using your popsicle stick or paper creaser(sometimes these are called “bone folders” though they are generally made from plastic nowadays). glue the large side flap over the top of the folded in bottom (the tapered end is the top) and opposite side flap. I find they stick better if you apply the glue to both surfaces being stuck together. Press and smooth out to seal, then let dry completely. Give them at least a few hours to set, then pour a tablespoon or so of seed mixture into the open end, and apply glue to both the flap, and packet surface to thoroughly seal. Smile about all random acts of guerrilla gardening you are setting into motion : )
I want you guys to be able to go nuts with this idea. So I’m releasing it under a Creative Commons license. That means you may “perform”, tweak, and publish this tutorial to your hearts content, even for commercial purposes. The only requirement is that you should acknowledge its use anywhere you might republish or showcase a derivative product online by linking back to craftingagreenworld.com. Here are just a few possibilities for hobbyists and entrepreneurs alike:
- Enlarge the template image and use for packaging larger trinkets and such.
- Are you a gardening enthusiast? Package your own seeds! Keeping them sealed in a cool, dry place should prevent any random sprouting. I’ve had no problem whatsoever with that.
- Do you make and sell items for gardeners? This would be a great addition to a gift set.
- Make them into tags by taping a loop of scrap paper on the back to attach with a string.
- What else could you put in them? Emergency sewing kits? A small beading project? Surprise collectible pin-backs? Trading cards? Product samples?
- Try sticky velcro to seal the top for larger reusable contents.
 Go ahead, escape the the force of craft gravity. The sky is no longer the limit. This attribution requirement only applies to the fabrication described in my tutorial. You may attach your own copyright preference to any original imagery or artwork you apply in the process.
Sponsored link: If you find yourself needing to print your business cards in the future, pay our PsPrint a visit. You’ll definitely save lot on your printing services and get excellent business cards without spending a lot.
![]() Brown Paper Seed Packet Business Cards by Crafting a Green World – Autumn Wiggins is licensed under a Creative Commons Attribution 3.0 United States License.
Brown Paper Seed Packet Business Cards by Crafting a Green World – Autumn Wiggins is licensed under a Creative Commons Attribution 3.0 United States License.


I have always tried running paper scraps & bag scraps, and they’d get jammed in the printer…can’t believe i never thought of ironing them out first! This changes everything! I love this project idea, it’s so awesome 🙂 I am always saving seeds from my garden, and sharing them.
I have always tried running paper scraps & bag scraps, and they’d get jammed in the printer…can’t believe i never thought of ironing them out first! This changes everything! I love this project idea, it’s so awesome 🙂 I am always saving seeds from my garden, and sharing them.
I have always tried running paper scraps & bag scraps, and they’d get jammed in the printer…can’t believe i never thought of ironing them out first! This changes everything! I love this project idea, it’s so awesome 🙂 I am always saving seeds from my garden, and sharing them.
I have always tried running paper scraps & bag scraps, and they’d get jammed in the printer…can’t believe i never thought of ironing them out first! This changes everything! I love this project idea, it’s so awesome 🙂 I am always saving seeds from my garden, and sharing them.
thanks so much for putting this up! I think it’s a fab idea with so much potential. Can’t wait to try it out!
thanks so much for putting this up! I think it’s a fab idea with so much potential. Can’t wait to try it out!
thanks so much for putting this up! I think it’s a fab idea with so much potential. Can’t wait to try it out!
Wow, beautiful idea, Autumn. Thanks for sharing!
Wow, beautiful idea, Autumn. Thanks for sharing!
Wow, beautiful idea, Autumn. Thanks for sharing!
This is such a wonderful idea and thank you for allowing us to use it. I will definitely make good use of it in my wedding place settings.
This is such a wonderful idea and thank you for allowing us to use it. I will definitely make good use of it in my wedding place settings.
This is such a wonderful idea and thank you for allowing us to use it. I will definitely make good use of it in my wedding place settings.
These are delightful. I hate to point out a spelling error on such a lovely project, but you “sow” seeds, if you sewed them they’d be damaged by the needle and might not sprout.
These are delightful. I hate to point out a spelling error on such a lovely project, but you “sow” seeds, if you sewed them they’d be damaged by the needle and might not sprout.
These are delightful. I hate to point out a spelling error on such a lovely project, but you “sow” seeds, if you sewed them they’d be damaged by the needle and might not sprout.
love it, autumn! such a great reflection of you and your passions. thanks for sharing it.
love it, autumn! such a great reflection of you and your passions. thanks for sharing it.
love it, autumn! such a great reflection of you and your passions. thanks for sharing it.
What an awesome idea! And I’ve been looking for a way to make business cards that were eco-friendly, too! Yay!! Thanks Autumn!
What an awesome idea! And I’ve been looking for a way to make business cards that were eco-friendly, too! Yay!! Thanks Autumn!
What an awesome idea! And I’ve been looking for a way to make business cards that were eco-friendly, too! Yay!! Thanks Autumn!
Totally rad.
I used old discarded books from my school’s library to make my seed packets. All the books are pre-1973, and have wonderful quirky graphics. Plus, “free” is a good price!
Totally rad.
I used old discarded books from my school’s library to make my seed packets. All the books are pre-1973, and have wonderful quirky graphics. Plus, “free” is a good price!
Totally rad.
I used old discarded books from my school’s library to make my seed packets. All the books are pre-1973, and have wonderful quirky graphics. Plus, “free” is a good price!
Thanks for your comments everyone! Thanks to Craftzine.com as well for blogging us!
I’m delighted to hear from some of my fellow Craft Con-ers…Readers, be sure to check out everyone’s links here. Good stuff!
MarvaJo – I did that on purpose. It’s hard to read the front of the card here, but the text is craft related…it’s a bit tongue-in-cheek 🙂
Allison, old books are also a fantastic idea. Are the seeds from your monster garden?
Thank you for the tutorial! I’ve been trying to do this on my own, but couldn’t get the paper to feed through the printer. I tried your method, and the template and rotary cutter worked beautifully.
Thank you for the tutorial! I’ve been trying to do this on my own, but couldn’t get the paper to feed through the printer. I tried your method, and the template and rotary cutter worked beautifully.
Thank you for the tutorial! I’ve been trying to do this on my own, but couldn’t get the paper to feed through the printer. I tried your method, and the template and rotary cutter worked beautifully.
This is great. Thank you so much for sharing it with us!
I do a lot of garden art from recycled materials, so the seed packet idea is especially appropriate for me, but I could see jewelry makers putting a few beads into theirs, too. You’ve created a business card people won’t throw away, and will remember.
Awesome! Thank you so much for posting this! I’m not sure why I never thought of sticking grocery bag paper through the printer before. Good thinking.
Awesome! Thank you so much for posting this! I’m not sure why I never thought of sticking grocery bag paper through the printer before. Good thinking.
Awesome! Thank you so much for posting this! I’m not sure why I never thought of sticking grocery bag paper through the printer before. Good thinking.
Pingback: Smelly Chick’s Online Soapmaking Resource » Seed Packet Business Card Tutorial
Hi,
Thank you so much for the innovative idea. I am planning to put organic bath salts in my envelopes. I own a carbon-neutral maid service (www.myimmaculate.com) and we like to leave little spa-type gifts for our clients. They would love this!
Thanks,
Will
Hi,
Thank you so much for the innovative idea. I am planning to put organic bath salts in my envelopes. I own a carbon-neutral maid service (www.myimmaculate.com) and we like to leave little spa-type gifts for our clients. They would love this!
Thanks,
Will
Hi,
Thank you so much for the innovative idea. I am planning to put organic bath salts in my envelopes. I own a carbon-neutral maid service (www.myimmaculate.com) and we like to leave little spa-type gifts for our clients. They would love this!
Thanks,
Will
I love this idea! I am going to use it for a class I teach at a homeschool co-op on flowers and plants. We make a lap book and I am always looking for fun ideas, pockets and so forth to include in our book. Kids always seem to enjoy workiing with little envelopes/pockets…and now they will have a fun way to take seeds home to plant. Thank you!
I love this idea! I am going to use it for a class I teach at a homeschool co-op on flowers and plants. We make a lap book and I am always looking for fun ideas, pockets and so forth to include in our book. Kids always seem to enjoy workiing with little envelopes/pockets…and now they will have a fun way to take seeds home to plant. Thank you!
I love this idea! I am going to use it for a class I teach at a homeschool co-op on flowers and plants. We make a lap book and I am always looking for fun ideas, pockets and so forth to include in our book. Kids always seem to enjoy workiing with little envelopes/pockets…and now they will have a fun way to take seeds home to plant. Thank you!
I just linked to your tutorial on my blog craftevolution.com. Thanks so much for sharing this idea.
I just linked to your tutorial on my blog craftevolution.com. Thanks so much for sharing this idea.
I just linked to your tutorial on my blog craftevolution.com. Thanks so much for sharing this idea.
Pingback: Upcycled paper crafts: Seeded business cards and handmade planners | green LA girl
Pingback: Tutorial: Brown Paper Bag Recipe Cards : Crafting a Green World
This a really unforgettable idea.
It looks like it takes some time to do, but good ideas often do!
This a really unforgettable idea.
It looks like it takes some time to do, but good ideas often do!
This a really unforgettable idea.
It looks like it takes some time to do, but good ideas often do!
You are brilliant! I found this on Tipnut. Thanks for sharing it. I can’t wait to tell all my gardening friends 🙂
You are brilliant! I found this on Tipnut. Thanks for sharing it. I can’t wait to tell all my gardening friends 🙂
You are brilliant! I found this on Tipnut. Thanks for sharing it. I can’t wait to tell all my gardening friends 🙂
Pingback: Earth Day - Green Share | Lolaness Design
I loved this tutorial! What a brilliant idea! I guess some junk mail could be used to make the packets too.
I loved this tutorial! What a brilliant idea! I guess some junk mail could be used to make the packets too.
I loved this tutorial! What a brilliant idea! I guess some junk mail could be used to make the packets too.
OH. MY. GOODNESS. This is such a great idea. Cate from Nature’s Child Blog sent me over. I’m going to have to try this. However, what I’ll probably have to do is ASK for paper bags on freecycle (because I think my local grocers only use plastic–so even when we forget our fabric bags we end up with plastic). I love the brown paper look. So great!
OH. MY. GOODNESS. This is such a great idea. Cate from Nature’s Child Blog sent me over. I’m going to have to try this. However, what I’ll probably have to do is ASK for paper bags on freecycle (because I think my local grocers only use plastic–so even when we forget our fabric bags we end up with plastic). I love the brown paper look. So great!
OH. MY. GOODNESS. This is such a great idea. Cate from Nature’s Child Blog sent me over. I’m going to have to try this. However, what I’ll probably have to do is ASK for paper bags on freecycle (because I think my local grocers only use plastic–so even when we forget our fabric bags we end up with plastic). I love the brown paper look. So great!
Thanks for the ideas. I really need to consider this since I’m not promoting my local blog because I don’t want to waste paper in promotional cards. I’ll try to find a way to use manual printing, maybe with a seal.
Thanks for the ideas. I really need to consider this since I’m not promoting my local blog because I don’t want to waste paper in promotional cards. I’ll try to find a way to use manual printing, maybe with a seal.
Thanks for the ideas. I really need to consider this since I’m not promoting my local blog because I don’t want to waste paper in promotional cards. I’ll try to find a way to use manual printing, maybe with a seal.
LOVE LOVE this idea! this is probably my next craft project….
LOVE LOVE this idea! this is probably my next craft project….
LOVE LOVE this idea! this is probably my next craft project….
Pingback: Crafters Medley: 20 Neat-O Projects To Make (July 2008) : TipNut.com
Pingback: Crafting a Green Font: A Review of Ecofont : Crafting a Green World
Pingback: DIY Business Cards: Crafty, Thrifty, and Eco-Friendly : Crafting a Green World
Pingback: Tutorial: Brown Paper Bag Book Cover : Crafting a Green World
OMG! I have to try this. thanks for sharing
These would be lovely wedding favors!
These would be lovely wedding favors!
nice posting keep blogging.
http://www.viaam.com
Such a great idea! We were looking for a customizable seed packet idea to accompany a children’s book about gardening that my high school is putting out, and this fit the bill perfectly!
I use a Mac, and have had some issues running GIMP, but recently found a great free program called Seashore that is very similar, but less well-known.
Great idea. Now I am thinking of other ways to use. Blessings.
Great tutorial, hope this goes viral! Just saw your post today, but several months ago I tried doing seed packets with brown paper bags cut into standard letter size, and they worked great! It was a nice ‘soft grunge’ effect, but I didn’t set the print quality to high as you recommend, so the design was a bit muted (the porous paper really does suck up ink). Still really loved the effect. And this is brilliant to do seed packets as business cards.
I also rarely bring home paper bags anymore as I have boatloads of reusable bags. But I still have a pretty good sized stash of brown paper, and it sure beats paying for high end specialty ‘textured’ paper (or sending paper to the landfill!)
Pingback: Green Business Cards
OH. MY. GOODNESS. This is such a great idea. Cate from Nature’s Child Blog sent me over. I’m going to have to try this. However, what I’ll probably have to do is ASK for paper bags on freecycle (because I think my local grocers only use plastic–so even when we forget our fabric bags we end up with plastic). I love the brown paper look. So great!
You are brilliant! I found this on Tipnut. Thanks for sharing it. I can’t wait to tell all my gardening friends
Pingback: How to Make Wedding Favor Seed Packets » Cutest Wedding Favors
Pingback: Make Your Own Seed Packets! « resilientexistence
Pingback: 21 Truly Awesome Ways to Upcycle A Cereal Box | Fox Rio 2 News RGV