These melted crayon ornaments are so easy to make that the kids can do most of the work while you’re frantically cleaning the house for company.
Actually, since they use old, broken crayons in their making, you can even pretend like the kids are helping you clean when they make these!
That’s a joke, by the way. Kids don’t help clean. Or, rather, they kind of help clean, but that help entails so much griping and moaning that you almost wish you hadn’t even asked for their help in the first place, which is exactly what they want you to wish.
The secret to the construction of these melted crayon ornaments is novelty silicon muffin tins. They add the level of detail to the project that will make any color of crayons that your kids choose look cute.
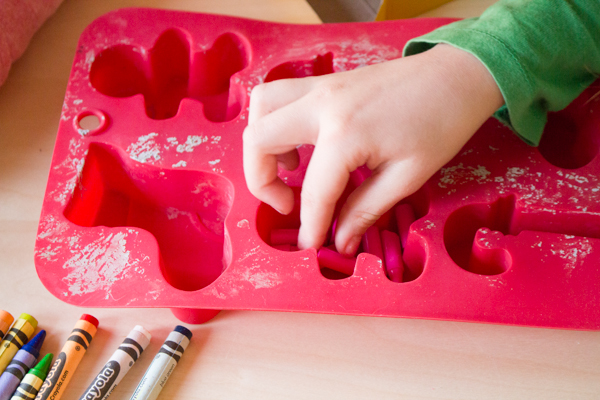 Lay out the muffin tins and some old crayons for the kids, and instruct them to fill the molds so that just the bottom of each is covered. Unlike these beeswax ornaments that are poured, the melted crayon ornaments should be very thin.
While the kids are working, set your oven to its lowest setting.
When the kids have their masterpieces finished, put the silicon muffin tin on a baking pan, and then put the whole thing into your oven. Remind the kids to clean up after themselves, and then go in and pick up all the little bits of crayon wrapping that they didn’t happen to *see* as they cleaned. Sigh.
Casually check on the crayons in the oven whenever you walk through the kitchen; the time that it takes for them to melt will depend on the brand of crayon that you’ve chosen, as well as the temperature at which you set the oven. Eventually, however, you’ll pop in and see that all the crayon bits have melted–at that point, turn the oven off and let the crayons cool.
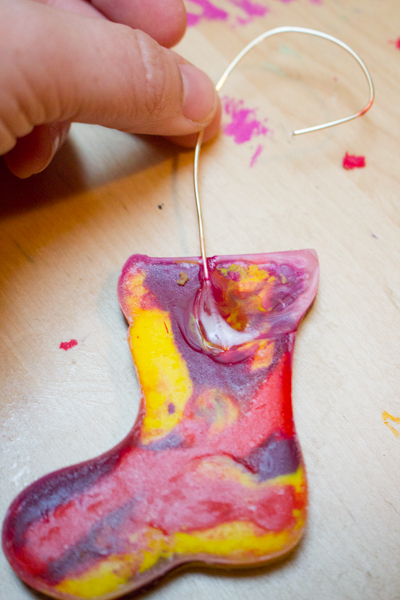 Use a pair of wire nippers to nip off a few inches of wire, then heat your iron and using just the tip of it, iron one end of the wire onto the back of each crayon. The crayon will melt under the iron, and when you lift the iron, melted crayon will pool over the wire end and then cool, sealing it in.
When you’re finished, iron a piece of newspaper to clean off the wax residue.
This project is suitable for a wide range of ages–while younger children will enjoy simply putting crayon bits into the molds and seeing what comes out, older children will enjoy carefully choosing colors and arranging them.