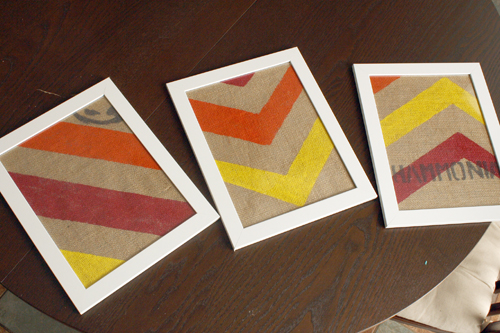
This project was a lot of fun to do, and it combines two things that I love: mod design and burlap!
A couple of weeks ago, my husband and I celebrated our fifth wedding anniversary! I don’t know about you ladies, but I find it much harder to come up with good handmade gifts for fellas. With a girlfriend, you can whip up fun accessories or even a cute stuffie, but crafting for dudes is tough for me.
Dave and I have both been really into old school design lately, especially supergraphics. If you’re not familiar with the supergraphic, it’s a design style that was popular in the 60’s and 70’s that featured bright colors and bold, often geometric shapes. My burlap paintings are sort of a miniaturized take on that idea.
Want to make your own chevron paintings? It’s pretty simple and lots of fun! Here’s how…
Materials
- Burlap coffee sack
- Water-based screen printing or fabric ink in 3 colors (your choice!)
- Paint brush
- Masking tape
- Picture frames
- Sewing machine and thread
Directions
- First, you need to figure out what size to cut your burlap. This all depends on your frame, and you can use the little piece of insert paper as your pattern. Cut out three pieces of burlap to the same size as that piece of paper.
- Head to your machine, and use your zigzag stitch to sew all the way around each piece of burlap. Burlap loves to unravel, and the stitching will keep it in one piece.
- Grab your masking tape and tape off a pattern. I went for a mix of chevrons and diagonal lines, but you can do whatever you like! Remember that the tape is going to be where the burlap shows through. This sounds obvious, but when you get into taping it’s easy to forget! I just sort of finagled the chevrons, but if you want to be more scientific about it, Swoon Worthy has some good tips on how to tape them off.
- Time to paint! Paint the untaped areas with your fabric ink, making sure that you get really good coverage.
- This is the trickiest part. You don’t want to wait for your paint to dry, because you want clean edges on your design, so you’re going to pull the tape off while it’s still wet. Waiting for it to dry could work just as well, but I’ve had some nightmares with tape taking paint with it, and it’s no fun at all. Do not panic! Use one hand on an unpainted part to hold the burlap down and use the other to gently remove the tape, being careful not to smudge anything.
- Let your pieces dry, frame them up, and you’re ready to hang!
These were lots of fun to make, and they were pretty simple to put together. Dealing with the tape was the trickiest part, and it’s important that you use care when you’re laying down the tape and when you’re pulling it off at the end. Have you guys been crafting with burlap? I’d love to hear what you’re making!


Pingback: Easy Eco Home Decor: Painted Burlap | Glue and Glitter
Pingback: Creative Reuse Centers
Thanks so much for for sharing this approach. I have some mudcloth that I want to frame and hang and have been wanting make smaller accent pieces to hang with it…using the mudcloth as inspiration. I’m thinking your approach may work well for this. I’m in Atlanta too.
Do you have a source for cheap burlap? I’ve seen a few ads on Craigslist for used coffee bags but would love to find used pieces that are larger.
I guess I could sew a few together. What do you think?