

Drapes are a surprisingly eco-friendly home furnishing!
You might think of drapes as those heavy velvet beasts that hide the windows in your grandma’s parlor, gathering dust and waiting for Scarlet O’Hara to come along and upcycle them into a dress. Drapes, however, do more than just look pretty (if you just want something to look pretty, you want curtains!).
Drapes are lined, usually with a specifically light-blocking fabric, but any tightly-woven fabric will do in a pinch. Lined fabric keeps out the light bleed that can negatively affect your sleep, whether that’s dawn’s early light or your neighbor’s *^&%#%&#!!#% end-of-the-driveway beacon that they have no business keeping on all freaking night and not even because it shines directly in your bedroom window. I mean, how about because of light pollution!?! Energy expenditures! Seriously, do they not care about their electric bill AT ALL?!?
Anyway, where was I…. oh, right! The lined fabric of drapes makes it great for light-proofing a room, and it also makes it great for insulation. No matter how eco-friendly your windows, they’re still less insulated than, say, your walls. The extra layer of insulation that drapes provide is always going to keep indoor temperatures more consistent and allow your climate control to run more efficiently.
Drapes are surprisingly easy to sew, even for a novice. All you need to know is how to sew a straight line!
Here’s everything that you need to make your own drapes:
Flat Sheets
There are a billion curtain width calculators online. However, they assume you’re either going to buy new curtains or make your own from scratch. To use flat sheets for curtains, here’s an easy rule of thumb: each flat sheet should be AT LEAST as wide as your window. Since you’ll have two for each window, this is an easy way to make sure your curtains are at least double the width of your window. Check out my post on sheet sizes translated to fabric yardage to see the width of standard flat sheets. Remember, though, that sheets aren’t always standard. If they’re new, they’ll probably shrink when you pre-wash them. Thrifted sheets have probably already shrunk. And if they’re vintage, who knows? The only way to get an accurate measurement is to pre-wash your sheet and then physically measure it by hand.
Drapes look even better when they’re more than double the width of the window, so don’t be afraid to go up an entire sheet size to get the look that you want. Just remember that you’ll have to buy lining fabric to match.
Lining Fabric
Lining fabric is useful in several ways. It keeps a room darker when the drapes are closed, it adds another layer of insulation, and it prevents direct sunlight from fading the drapes.
The bad news is that all readily-available, specifically-marketed-as-such lining or blackout material is essentially plastic. And because all fabric has some sort of weave, you’re not going to get a true blackout effect with just fabric alone.
Fortunately, if you don’t need a room to be 100% dark with the curtains closed, you have a ton of out-of-the-box lining options. For instance, I really like the option of simply using another flat sheet as a curtain lining. If you buy two of the exact same flat sheets, one for the drapes and one for the lining, their sizing will match perfectly. Buy them in the same color to blend, or buy them in different colors to look cute!
A blanket is another lining option that gives good light blockage and good insulation. It’s a little harder to make a blanket blend in and look like anything other than a blanket on your window. However, if it’s hidden as the lining on the backside of an otherwise conventional-seeming curtain, it’s easier to get away with.
Curtain Rings
Clip-on rings are the solution with the least sewing required. These are also really handy if you’re just evaluating potential looks, because you can clip your wannabe drapes up and then easily take them down again without much fuss.
Alas, clip-on rings are super annoying when I want to wash my drapes, because I have to remeasure their placement on the drapes each time. It’s only now occurring to me that what I should do is stitch a little x in matching thread where I want each clip to go!
Okay, hold on… I’ll be back in about an hour.
Yeah, that worked great. Do that.
Okay, here’s how to make your beautiful new drapes!
Step 1: Wash and Dry the Fabrics.
Even if your fabric is new, pre-wash it using the same method you plan to use when you wash your finished drapes.
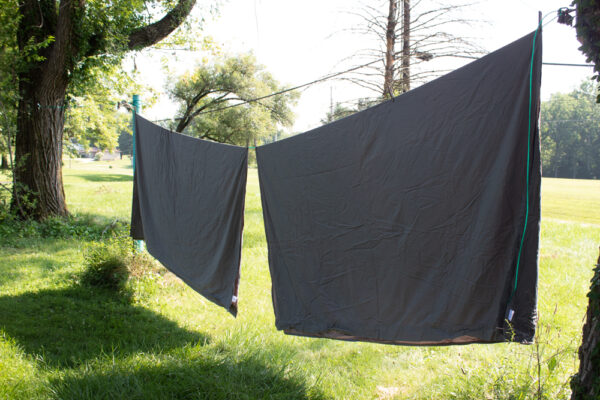
Drying your fabric can be tricky, because that’s when fabric gets wrinkled. For wrinkle-free fabric, find a place where you can hang it to dry. Outside on the clothesline is ideal, of course, but I’d rather hang my fabric over the shower rod for an entire day to dry it without wrinkles than throw it in the dryer for an hour then spend three hours ironing.
Step 2: Measure and Cut Any Curtain Fabric.
If you’re using only flat sheets or blankets and therefore don’t have to cut anything to size, then you’re all set for the next step, you Lucky Duck!
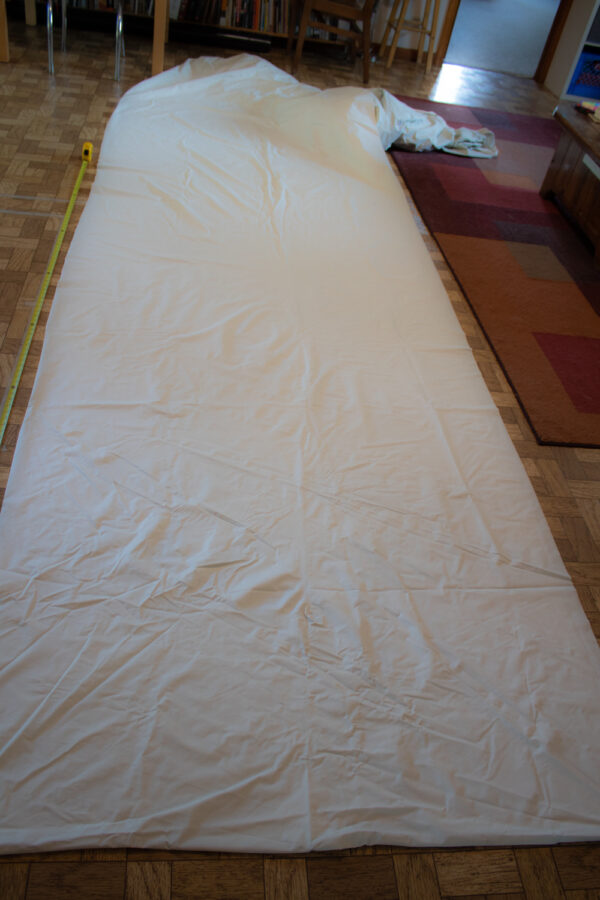
Although I used two king-sized sheets for the curtain fabric, I used store-bought fabric for the lining. Above, then, is a photo of my family room after I shoved all the furniture aside and vacuumed the floor. Pretend you don’t see the wrinkles, because I’ll go live in the chicken coop before I iron all that.
Speak this mantra with me: gravity will pull the wrinkles out after the drapes are hung.
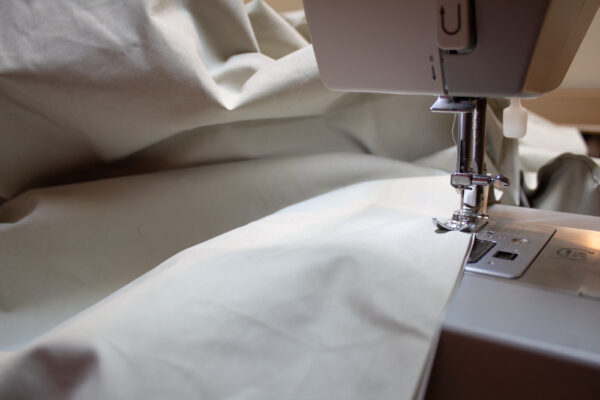
Step 3: Sew the Lining Fabric to the Curtain Fabric.
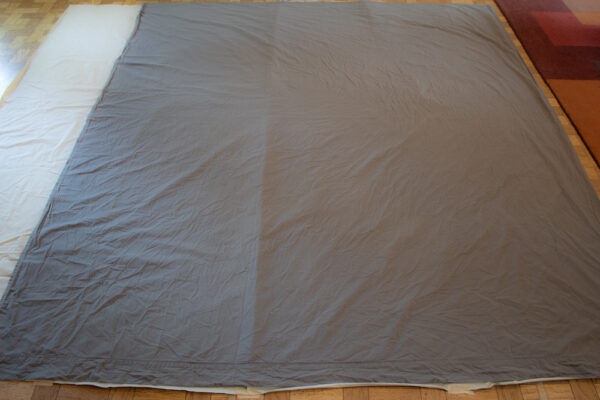
Don’t forget: we don’t see those wrinkles!
If you’ve got enough floor space, backing any large piece of fabric is fairly straightforward. First, tape down the edges of the bottom fabric, pulling it taut as you go. Next, lay the top fabric over it, pulling it taut and lining up the edges with the bottom fabric. Trim to size, then pin together. Finally, remove the tape.
I don’t usually pin when I’m just sewing a simple, straight seam, but it’s more necessary when the two pieces I’m sewing together are so large. It’s too easy to get tangled up, otherwise!
Here’s my secret pro tip for sewing the lining fabric to the curtain fabric: if there are no raw edges (or if the raw edges won’t ravel), only sew them together at the top.
Step 4: Clip on the Curtain Rings.
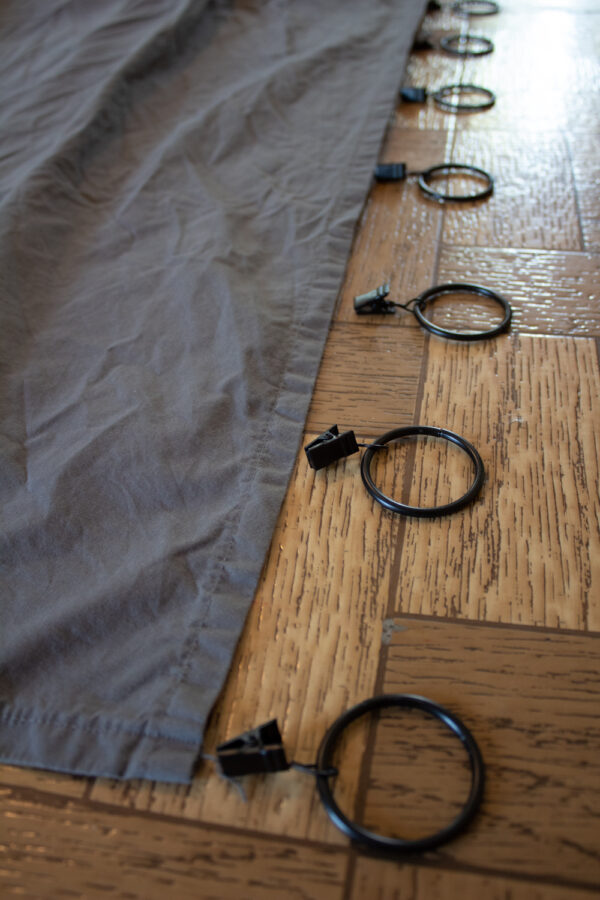
Drapes are heavy, so they need support every few inches. Clip-on curtain rings are an easy solution, quick to remove and replace and simple to adjust. Eyeball the placement until they look evenly spaced, then clip them onto the drapes and mount the drapes on their curtain rod.

These DIY drapes are a huge improvement over the vertical blinds that used to live there. During the day, the room is much brighter with drapes that can be completely pushed aside. When I’m asleep, the drapes do a much better job blocking the neighbor’s light pollution and the annoyingly early sunrises.
Next up, my kid wants her bedroom curtains upgraded to these light-blocking drapes, too. Her window also faces the neighbor’s house!


I just read your article (duh) applied logic, common sense…hurry & thank God. Almost 5yrs ago my home & town burned down I’ve been sharing a family members home since (with a neighbor who’s motion detector and extremely bright porch light showed like a beacon into my room). I’ve spent alot setting up my own place & can’t find the particular shade of French b!ue except in sheets, now I can have the drapes I truly want.
I appreciate the way you write & can not wait to read more.
Best regardx, Kathleene