Don’t let outgrown building blocks languish unloved in a back closet when there are so many beautiful ways to upcycle them!
I’ve been in the process of slowly upcycling my kids’ old building blocks for years (I promise, there will still be more building blocks in the world when/if I have grandchildren!), and one of my favorite ways to upcycle building blocks is to turn them into holiday decorations using simple decoupage techniques.
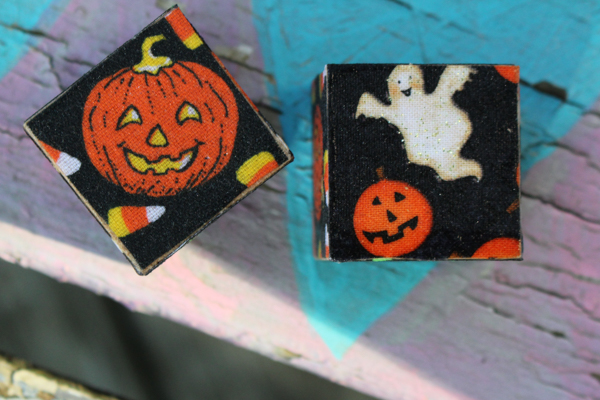
I’ve already shown you how easy it is to decoupage blocks with paper, but you’ll be pretty excited to know that decoupaging blocks with fabric is EVEN easier! Fabric is sturdier than paper, which means that you need fewer layers of Mod Podge to seal it, and the surface is so much more forgiving than paper, so you’ll find that every Mod Podge layer looks nice and smooth, in stark contrast to all the fussing that one tends to have to do with paper decoupage.
For paper or fabric decoupage, the supplies are nearly identical. Here’s what you need:
Supplies
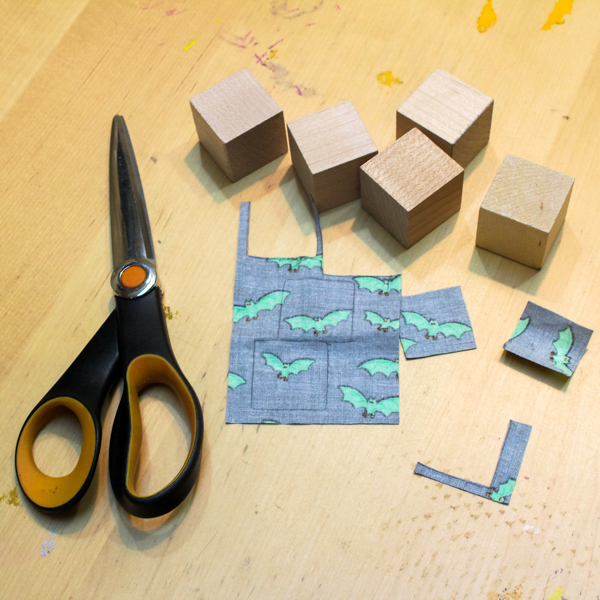
- Outgrown building blocks. I love the look of plain cubes, but you can decoupage any block shape.
- Fabric, pencil, and scissors. You’ll be fussy cutting your fabric to size, then trimming, if necessary.
- Mod Podge and a foam paintbrush. Foam paintbrushes aren’t as eco-friendly as natural hair brushes, but they apply the glue smoothly, and if you wash them well after each use they’ll last forever.
Directions
- Prepare your fabric. If it’s new fabric, there’s no need to wash and dry it just for this project, but you should iron out any creases.
- Measure and cut the fabric. I like to fussy cut the fabric pieces for my decoupaged fabric blocks, so I use the block itself as my template, tracing around each side on the reverse of the fabric piece. You can do this with a pencil or piece of chalk, and if you cut INSIDE the lines that you drew, the piece will match the side of the block more closely.
- Glue the fabric to the block. Working on one side at a time, paint a layer of Mod Podge onto the block, carefully smooth the fabric piece onto that side, and then paint another thin layer of Mod Podge on top of the fabric. Let it dry completely before you glue another side–this isn’t a hands-on time-consuming project, but it DOES take up a lot of resting time!

You might think that these cute blocks are only for decorating–and yes, they DO make super cute decorations!–but once they’re sealed with Mod Podge, a kid can play with them just as they do any other blocks. I wouldn’t let a kid who’s still mouthing things have them, but any other kids would probably love having some fun, festive holiday elements added to their open-ended block play.
Upcycled Building Block Projects
Do you have even more blocks that you’re ready to upcycle? Here are just a few of my favorite ways to upcycle building blocks!
1. DIY puzzle blocks. Older kids will enjoy the challenge of using their building blocks in this completely new way.
2. Artist Trading Blocks. Create, share, and collect these blocks with other artists.
3. Candle holder. These candle holders work best with big, chunky alphabet blocks.
4. Art dice. Amp up your creativity with this fun, open-ended art game!
5. Snowman blocks. Here’s another simple holiday decoration.
6. Building block tabletop. This method to make a tabletop out of upcycled building blocks is brilliant, and it’s on my to-do list, for sure.
7. Alphabet block coat rack. Here’s another fun piece of furniture that you can make from unneeded alphabet blocks.
8. Photo holder. You always need more room for photos, and here’s an easy way to make a photo holder out of old building blocks.
https://www.instagram.com/p/9PMRe9yjg4/?taken-by=ducttapedenim
9. Mirror. This would be a cute way to decorate a children’s bathroom mirror.
10. Translucent color blocks. Upcycle Keva or Kapla blocks into these beautiful science and sensory manipulatives.
11. Photo puzzle blocks. These aren’t just for kids–they make a great coffee table or desktop toy, so they’re a great gift to make for grandparents.
12. Countdown calendar. A countdown calendar is sooooo much easier than an Advent calendar!
13. Block signage. These blocks would make a great holiday message, either out of the way on the mantle, or on the coffee table for kids to rearrange at will–it’s not hard to put them back in order!
14. Chalkboard blocks. Sometimes a set of building blocks just needs a new coat of paint to make them brand-new. If you use chalkboard paint, then the fun never has to end!
15. Baby shower craft. I LOVE this idea! At one of my baby showers, guests decorated onesies, but how much fun could it have also been for guests to embellish baby’s future toys! This project would work best with clean, unfinished wooden blocks that haven’t been loved a lot in their previous life. They’ll be loved a lot in their next one!
What are YOUR favorite ways to upcycle old toys? Tell me about them in the Comments below!