

 I don’t have a natural affinity for interior design, so it’s taken years of work to keep finally coming closer and closer to a craft fair display that is pleasing, unique, manageable, and effective.
Two long tables with all my stuff piled on? Nobody could see anything from outside my booth, and thus didn’t bother to enter. Two big hinged display boards for vertical display? People could see them, but they were hugely heavy to haul and couldn’t actually hold much. Store-bought displays? I don’t buy new things, and I don’t pull enough profit to spend that kind of money, anyway.
And thus, over time, I’ve come to my trifecta of craft fair display requirements: 1) It must be made primarily of recycled, salvaged, or scavenged materials (just like the items I sell). 2) It must be a VERY effective display, ideally taking up little space and able to display more than one item. 3) It must be AWESOME.
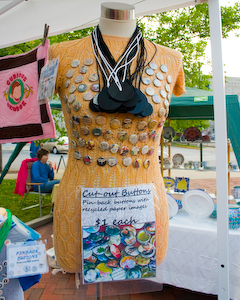
One of the basics of craft fair setup is to go vertical: a vertical setup is easy to see from a distance, it’s comfortable to browse, and it gives you more room overall for display. I still have one table in my craft fair booth, just because I haven’t yet been creative enough to think of alternatives, but my most successful displays are vertical. My dressmaker’s dummies, that I bought at a garage sale a few weeks ago, are a terrific resource for display for necklaces and pinbacks. Since every single pinback is different, actually pinning them to an actual shirt at eye-level allows customers to see every one that’s available, lets more than one customer browse my selection at the same time (something that wasn’t possible when I had them all dumped into one bowl on a table), immediately tells customers what the item is for, and allows them to help themselves to the pinback by simply unpinning it.
In addition, I can also display dozens of necklaces by hanging them around the dummy’s neck. This isn’t a great option for necklaces made with such detail that a customer would want to really examine it, since twisting and turning over just a few pendants just a few times would tangle the whole lot, but it’s a great option for simple styles, such as my Scrabble tile monogram pendants or my vinyl record pendants, that won’t get a lot of tangle-prone fussing by customers. My choice of a larger cord for hanging my pendants also makes them far less prone to tangle.
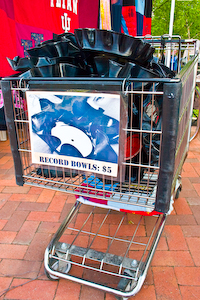 When I had some of my record bowls up on a vertical display board, people could see them from far away and would come over to examine them, but one person standing in front of the board would block everyone else’s access to it, and the board could only hold a small selection of my bowls–someone who wanted to dig through the rest was forced to crouch and dig through a bin on the ground.
With this shopping cart that I salvaged from next to a dumpster, I can hold my entire stock of record bowls high enough for someone to dig through them without squatting. The shopping cart is expansive enough for several people to browse at once, and since it’s mobile, I can display something vertical, like a quilt, behind it, and it’s easily moved to give access. The space underneath the cart allows me to store extra stock during the fair, and I can pile that space under the cart and over the cart as high as I can manage with all my craft fair stuff and just wheel everything to and from my car. It’s also actually pretty convenient for travel, since the cart holds as much as a storage bin but doesn’t require me to haul any extra display components. And not least, it’s unique and eye-catching.


Pingback: Outdoor Craft Fair Vending: Salvaged Setups
I really like the idea of not buying pre-made new displays. Its so much more fun to come up with ones. I am in the process of going vertical and this really gave me more insite that UP is the way to go. Thanks
Great ideas! I love the dress dummy as pin display.
In the design-side of my business, I have designed tradeshow booths, so I have to admit that when I go to fairs, I am often evaluating booths on their successful/unsuccessful displays. I made it to two shows this weekend – an outdoor art show and a farmers market, and noticed several things:
1. Signage – spellcheck those signs, especially temporary signs. It amazed me how many typos I saw, which made me question the quality of the items on display.
2. Don’t overcrowd – If you want people to walk into your booth, leave enough breathing room for people to pass each other. I know booths don’t have much space, but it makes a huge difference. The one place I purchased something at the art show was completely open at the front and with enough room to examine the pieces without breathing down each others’ necks. And not overcrowding goes for how much stuff you put on display as well. Overwhelm the senses and people shut down, not seeing items.
3. Be aware of what you’re putting side by side. My favorite example of this was a large “V” display of hanging signs that ended at the bottom of the “V” with two signs saying “Namaste” and “Beware” side by side. Made me laugh, but I’m pretty sure they didn’t intend it.
Pingback: Promote Your Crafty Biz in Green: Business Cards : Crafting a Green World
Pingback: Promote Your Crafty Biz in Green: Business Cards
Really enjoyed all your ideas. THANK you for including photographs, it really helps to get your point across. I am a decorative painter and alot of my items are distressed, country style and I love giving something old a new life to display things…