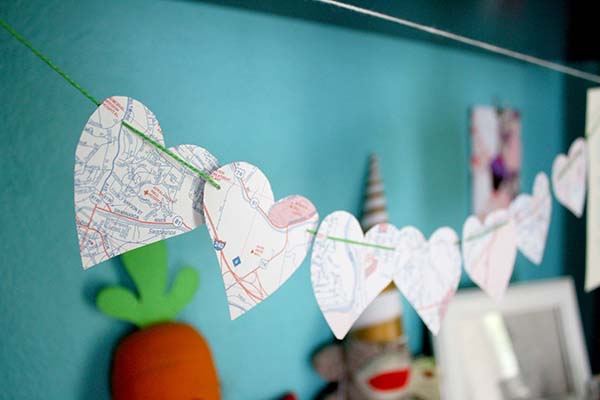
Instead of tossing that old map that, make a paper garland to preserve your memories!
Don’t you just love old maps? Whether they’re from a town where you used to live or a special road trip, maps remind us of where we’ve been. Next time you discover an old map, you can make a paper garland instead of tossing it in the recycle bin. What I love best about this project is that it’s super simple, and it’s scalable. I used 7 hearts to decorate a wall shelf, but you could cut out dozens and make one to hang all the way across a wall!
Recycling paper is definitely better than sending it to the landfill, but it’s not a perfect solution. Recycling paper takes energy and produces greenhouse gas emissions. When you use any reclaimed paper in your crafts – maps included – you’re avoiding the energy associated with both recycling that piece of paper and with creating new paper to craft with. Hurrah for reuse!
Make a Paper Garland from an Old Map
Materials
- reclaimed map – either one that you have laying around the house, from the thrift store, or from your local Creative Reuse Center
- embroidery needle and thread – the length of thread depends on how long you want your garland
- nails or clothespins, to hang your garland
Directions
1. Cut out your hearts. I cut mine out freehand, and they’re about 2″ wide by 1.5″ tall. If you want your hearts to be uniform, cut a heart out of some reclaimed cardboard, like an old file folder, and use it to trace the hearts onto your map.
2. Grab your needle and thread and your first heart. To string your garland, start by pushing the needle through the heart from the back, about 1/2″ from the left side and 1/2″ from the top. Then, push the needle through the front of the same heart 1/2″ from the right side and 1/2″ from the top.
3. Repeat step 2 with the rest of your hearts, until you have them all strung, making sure to leave a 3″ tail on either end of your garland, so you can string it up. You can arrange your hearts in a few different ways. You can space them out evenly or have them slightly overlap. With my garland, I started the hearts out overlapping and gradually spaced them more from left to right.
4. To hang your garland, you can tie the tails onto nails or use clothespins to clip them up.




Pingback: 25 eco-friendly DIY wedding projects | Blog Off The Wall
Pingback: Last-minute Valentine gifts to make with the kids - Cool Mom Picks
Pingback: Crafting a Green World | The home for green crafts and tutorials!
Pingback: 8 Thoughtful Family Acts of Kindness For Valentine’s Day