
Here’s a shout-out to my fellow VERY thrifty crafters!
I like to do a lot of wax crafts, but beeswax is expensive, and lacking my own set of beehives, my budget can’t quite keep up with my habit.
Fortunately, I also have a lot of jar candles around the house, some homemade (with more lovely beeswax!) and some gifted or store-bought (with various qualities of wax, but often most likely the cheapest). When these candles burn down there’s always still some wax left at the bottom and around the sides of the container. Reclaiming that wax is a simple process, and when I’m done, I have all-new wax to craft with!
It’s worth it even to reclaim that cheap wax of unknown (but probably petroleum-based) provenance. You can use it to make fire starters, or dye it and use it to make wax seals. Perhaps you have an origami boat that you’d like to waterproof?
The possibilities for reclaimed beeswax or soy wax are endless, of course, including remaking your own jarred or poured or dipped candles.
And don’t forget that you can also reuse the jar that the candle came in! I’ll show you how to get it squeaky clean near the bottom of my post.
Supplies
Here’s what you need to reclaim the wax from your jar candles:
- used jar candles
- crockpot*
- oven mitts
- silicone molds
*Save yourself some trouble and hit up your nearest thrift shop for the cheapest crock pot on the shelf, and then use it only for crafting. I bought this crock pot from Goodwill for $1.50 probably a decade ago, and it works perfectly for me and then lives out in the garage when I don’t need it.
Directions
1. Cover your work surface with newspaper, then ready your crock pot.
Because I promise you that you do NOT want to spill melted wax all over your kitchen. Just… you really don’t.
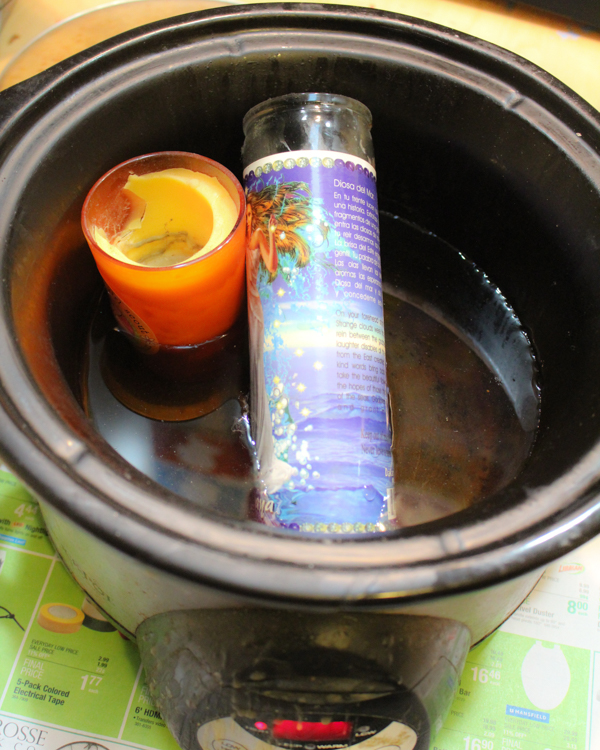
2. Add the jar candle containers and water to the crockpot.
Oh, if only it were so easy! So here’s the thing: those nearly empty jar candle containers are going to want to FLOAT, dagnabit. It’s super annoying, and also, you really don’t want to get water in the containers with the beeswax.
What you have to do, then, is wedge the containers in so that they can’t float away. Setting a ceramic plate on top of them works well, as does filling Mason jars with water and setting them in the crockpot to take up all the rest of the available space.
3. Melt and pour.
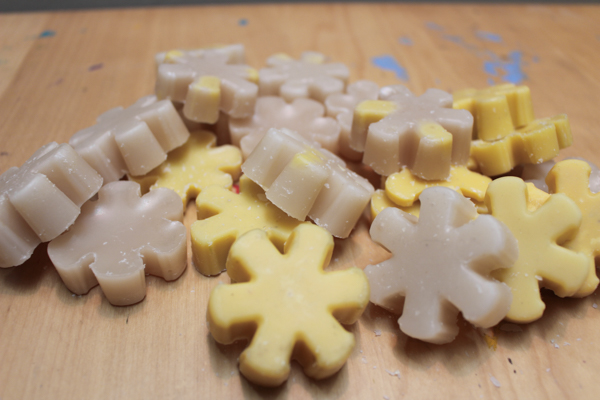
After everything is wedged tightly into place, all you have to do is turn your crock pot on and wait for the wax to melt. I like to pour the melted wax into silicone molds, not only because the wax slips out so easily when it’s cooled, but also because afterward, you have lots of manageable little blocks of wax that it’s then easy to melt again and use for all your projects.
Often, your melted candle wax will have soot or wick fragments in it. If so, pour it through a layer of cheesecloth to catch the impurities.
4. Store reclaimed wax separately.
It’s worth it to always store this reclaimed wax separately from your other wax stash. If you have no idea what type of wax you’ve reclaimed, you obviously don’t want to mix it in with your lovely soy and beeswax, but even if it’s soy or beeswax that you’ve reclaimed, you still don’t want to simply add it back to your stash. Reclaimed candle wax is fine for making more candles, but I certainly wouldn’t want to use it for the skin care products that I also make using beeswax.
Now, what about those reclaimed jar candle containers? Even with the wax melted and poured out of them, you’ll notice that they’re still waxy. The trick to getting them squeaky clean is to completely immerse them, right side up, in a large pot of water. Make sure there’s plenty of water covering the top of the containers. Heat the pot of water on the stove, and when the water temperature reaches the melting point of the wax that the candle containers once held, the remaining wax will melt and float to the top of the water.
You have to play around with this method a bit and keep a good eye on the pot, because your wax of unknown provenance is going to melt at an unknown temperature, and if you have several candle containers in the pot, you’re probably going to be dealing with a different melting point for each of them. But when all the wax has finally melted and floated up to the top of the water, you can take the pot off the burner and let the water cool.
Skim the solidified wax off of the cooled water and toss it, and then you’re free to check out your former candle containers. They’ll likely still be sooty and need a good scrub-up, but after that, they’re ready to reuse or upcycle.
Might I suggest that you use them to make another jar candle?


I have a full candle I don’t like the scent but I like the jar, will this work?
It should work perfectly!