This easy 3D paper star makes a big impact with just a little effort!
I love Christmas decorations that make a big impact, and this is one of my favorites. This paper star is super easy to make, and so simple! On a recent road trip, I packed a stack of origami paper and a couple of glue sticks, and with a hardback book as a work surface, I made all the paper stars my house could hold all while playing passenger princess.
I don’t have infinite seasonal storage space, so my secret trick is to use a paperclip instead of a glue stick on the final join. That way, come January 2, these 3D paper stars fold right up and can be stored flat… or even recycled, if you don’t want to re-use them next year!
Here’s how to make your new favorite decoration!
Materials
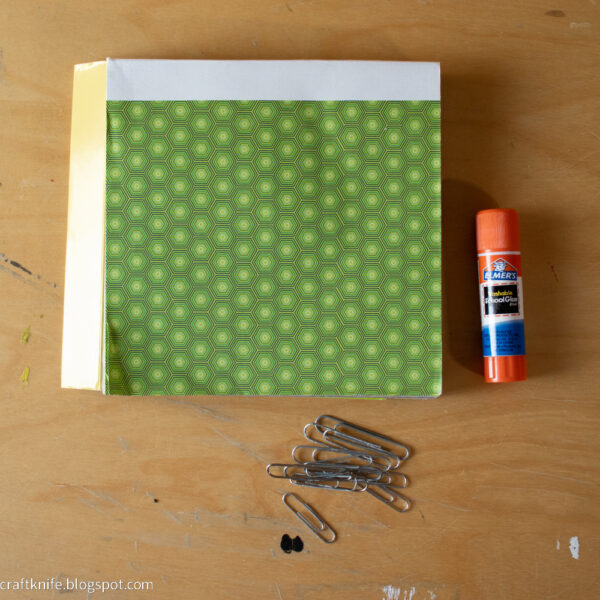
To make a 3D paper star, you will need:
- square format paper. Look for origami paper, or cut any other paper down to size. An easy way to cut typing paper to size is to fold one top corner diagonally down to meet the opposite edge, then cut off the excess. You’ll have square paper AND your first fold! Just keep in mind that your finished paper star will be twice as long in every dimension as your paper. In these photos, I’m using 6″x6″ origami paper, and my finished stars are 12″x12″.
- glue stick. You can use any glue you have on hand, but a glue stick is genuinely the best choice for gluing paper to paper.
- paperclips. This is my secret trick for being able to store these paper stars flat! If you don’t want that, then simply glue the final join instead of paperclipping it.
- needle and thread or fishing line. Clear thread is my favorite way to display these stars, since it makes them look like they’re floating. If you don’t prefer that look, however, you can use any hanging materials that speak to you.
Step 1: Make the first folds.
First, fold the square paper exactly in half corner to corner, with the pretty side of the paper facing down. The backside of the paper will be visible as the center of the finished star on the backside, but otherwise, you’ll see the pretty part on both sides of the star!
Note: I’m not using all the proper origami jargon, but here it is so you can!
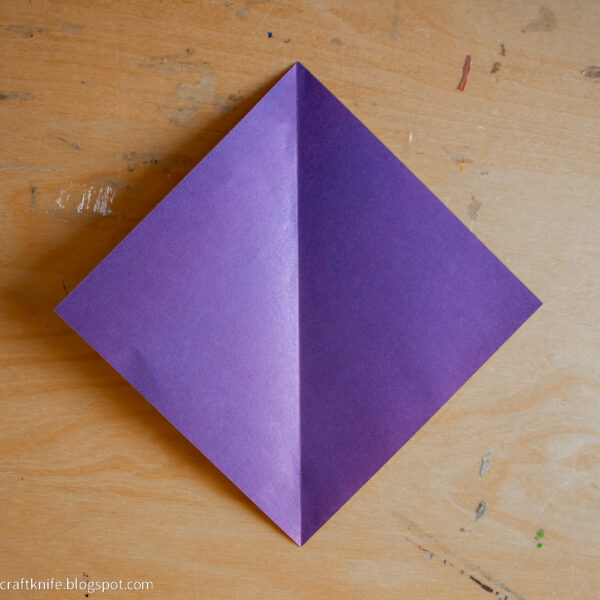
Fold the left and right corners in diagonally so that the edges meet at the center crease. Don’t get too Type A about it, but do make a reasonable effort to be precise.
My favorite thing about origami paper is when there’s a different pattern on each side. My star is going to be so pretty!

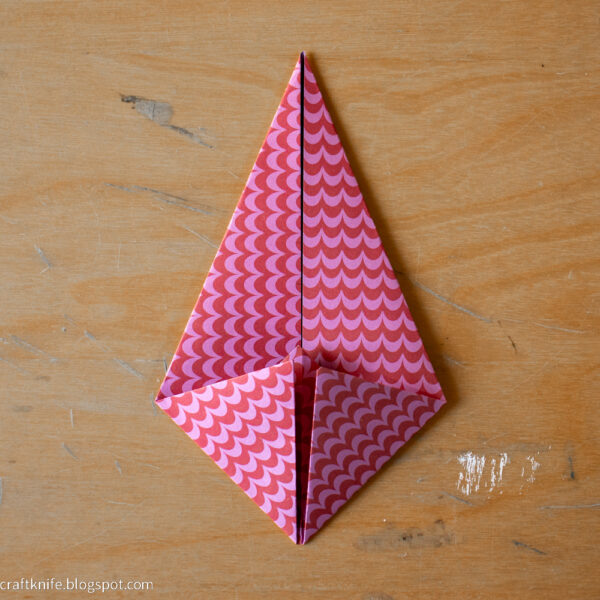
Fold the bottom corner up, lining the crease in the fold with the bottom edges of the previously folded paper.
Try to keep the center crease of that bottom fold lined up with the paper edges in the middle. You want every point of your star to be so nice and symmetrical!

Fold the bottom left and right corners diagonally up so that the sides meet at the center crease and the points meet at the top point of the previous fold.
That’s every origami skill you need for your star!
Step 2: Glue the corners down.
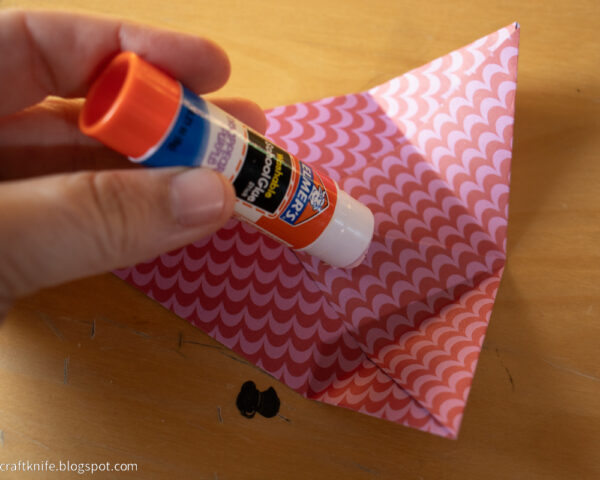
Unfold those bottom two corners and run your glue stick all around the bottom triangle, then refold the corners and press down until they’re well adhered.

Step 3: Push the bottom fold out.
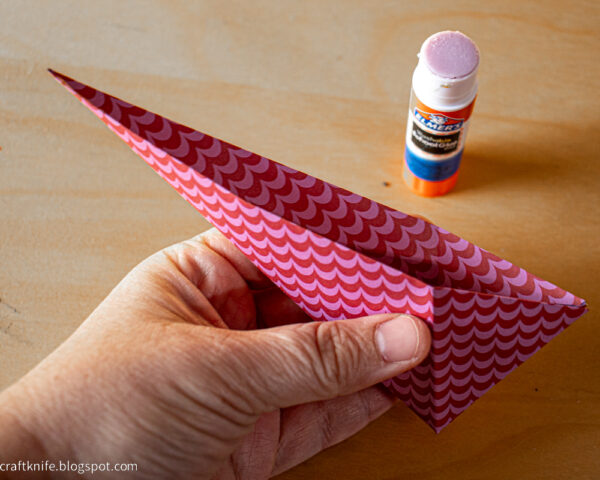
With the bottom corners glued down, you can now push out that entire bottom triangle. As you fold it out, the entire star point will naturally fold itself in half along that center crease. With the star point folded in half, make sure the center crease is nice and sharp and set the star point aside.
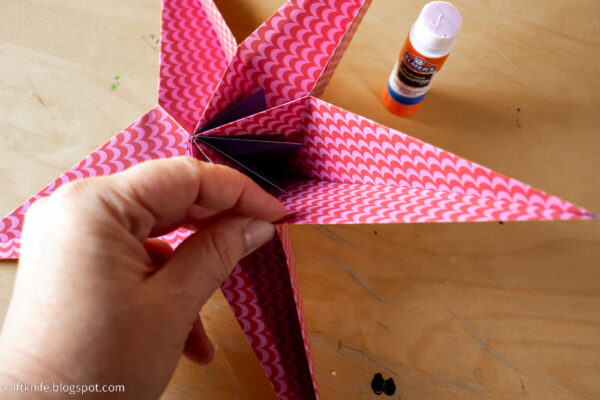
Step 4: Make all the star points for your star.

This paper star works okay with four points, but I think it looks the best with five, six, or seven points. Especially if your paper is larger, even more points might be fun!
Repeat the steps you used to make that first star point to make all additional star points.
Step 5: Glue the star points together.

Each star point has a triangle at the bottom, formed by the crease of those bottom points getting folded up. Spread glue all over this triangle, being careful not to spread glue outside it, then stack another star point on top of it, lining up those bottom triangles.
Continue gluing and stacking until all star points are in your stack.
You can now open up your paper star and see what it looks like!
Instead of gluing those final two triangle sections together, however, slide a paperclip onto them just at that edge.
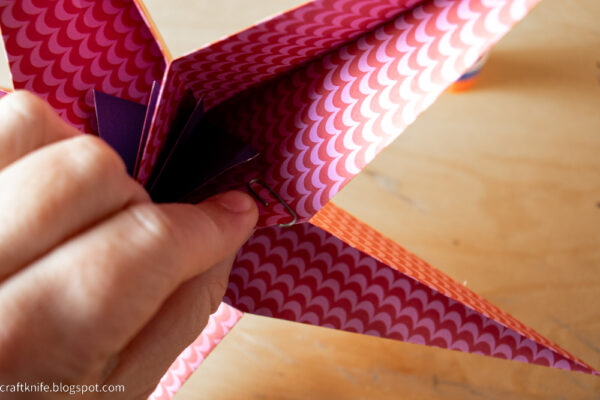
This will join them together without glue, so that you can remove the paperclip and store the paper stars flat.

To hang these stars, string clear thread through the top point, then tie into a loop.
I’ve got a whole hallway full of these stars by now, and I keep getting distracted from doing stuff I need to do by deciding to make just one more, ahem. And I know I’ve made a lot of noise about how easy they are to store and how little space they’ll take up, but I dunno, y’all. I think they look pretty enough to leave up all year!
P.S. Want even more easy origami projects? Here you go!