
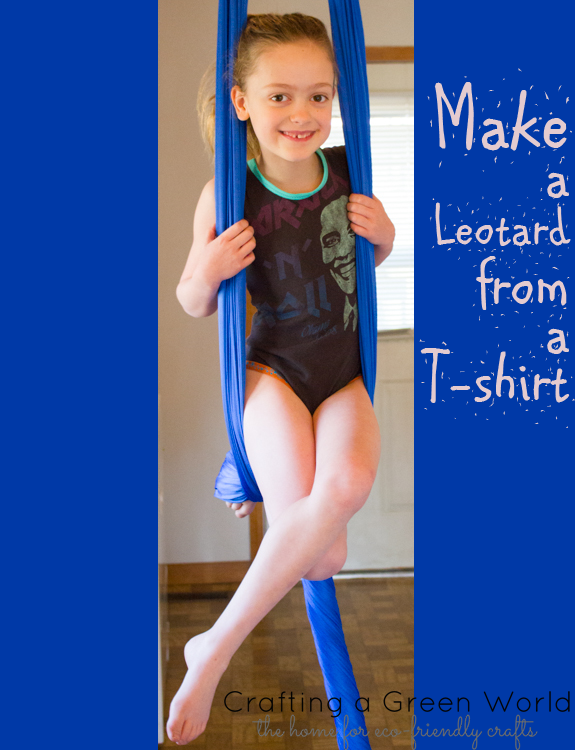
How boring the ubiquitous cotton leotard is! If you or your kid regularly participates in an activity in which the uniform is a cotton leotard, then you have no doubt long grown sick of it. Cuter leotards can be obtained, but they’re pricey, and how much money can you really justify spending on such a small scrap of fabric? Learn how to make a leotard from an old tee that’s cuter than the ones at the store.
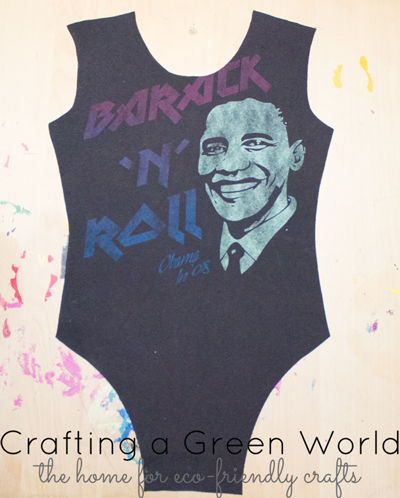
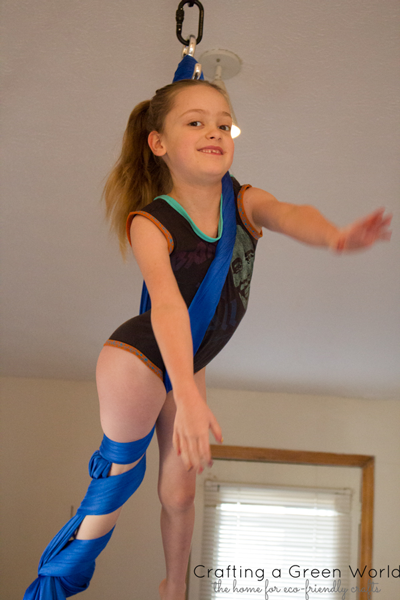
This particular leotard that my kid is wearing cost probably a couple of bucks, and that’s including the fold-over elastic. It’s made from my old Obama 2008 election T-shirt, so whatever else you may have to say about it, it’s not boring. And it was actually surprisingly easy to make, with one of the kid’s other [boring] leotards as the pattern.
If you, too, have a well-fitting leotard to copy, then you can make your own comfy cotton leotard out of a T-shirt. Here’s how to make a leotard from a tee.
How to Make a Leotard from a T-Shirt
You will need:
1. a well-fitting leotard. You can use a regular leotard or a biketard for this, but for now, keep it sleeveless. Sleeves are just a little more complicated, and we’ll talk about creating and sewing them another time.
2. T-shirt. This leotard that fits my eight-year-old is made from a shirt that’s a woman’s medium. Make sure that the shirt that you use is very soft, on the thin side, and that it drapes well in a body-hugging way. T-shirts that drape well are usually made from fabric that’s cut on the bias, and that will also make an excellent leotard that moves well with the body.
3. newspaper and Sharpie. You’ll be drawing your pattern pieces onto yesterday’s newspaper.
4. fold-over elastic. It’s usually abbreviated as FOE, and it’s become much more mainstream, which is great, as it’s easy to use, and makes sewing with stretch fabrics SO much easier.
5. scissors, cutting mat, iron, and the other usual sewing supplies. Don’t forget a ballpoint needle that’s suitable for jersey knit fabric!
 1. Lay out a well-fitting leotard as a template. There are a few tricks to using an existing piece of clothing as a pattern, all of which I lay out in this tutorial on how to copy a vest. The most important thing is to make sure that the existing garment lies completely flat, and for that, you need to use masking tape. If you tape along the seam lines, you’ll have a neater time tracing the garment.
Trace around the leotard onto newspaper, doing the front and back of the leotard separately, and then labeling each piece; I label with the garment, size information, and usually which kid the pattern is for. Cut out the pattern, then fold it in half lengthwise and trace it again, neatening curves and straight lines and dealing with all the little ways in which your first pattern wasn’t symmetrical. Label this new pattern, and cut it out, as well. This is the one that you’ll sew from!
Repeat these steps for the second pattern piece.
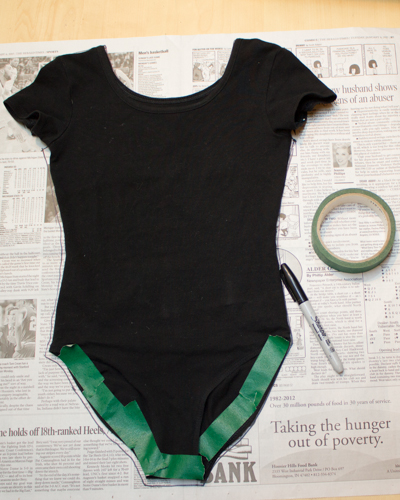
 2. Cut your leotard from the T-shirt. Cut the T-shirt into front and back first, and iron it well, and then trace your pattern in chalk directly onto the fabric. I add seam allowance by hand at this step–usually about 5/8″, for me, but whatever seam allowance you like will work fine for this.
Cut out each piece, and then move immediately to the next step. If you let the cut pieces sit too long, the edges will curl up and make the next steps more difficult.
3. Iron and starch. I talk more about this in my double-sided T-shirt quilt tutorial, but the gist is that jersey knit fabric will not curl and will sew more evenly in your sewing machine when it has first been starched. It’s highly worth it not to skimp on this step.
4. Sew the crotch of the leotard. Sew the two crotch pieces together, right sides together, using a zig-zag stitch. Iron the seam to one side, and then zig-zag over it again to finish it flat.
Make a lining for the crotch by laying out the leotard over a scrap piece of the T-shirt fabric, and tracing the two sides of the crotch onto it. Lift up the leotard, and use a ruler to connect the two sides with straight lines. Cut out this piece, iron it, and starch it well.
Pin the crotch lining to the crotch of the leotard, wrong sides together, and then zig-zag stitch just the long sides to the leotard.
5. Sew the rest of the leotard. Sew the sides and the shoulder straps of the leotard together, each time using a zig-zag stitch and finishing each seam by ironing it to one side and then zig-zag stitching it flat. Be mindful not to pull on the fabric or otherwise stretch it as you sew.
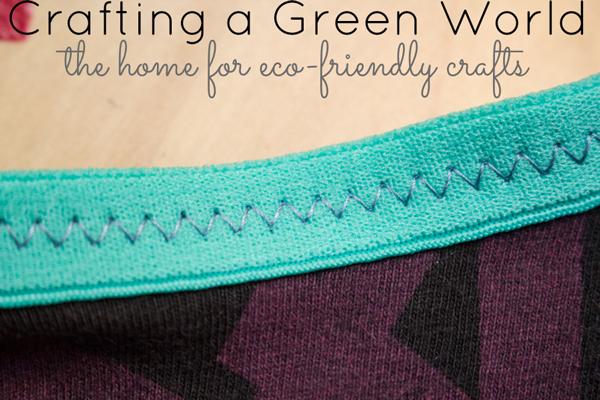
6. Enclose all edges in fold-over elastic. Use this method to bind the leotard’s leg holes, armholes, and neck with fold-over elastic. I like the binding to be a tightest at the leg holes, to keep wedgies at bay, and then less tight at the arm holes, and not very tight–perhaps 80%–at the neck.
 This method should result in a workable leotard right off, but there will undoubtedly be little things that you’ll want to change. This leotard pattern, for example, needs the shoulders to be a little longer, the leg holes a little more narrow, and a lot more room in the booty. Another time (after I buy some more FOE!), I’ll show you how to make these easy modifications to your pattern, so that your next leotard will be longer, leaner, and more booty-full.


This is SO CUTE! I wish I were handier with a sewing machine. My daughter is a gymnast and a dancer so we have need for a LOT of leotards. I have had good luck with thrift stores and Craigslist for inexpensive leos. I wonder how easy these would be for a more inexperienced seamstress though?
The pattern is super easy, but a beginning sewer might struggle with sewing knit fabric. I’d suggest starching REALLY well, going nice and slow, and not starting with a favorite T-shirt. Even experienced sewers are pretty comfortable with a few flubs at first, so I always expect to go through a few drafts when I’m trying to create or modify a new pattern.
I might try my hand at this. I’ve sewn knit fabric before and it is intimidating but I didn’t know the starch trick. And, as an art teacher, I have PLENTY of spare Tshirts (i.e., paint shirts) laying around to mess up first. 🙂
Pingback: How to Make a T-Shirt Leotard | The blog of COOPER APPAREL. Find us at https://www.facebook.com/Coopertees
Pingback: Tutorial: Make a child’s leotard from a t-shirt – Sewing
Great tutorial! If I get to lock myself away tomorrow with the sewing machine, a biketard and a bathing suit will be made.
A biketard for Willow is my next project! You’re starting with a biketard that fits, aren’t you? I’m afraid that I’m going to have to figure out my biketard pattern using a leotard and a pair of boy shorts, and it’s bugging me how I’m going to make enough room for the booty.
can you just start with a good fitting pair of pants/shorts and build up? Emma’s biketard is two pieces in the back and I think that is to account for the buns. I finally took pictures last night of her wearing it, just to get a blog post written.
Pingback: Crafting a Green World | The home for green crafts and tutorials!
Pingback: Crafting a Green World | The home for green crafts and tutorials!
Pingback: 19 Tutorials From Cool Kids Clothes From Old Ones - The Mommy Mess