
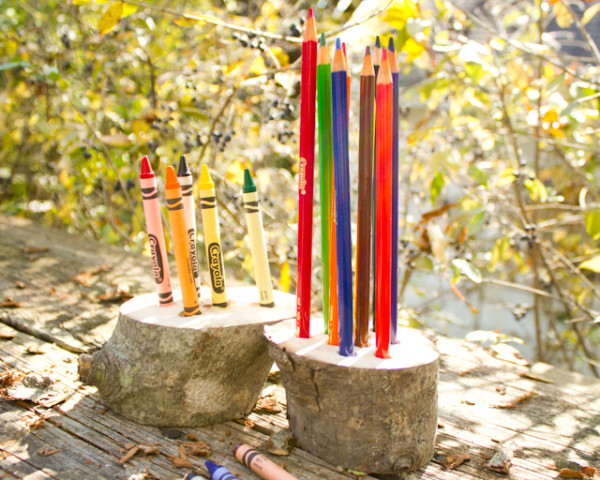

Want to bring more nature into your art?
Crayon, colored pencil, and marker holders are easy to make from reclaimed fallen branches. They organize your art supplies, make them visible while you work, and, if you’re creating with kids, display a manageable (and easy to clean up!) number of utensils that the kiddos can access independently. Here’s how to make one for yourself:
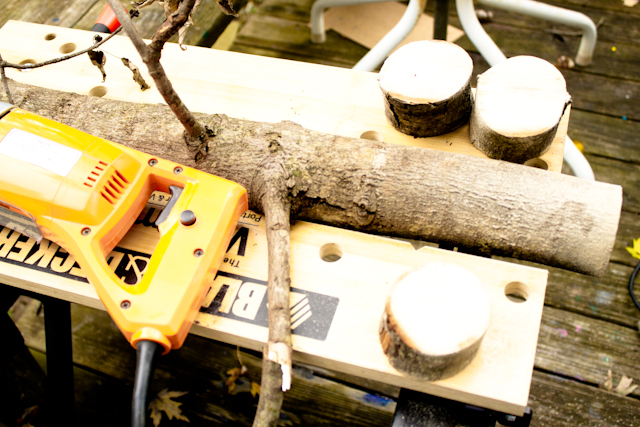
1. Saw up a fallen tree branch. Look for a wide branch to display a number of utensils, or a narrow one to hold just one or two special graphite pencils. To make your future wooden holder even roomier, consider cutting the wood slice at an angle, or even lengthwise down the branch.
Three to four inches is a good thickness for a wood slice–this will allow you to drill a hole a couple of inches deep without being afraid that you’ll drill through the bottom of your slice!
2. Find the correct drill bit. Measure the width of the crayon, colored pencil, or marker that you’d like to use with your holder, and choose a drill bit that is 1/16″ wider than that utensil.
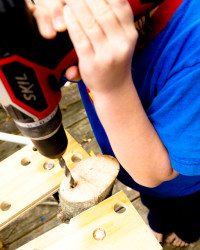 3. Drill pilot holes. If you’d like a special pattern to your drilled holes, mark them in pencil. Then, clamp the wood slice firmly to your work surface, insert a narrow bit into your drill or Dremel and drill a pilot hole at each mark.
The drill bit that you’ll be using to drill the correctly-sized utensil holes will be pretty fat, and pilot holes will guide that drill bit so that it stays on course, keep the wood around the hole from cracking as you drill, and just generally make an easier job out of drilling through wood with that fat, unwieldy drill bit. It’s a step that you should NOT skip.
4. Drill your holes. Take a lot of care to hold the drill perfectly perpendicular to the wood slice, without letting the drill shift. If you accidentally make your holes wider at the top, then your utensils won’t stand up straight.
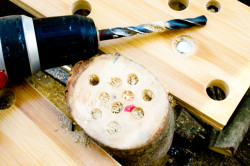 Drill down about 1″; the depth of each hole doesn’t have to be absolutely identical, because your colored pencils and crayons, at least, won’t take long to be worn down to different lengths, anyway, but you can always mark off one utensil as a depth guide, if you wish. Periodically insert the utensil into the hole until the line that you’ve marked on it for the correct depth is flush with the top of the wood slice.
5. Sand and seal. These holders work well as-is, but to make them especially nice, sand the top and bottom surfaces, then seal them with some homemade wood polish.
You’ll see in my photos that my kiddos are making their own crayon holders while I’m working, but this really isn’t the perfect project for a kid–the holes need to be placed and drilled very carefully, and drilling with a wide drill bit into wood can take some muscles. But if your kiddos are eager to participate (and who wouldn’t be, with power tools involved?!?), there’s a lot to be said for an assortment of tools and a generous supply of scrap wood.


Pingback: Reclaimed Wood Craft Ideas | Care2 Healthy Living
Pingback: 14 Beautiful Tree Branch Crafts | Care2 Healthy Living
Pingback: 14 Wonderful DIY Crayon Holder Ideas - Easy Crafts for Kids - DIY & Crafts
Pingback: Awesome DIY Crayon Holder Projects for Kids - DIYCraftsGuru
Pingback: 35+ Amazing DIY Wood Log Decoration Ideas For Your Home