
Beeswax is good for so much more than just candlemaking and nature crafts. In particular, beeswax is an ingredient that I find myself using often in my homemade natural cleaning supplies. From my antique library table to my unfinished wood kitchen countertops to my children’s many wooden toys (especially the hand-stained wooden toys), my homemade beeswax wood polish keeps them all in good condition, with all-natural ingredients and scented with essential oils. Here’s my recipe:
 The general ratio for beeswax wood polish is one part beeswax to three or four parts oil. I use a 1:3 ratio, because I like a polish that’s a little more solid. Even at 1:3, however, the polish is still quite soft, easy to dip into by hand and easy to spread.
For oil, you may use any oil that you prefer, as long as it’s shelf-stable. I use the same low-quality olive oil that I use in soapmaking, but other possibilities are coconut oil and jojoba oil–I imagine that you could even use Crisco if you had a mind to.
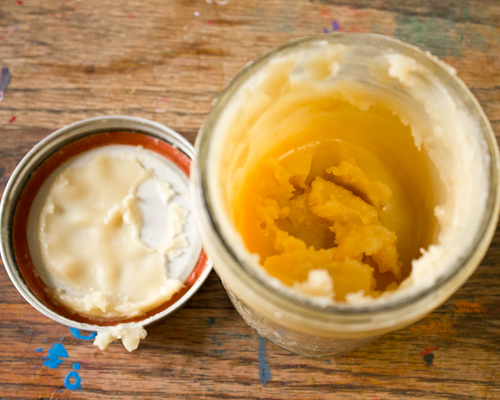
To make enough wood polish to last my family a year, I first heat 1/3 cup of beeswax until melted. In my opinion, the easiest and safest ways to melt beeswax are in a crafts-dedicated crock pot (which you can find at a thrift store) or in a crafts-dedicated double boiler. If you fix yourself up a DIY double boiler, however, then you can melt your beeswax right in whatever glass jar you’ve chosen to hold the beeswax polish, saving yourself an extra step and a dirty dish.
As soon as the 1/3 cup beeswax is melted, combine it with one cup oil, directly into the jar that you’ll be using to store the beeswax wood polish. I use wide-mouthed jam jars from last year’s canning season, but a variety of reclaimed glass jars or decorative tins would also suffice.
Next >>
 Add to the mixture a capful or so of whatever essential oils you prefer. In my furniture polish, I often add tea tree oil and cedar or pine oils, but I rarely add essential oils to the polish that I use on my children’s toys.
Stir the mixture well, or–even better–fasten the lid tightly and give the whole thing a very good shaking. You can stir or shake again a couple of minutes later, but the beeswax solidifies so quickly that it will likely be unnecessary.
To apply the polish, use your hands to rub it into the wood, then come back an hour later and buff the wood well with a clean cotton cloth. You can see in the photo how drastically the polish changes the appearance of our beat-up but very beloved antique library table, which is witness to 3+ meals, two hours of schoolwork, and several messy craft projects every day.


Thanks for this post. I’ve been crazy for oils lately (lip balms, lotions, pomades, etc.) and have been using coconut oil for absolutely everything. I hadn’t thought of adding beeswax though. I’ll be trying this on some of our wood furnishings. Thanks again.
Pingback: Vegan Beeswax Alternative
Pingback: 4 Top Green Living Stories | Planetsave
Hello! I have an unfinished fir wood adirondack chair that I would like to oil before I put it outside. Could I just use this beeswax and coconut oil combo for that? I’m hoping to coat it with something totally nontoxic.
Thank you so much!
You could, but you’d need to repeat the process regularly, since the wood polish will wear off with use. I wonder how something like linseed oil or even shellac would work for your purposes?
Great article! I will use this receipt for protecting my botanical wooden jewelry!
Thank you!
I have a question that maybe you could answer. I am currently making wooden toys for my toddler but have run into a big problem. Once I paint them with watercolor and let them dry, I use a beeswax/walnut oil finish. However, with each application it takes off more and more paint and it never seals it completely and the colors can still be rubbed off. Any suggestions?
Did you make the polish yourself? It sounds to me like you need more beeswax to make it harder. If your polish is soft enough, it could just be sinking into the wooden toys, pushing the paint with it or knocking it off.
The other problem, though, is that I just don’t think you’re going to get a complete, polyurethane-like seal, from a beeswax polish. A natural wood polish is more to protect the toy, not seal it off completely. It will protect the paint for wear-and-tear, for regular kid playing, and even for some mouthing, but if your toddler is as mouthy as mine were, you’ll see fading over time. A lot of parents leave their kids main toys unfinished at this age, and paint the big items, like wooden shields and swords, or the special items, like candle holders or holiday gnomes or whatever.
But you’ve completely sidestepped the question that I MUST have you answer, because I’m fascinated by this: what kind of wooden toys are you making for your kiddo, and how are you making them?
I do make the finish myself. I also use 100% pure tung oil as that will make my projects water proof once it dries. However I am having the same issue with the tung oil as well. (But as tung oil takes a long time to dry, I am going to wait a week and see if I can still rub the color off.) I contacted the online store where I buy my watercolor, and they suggested there might be some kind of dye in the watercolor – but I do buy good student quality paint – but maybe I should try to spend more money and get “artist” quality.
I read some other crafters decriptions on Etsy about their non-toxic toys coated in beeswax and at least one person says their paint is permanent and doesn’t “run.” Wondering how she makes that happen?
I’ve made my son a rocket with space men and alien figures, two castles, a dryad-esque figure with a baby, a wizard figure, a little fox and some mushroom gnomes with their mushroom “houses.” Currently I am designing some robots for him. I see things online that I like and try to emulate to the best of my ability or I just make things up. This has definitely been and continues to be a learning process for me!
I once had another crafter ask me about just one color of her watercolors (blue) running when her kid’s friend put it in her mouth. I suggested a brief vinegar soak, and she said that worked for her. I had completely forgotten about that until you mentioned it, but I did incorporate that step into this kid-painted wooden toy tutorial here: http://craftingagreenworld.com/2012/08/14/how-to-let-your-kids-turn-their-unfinished-wooden-toys-into-painted-and-sealed-wooden-toys/
I will give that a try. I am prepping some scrap pieces of wood to try out a few things and I will add the vinegar to one of them and see how it goes. Thanks!
My husband and I are going to be re-painting a crib, and I’ve been looking for a non-toxic paint sealer, considering babies chew things, and we don’t want him ingesting any of the paint. Does beeswax actually work as a sealer in that way?
Unless the paint is something that also soaks into the wood, like watercolor paint, I don’t think it would work. Beeswax polish does seal and protect wood, but it does so by basically saturating the wood, and thus repelling stains and other liquids. It won’t stick to or sit on top of any other paint. If you used a non-toxic stain, though, like a tea stain, then beeswax polish would work.
You could also use milk paint which is non- toxic and comes is a variety of colors. You can then seal it with tung oil which is also non -toxic. It comes from the tung tree and unlike some other oils or waxes, it does make a water proof finish. Just make sure you use high quality products – some that say they are a “tung oil finish” like products in home improvement stores are either not real tung oil or there is just a bit of tung oil mixed with a lot of other crap that you don’t want. One place you can find them is on this site: http://www.realmilkpaint.com/
The people here are very helpful as is the information on their site, so if you have questions before you buy anything, you can always give them a call or email.
Tung oil is also very forgiving and pretty much fool proof as far as finishes go and milk paint is pretty easy to work with as well.
Pingback: Waving, not drowning
I like your blog, many good ideas! Thanks!
Gosh wow, Beeswax linseed oil coconut oil that’s a lot of information !! I have to admit…most of it I have never even thought about before. That is what makes you a pro Julie Finn.! ! ! !!!!!
I love this idea on protecting toys! But, and please forgive my ignorance, won’t olive oil eventually go rancid? Or is it find after it has been cooked? Would mineral oil be better to use or does it really not matter?