

Liquid watercolors are a versatile art supply that kids, especially, love to create with. If you’ve got a stash of dried-out markers lying around, you can make your own liquid watercolors for free, in the process breaking down those plastic markers for recycling and upcycling one of their most wasteful components.
If you’ve read my tutorial on making DIY alcohol ink from dried-out markers, this process will sound familiar; the big difference is that since you’re using plain water for this project instead of rubbing alcohol, your kids can help!
To begin, break down your markers as described in my tutorial on recycling Crayola markers; you’re aiming for that ink reservoir inside the marker barrel, but since you have to tear the marker completely apart to get it, you might as well finish the job and recycle what you can! Even if your markers aren’t Crayola brand, the method for getting out the ink reservoir will be just about identical, although you’ll probably have to just trash those marker barrels if you can’t determine if they’re recyclable.
Separate the ink reservoirs by color, and source a containers with well-fitting lids to hold the liquid watercolors. If you have a ton of dried-out markers, you can use containers as large as Mason jars for this project, but I only have a couple of dried-out markers of each color to work with, so I’m using small glass vials. Recycled pill bottles and spice bottles would also be great containers.
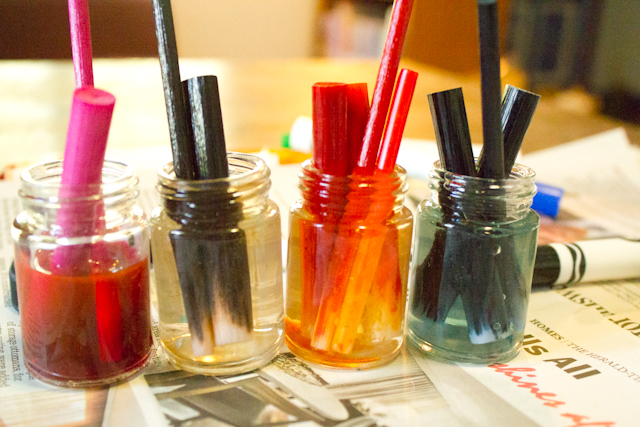
 Fill each container about three-quarters full of plain water, then put one end of each ink reservoir into the water. You’ll immediately notice the bottom end of the ink reservoir turn white, but otherwise the ink will dissipate into the water very slowly, so you may not see a difference for a while. The containers will need to sit for several hours, preferably a full 24 hours, and I’ll tell you right now that the combination of little cups of water with temptingly battable ink reservoirs makes this project irresistible to housecats, so hide it well.
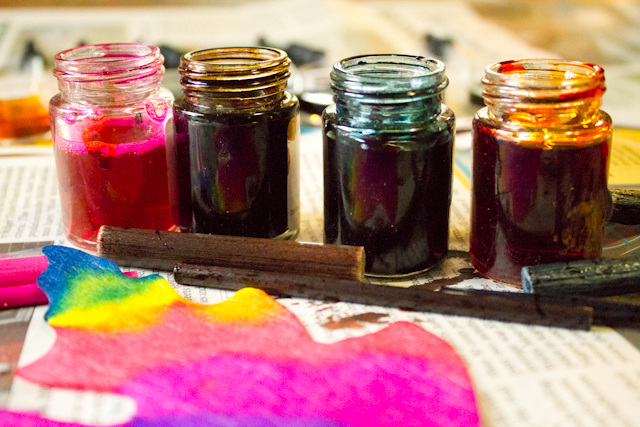
After about 24 hours, you should notice that the container of water is well tinted, but nevertheless milk any remaining ink that you can squeeze out of the ink reservoirs as you remove them from the containers–this is SO messy, but quite worth it.
 My girls use these homemade liquid watercolors interchangeably with our store-bought set, and they have tons of uses:
- dying unfinished wood
- painting on watercolor paper (dry or wet-on-wet)
- dropping with eyedroppers onto coffee filters
- coloring homemade play dough
- serving as homemade, non-toxic spray paint when poured into little spritz bottles
Do you have a good use for liquid watercolors? Tell us about it in the Comments section.


Love your site and items!!! The Fingerpaints would be GREAT for my Camp Fire Group!!!
Wow, that’s fantastic! Thank you for sharing.
Love this idea … It reminded me of what I used to do with these markers and liquid glue! As a primary teacher, I always was on the hunt for new ideas. I loved the colored glue that came out but they were so expensive, so I came across this idea of inserting the dried up insides of markers into a bottle of glue! It takes a while for the colors to dissipate, like the watercolors, but it yields the same results. My class used to love doing this with me sometime around March, then watched the glue change colors. We shook the bottles frequently to mix the colors up. When ready, we used the glue to “draw” designs on paper. It dried the color of the ink. Also, I put an overhead transparency over a picture of flowers or butterflies, and the kids colored them with the glue. When dry, you peeled off the glue from the transparency and it became a window cling that we decorated our windows with for the rest of the school year!
Wonderful! We’ve mixed acrylic paint with glue in the bottle before–
http://craftknife.blogspot.com/2011/08/tutorial-school-glue-in-many-homemade.html
–but your idea is a much better re-use project.
Pingback: Turn Dried-Out Markers into Watercolor Paints | Earth911.com
I just tried this for the first time, and have the ink sitting in water as I type. I hope to use them to dye rice and pasta. Thanks for this awesome idea!
The best way to brightly color pasta and rice is use a capful of rubbing alcohol and several drops of food coloring. Place in a plastic baggie and mix well. Add your rice/ pasta. Mix, mix, mix, and lay out on a cookie sheet covered in wax paper to dry. Stir every few hours until dry. Perfect results everytime!
Pingback: DIY Watercolors from Upcycled Markers « Shannon's Tot School
Pingback: Crafting a Green World | The home for green crafts and tutorials!
Love, love, love this idea. I cringe every time I though out a marker, so this tutorial makes me very happy. Thanks for all the work you do. Cheers! 🙂
Oops! I meant throw. 🙁
Pingback: Upcycled Marker Beads from Dried Out Markers
How long is the paint good for? Does it spoil?
Hmm, good question! We use it a few times and then toss it. It’s a good paint for kids, but not something that I’d go out of my way to store indefinitely.