
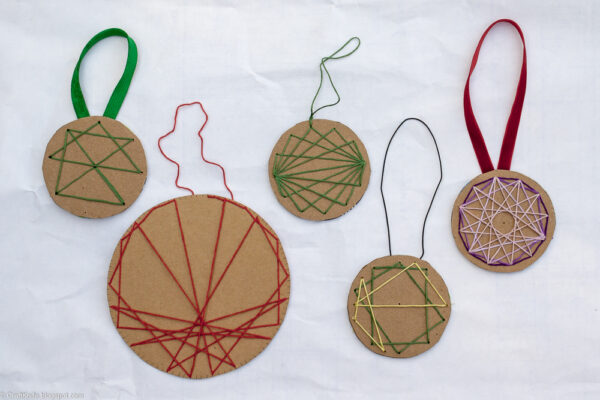
Clean out your recycling bin and your floss stash to make embroidered cardboard ornaments!
I am very drawn to patterns and geometric designs, and I’m always looking for ways to incorporate them into my favorite crafts. These embroidered cardboard ornaments are an easy winner, because although they lend themselves very well to creating spirals, mandalas, and other mathematical designs, they also lend themselves very well to… well, anything!
So whether you’re obsessed with soothing symmetry like me, or you like to make your stitching free-form or representative, you can stitch the design of your dreams onto these embroidered cardboard ornaments. Here’s how!
To make embroidered cardboard ornaments, you will need:
- upcycled cardboard. I know that I usually have a recommendation, but for this project, both corrugated cardboard and food packaging-weight cardboard work equally well. I prefer corrugated cardboard for smaller embroidered cardboard ornaments, just because I think the additional width keeps them from getting lost on a Christmas tree. Thinner cardboard is easier to work with, though, and works well, I think, with more intricate designs that require a larger diameter of cardboard. I prefer thinner cardboard for all the ornament backings, but more corrugated cardboard would work, too.
- measuring and cutting tools. You’ll want scissors, of course, and something to trace to make the ornament form (for these ornaments, I used a Mason jar lid and a saucer). For wheel designs, you may want a divided circle template; two templates that I often use are linked here and here. To poke holes in the corrugated cardboard, use a safety pin or thumbtack.
- embroidery floss and tapestry needle. A tapestry needle has a blunt tip, which will keep you from poking holes that you don’t want to poke through the cardboard. It’s also useful for stitching plastic canvas or cardstock. Even cheap cotton embroidery floss works perfectly for this project, but my favorite embroidery floss actually comes from my local thrift shop!
- tape and hot glue. You’ll use both on the backside of your ornament, so that nothing shows on the front but your beautiful stitching!
- ornament hanger. Ribbon, more embroidery floss, yarn, or anything that you have on hand!
Step 1: Trace and cut an ornament template.
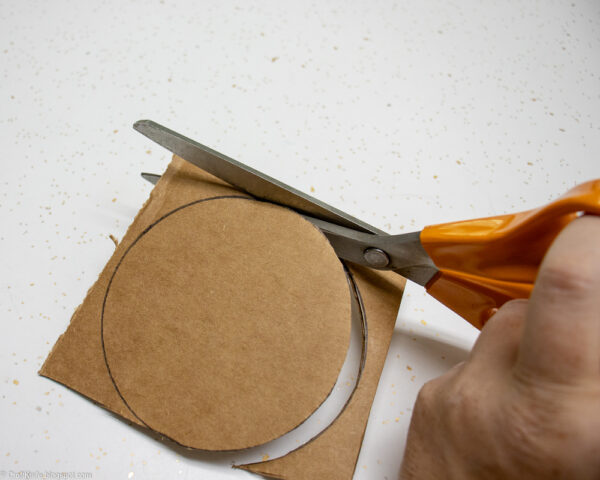
Find a circle template, anything from a jar lid to a ceramic saucer, and trace it onto cardboard. Cut it out with sturdy scissors.
To make ornaments with radial symmetry, you’ll probably want to mark divisions around your cardboard circle. You can actually eyeball this up to a fairly high number! But it’s also not cheating to use a template. I use my DIY circle template to divide my cardboard circle into twelve, and I use the templates linked here to divide it into 50 or 100.
With these cardboard ornaments, you DO have to pre-punch the holes you want to stitch through. Sometimes, I just cut eensy little slits or notches around the edges of thinner cardboard. With corrugated cardboard, or in the middle of either kind, use a safety pin to poke holes where you want to stitch.
Step 2: Embroider the cardboard ornament.
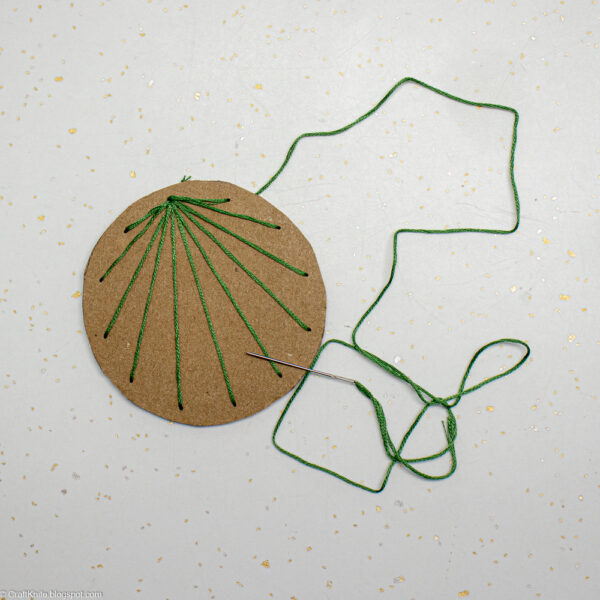
Thread your needle, and either tie a knot at the end of the embroidery floss OR tape it down on the backside of the ornament.
Embroider your ornament however you’d like. When you reach the end of the floss or you want to change colors, tape the end of the floss to the back of the ornament.
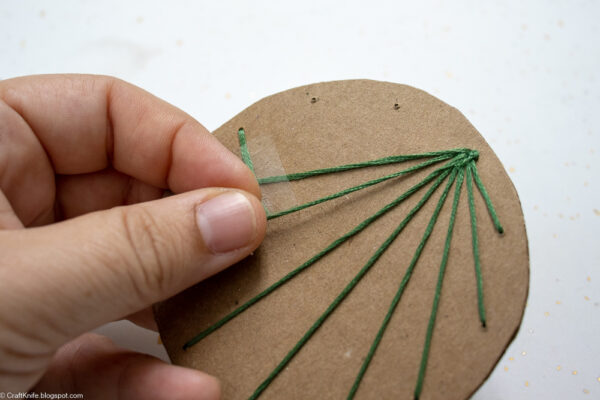
The tape won’t show, and will keep the embroidery floss super snug on the front of the ornament. Nobody wants saggy embroidery!
Step 3: Add a backing to the ornament.

When your embroidery is complete, add a backing to hide the ugly side of the stitching.
But first, hot glue an ornament hanger to the backside of the ornament. I like ribbon, but yarn, twine, more embroidery floss, or anything that you have on hand is fine.
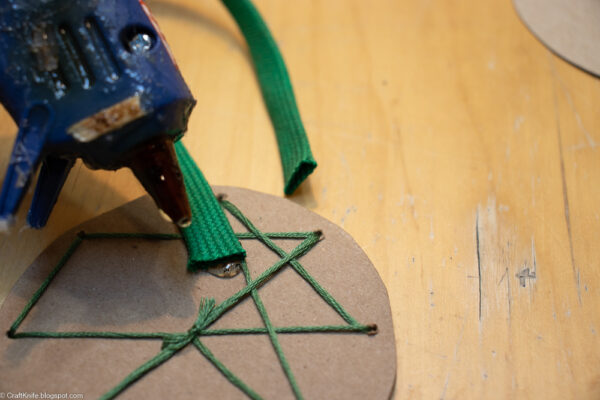
Cut another cardboard circle (I prefer thin cardboard for this) the same size as the first one. Hot glue it to the back of the ornament to hide the rough edges of the ornament hanger and the ugly side of your stitching.
You can also embroider this back piece, or write a name and date, or really just embellish it however you’d like. Or not! I personally like the look of the plain cardboard back to contrast with the fancy embroidered front.
I know I said that mathematical designs are my favorite, but any simple embroidery pattern works well for this project. Monograms are super cute, and a Google search will reveal all sorts of inspiring holiday patterns and other cute designs. Feel free to also experiment with floss weight, or even to switch to yarn for younger crafters or thread for making intricate, detailed designs.
If you prefer crafting with natural materials, get out the drill, because you can also embroider wood slices!


BIG love for this! I love stitching on unusual things and heaven knows I have plenty of cardboard. This goes on my never-ending things to make list!