Want a fun summertime project that highlights your creative expression, gives a second life to clothes otherwise destined for the waste stream, AND subverts Big Fashion?
You are going to love tie-dye!
Tie-dye is one of my favorite summer activities. In my opinion, mess doesn’t matter if you keep it outside. The fact that tie-dye can get pretty messy, then, is just part of the fun! I also love that it’s a process-oriented project. You can’t completely predict your outcome so there’s no point in getting stressed out about it. This also makes it a great project for kids, or a group in which people have different skill levels. Recently, I took my Girl Scout troop camping for the weekend. Along with making and cooking on tin can stoves, practicing wilderness survival, and tying lots of knots, you know what else we did?
Yep, we tie-dyed! With squirt guns, even, because we are just. That. Awesome.
Tie-dye materials aren’t always eco-friendly (I’ll talk about some that ARE eco-friendly below!), but even your most basic kit, used with the most generic mass-produced cotton T-shirt, is an accessible entry point into the kinds of clothing modification that can have a real impact on sustainability. If you can tie-dye a mass-produced T-shirt, you can tie-dye a thrifted T-shirt with a cool graphic on it. If you can tie-dye a thrifted T-shirt, why not alter it in some other ways? Cut it up and sew it to fit better? Embellish it and make it fancier? Modify it into a skirt or pants or different type of top?
And if you can alter a T-shirt, you can alter the rest of your clothes, too. If you can alter your clothes, you can sew new clothes from scratch. And if you can sew, alter, embellish, and dye, then YOU are an artisan creator, and Big Fashion no longer has any hold on you.
So whether you’re looking for a new creative outlet or just looking to entertain yourself on a hot summer day, check out the following tips and techniques that will hold your hand as you explore the craft of tie-dye.
Fabric
There’s a dye for every fabric, but natural fabrics tend to tie-dye best. Silk and cotton both tie-dye perfectly (although with completely different types of dye). You can even bully synthetics into dyeing pretty well. The process you have to use, though, does make them harder to tie-dye.
If you, like me, are super into tie-dying thrifted fabrics, however, the problem that you’ll run into is identifying fabric blends. Tie-dying thrifted cotton sheets and T-shirts is one of my favorite summertime hobbies, but so much fabric these days is cut with polyester. Polyester doesn’t take the same type of dye that cotton does, so a cotton/polyester blend T-shirt isn’t going to tie-dye as nicely as a 100% cotton T-shirt does. Read the labels when you thrift fabrics for tie-dyeing, and if the labels are missing, feel the fabric. You know what cotton feels like, and if the fabric you’re feeling is too buttery soft, or too stretchy, it’s probably not 100% cotton.
Dye
You can tie-dye using any dye that works for your fabric. A store-bought tie-dye kit isn’t necessary, and in fact will generally cost more per ounce of dye than you’ll pay by piecing together the supplies individually. However, a tie-dye kit does have the major benefit of containing everything that you actually need to make your first few pieces. It’s an easy and efficient way to try out the craft. If you like it, you can always re-use the supplies and just stock up on more dye.
Of course, most store-bought fabric dye is synthetic. You can tie-dye with natural dyes, and you can even source tie-dye kits that use natural dyes, but it can be more challenging to successfully tie-dye using natural dyes. Many natural dyes need to be boiled with the fabric. That makes your project less kid-friendly, less able to be done outdoors, and less likely to be able to incorporate multiple colors. There’s a reason why everyone wasn’t walking around in tie-dyed tunics in the Medieval period!
Techniques
Here are some of my favorite tie-dye techniques. Some are perfect for beginners, but some are more challenging, so jump in wherever you feel comfortable!
- a beginner’s guide to tie-dyeing. Let me walk you through every step of the process. If I can teach a four-year-old and a six-year-old how to tie-dye, I can teach you, too!
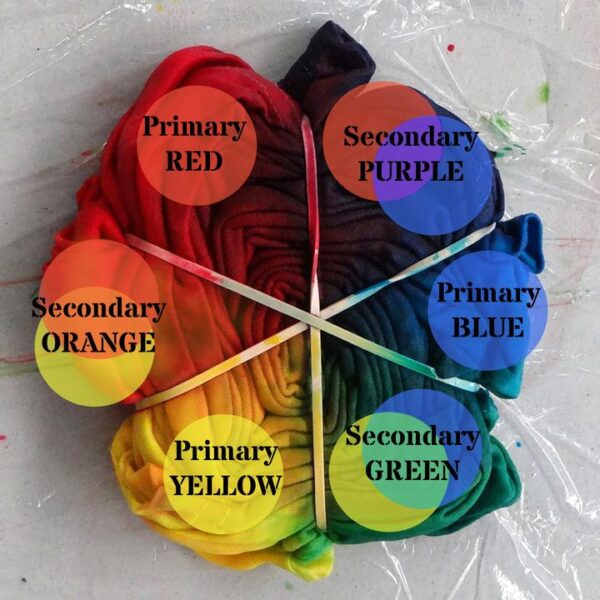
- rainbow. Here’s how to make the iconic rainbow tie-dyed shirt. Since it calls for only the three primary colors, you can get this look with even the most basic kit.
- accordion technique. If you can fold a piece of paper, you can create this accordion tie-dye!
- reverse tie-dye. Reverse tie-dye normally isn’t optimal, because bleach is super toxic. However, it does remain a vibrant–and therefore very effective!–way to jazz up a boring old black T-shirt. If nothing else, it will DEFINITELY get rid of that lingering stain…
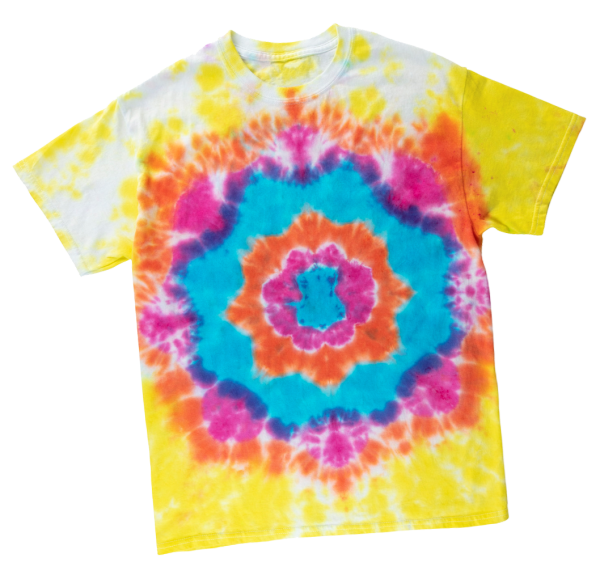
- mandala. The mandala technique is a little easier to do than the spiral, but has a similar look. I especially like this tutorial’s suggestion to put your piece on a cooling rack as you work on it. It keeps excess dye from pooling, so the back of your piece looks as nice as the front.
- ice dye. This technique requires fewer supplies, as you won’t need to rubber band off any parts of the T-shirt. However, it does require a lot of resting time. Make sure you’ve got a place where a T-shirt, permanent dye, and a bunch of ice cubes can hang out for 24 hours!
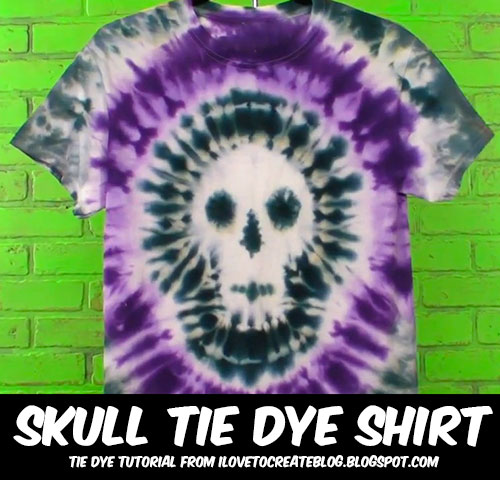
- skull. This is one of the most challenging techniques on this list, but it’s also the most awesome! You’ll need embroidery thread and a needle, but the resulting skull looks great, and it’s so fun to play with different color combinations.
- heart. Here’s a different method for tie-dyeing a specific shape. You could use this method interchangeably with the embroidery thread method, above, to create all kinds of complex shapes!
- five-point star. And here’s just one more method for creating a complex shape! The folding technique illustrated in this tutorial works especially well for geometric figures.
- tie-dye techniques. If you didn’t find a technique that you love in any of the previous links, you’ll find it here! I love this handy cheat sheet for showing you how to create a ton of fold patterns, how to rubber band them, and what each one looks like when it’s finished.
Do YOU have a great tie-dye technique (bonus points if it’s something that you learned at summer camp!)? If so, tell us about it in the Comments below!