
Here’s how to make a mini Christmas tree from a bottle you save from the recycle bin!
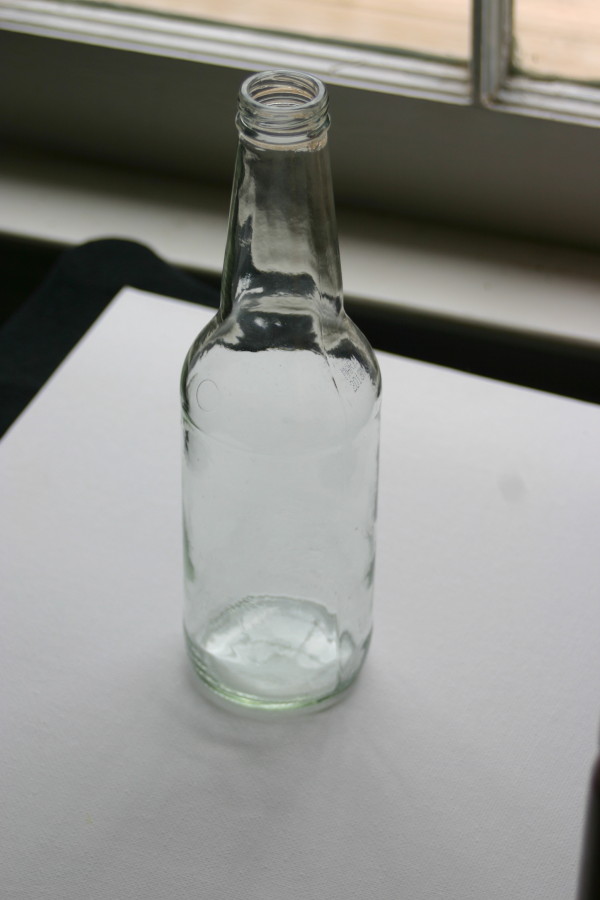
Over the past few weeks I’ve seen several really cute mini Christmas trees. You know, the little ones that are just for decoration, cost an arm and a leg, and are far from eco-friendly? Yeah, those. Enter: this glass bottle from my recycle bin:
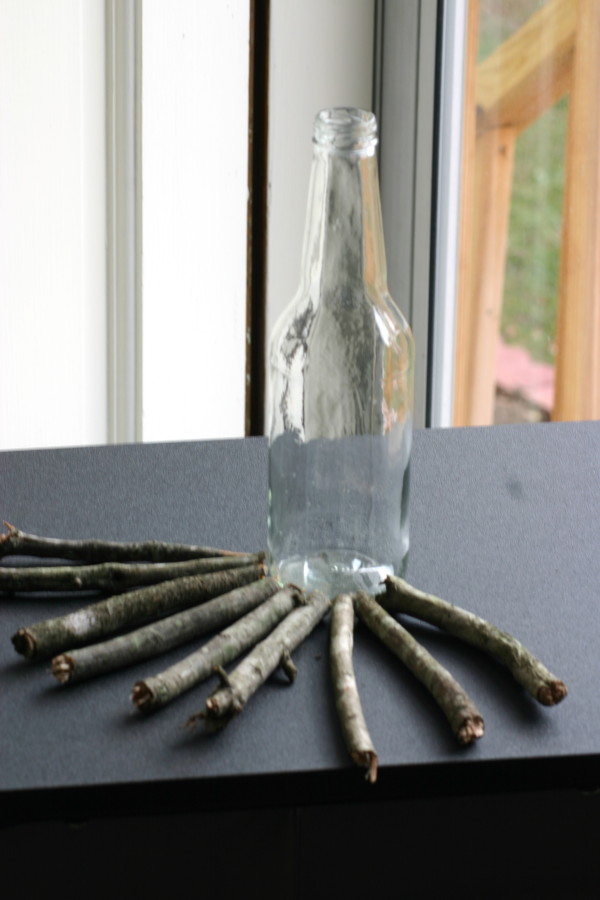
I knew it would have a purpose one day! I took branches– lots and lots of branches.

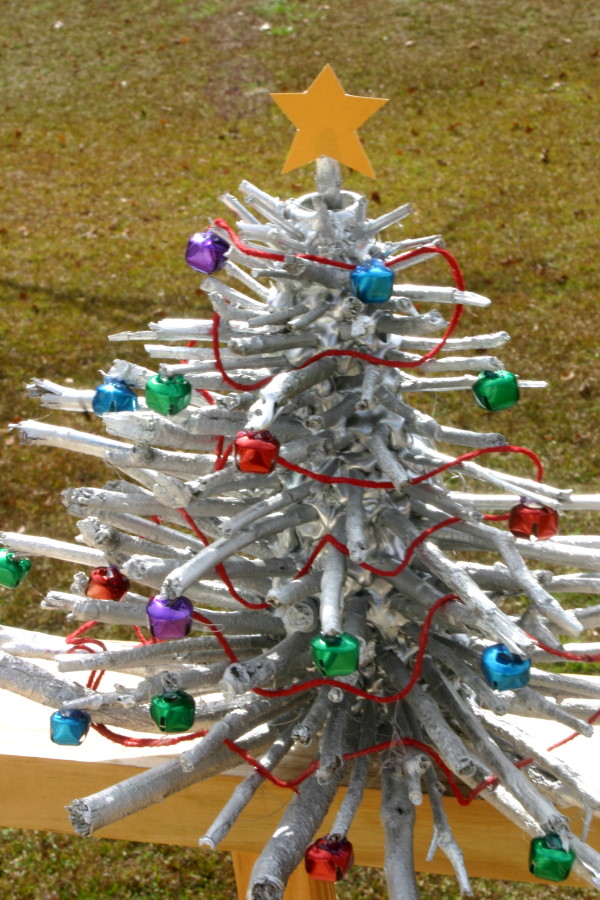
And made my own mini Christmas tree:
I have to warn you.. this project is a beast! You need to have patience in order to complete it.
How to Make a Mini Christmas Tree
Supplies
Glass Bottle
Branches
Hot glue gun/hot glue
Little rocks (I’ll explain later!)
Mini jingle bells.
Twine– I chose red twine. This might also be a good chance to whip out the hemp baker’s twine!
Yellow paper (I used a scrap piece I had in my craft stuff, but you could also use junk mail for the star).
Scissors.
Spray paint. Remember, spray paint isn’t the greenest craft supply, so opt for low-VOC spray paint, if you can.
How to do it:
1. Put your little rocks into the bottle. Due to the fact that we only attach the branches on one side of the bottle, you need to have something to weigh it down and keep it steady.
2. Once your hot glue gun is hot, start hot gluing the branches to your bottle. I started with the thicker branches at the bottom and used thinner branches at the top. This is how you will start it:
Once you get your first layer done, continue to work your way up the bottle. Make sure your hot glue has dried completely before moving on to the next layer (this is where your patience comes in!). If I could do my Christmas tree all over again, I wouldn’t put as much hot glue. I put a lot of hot glue because I was impatient and wanted to go on to the next layer, but, if you look closely, you will see that I have globs of glue peeking through my branches– not so pretty!
3. Put a tall branch inside the bottle. You might have to push it through your little rocks a bit. This branch will be the top of the tree (and where you will put your lovely star).
4. Spray paint the branches/bottle. The only reason I spray painted mine was because of the globs of glue. Otherwise, I would leave the branches their natural color. It’s all up to you!
5. After the spray paint has dried, add your twine. You’ll want to weave it through the branches like you would a real Christmas tree. I didn’t glue the twine on because mine stayed pretty well, but that’s also completely up to you.
6. Add your adorable jingle bells. I hot glued these as well.
7. Cut a star out of your craft paper. Glue it to the top of the tree.
That’s it! Now you have an adorable mini Christmas tree! I put mine on the mantle.
If you have another bottle, you could make a tree for each side of your mantle or you could put branches around the entire bottle for a beautiful table centerpiece! If you want even more ideas for your recycled bottles, be sure to check out this post. In it you will find instructions on how to make lights out of bottles and how to cut bottles into drinking glasses!


I so want to try this one. I recently saw a picture of a wine bottle with a string of lights in it. So…
Wine bottles… check!
twigs… check!
glue… check!
lights… err… I have a couple of solar ones… I guess I’ll have to sit the tree by a window, right?… check!
not true, I do have a couple of electric ones I use for the fireplace every year.
All right… thanks for the inspiration, I’ll let you know how ours turns out.
Happy Monday!
That’s awesome! I’m so glad I could inspire you 🙂 Send me a link when you have it finished! I would love to see it!
Pingback: Eco-Friendly Alternatives to Live Christmas Trees
Pingback: Five Christmas Tree Projects From Recycled Materials
I saw something like this (with paper tubes instead of twigs) for sale at Marshall’s…thanks for posting the how-to!
Interesting idea, but you’ve taken an item that IS recyclable, and changed it into something that IS NOT recyclable anymore (unless you take it apart and scrape off all the decorations & glue). So your “green” craft project is just the opposite. All these things will now end up in the landfill. Sorry, but that’s not being green.
Hey Meg! Thank you so much for your comment! You are right, but I also replaced a plastic product (a mini artificial tree, or many others that you can find in the store) with something that is repurposed and handmade. I have no intention of throwing it away, but if I do, I will be sure to take it apart. The great thing about hot glue is that you can peel it off just about anything. Something we must consider as well is that not all of our readers recycle. Some people come to our site just to get inspiration, or click on a pin from pinterest not knowing what we’re all about. If I can get readers that don’t normally recycle inspired to recycle items into handmade projects like this one, we can keep many things out of landfills.
I think meg is missing the point. Everything eventually ends up in a landfill, but buy recycling junk to make something beautiful to keep as a family heirloom is wonderful. Thus we are not buying something from a store reducing the amount of items used.
I couldn’t agree more, Rachel. If this replaces a toxic vinyl mini tree that you might have bought at a big box store, I’d call that a win for sure!
I live on 6 acres with lots of twigs I would love to get rid of. Also I cleaned my basement kitchen where relatives used to live and my reward was wine coolers (lucky me) left behind. If Im not too tipsy I will enjoy making a tree or two. Also I have lots of miniature ornaments that will look great on a tree.