Is it your New Year’s Resolution to write more? Draw more? Keep better track of what you need to do?
You can make an easy upcycled journal to meet all those needs, or to do whatever you want it to do. I’m going to show you three different methods to turn stash and found materials into journals that you can design exactly the way you’ve always dreamed of. Pick your favorite, or try them all!
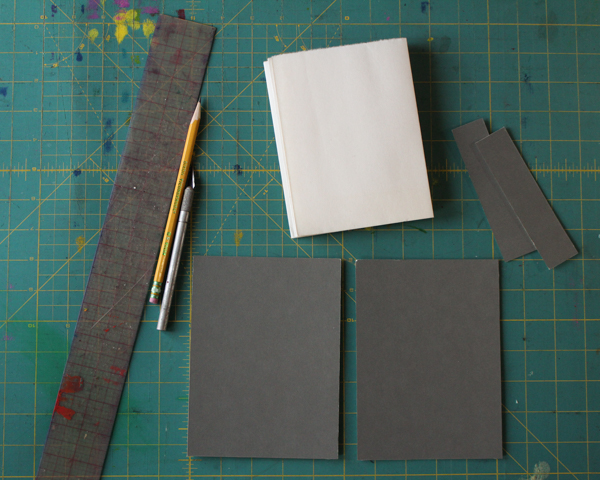
Five-Hole Pamphlet
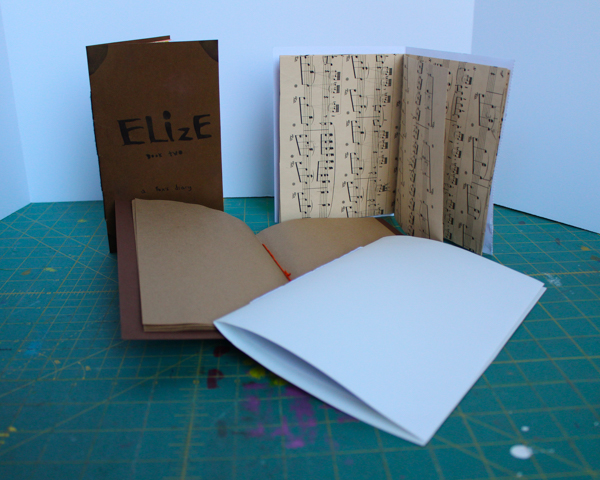
If you love those little Moleskine books, then you’re going to love the five-hole pamphlet. I keep a couple of these kicking around in my backpack so that I have one whenever I need one, and I encourage my kids to make and use them for sketching and nature journals. Their lay-flat pages and small size make them a terrific on-the-go notebook.
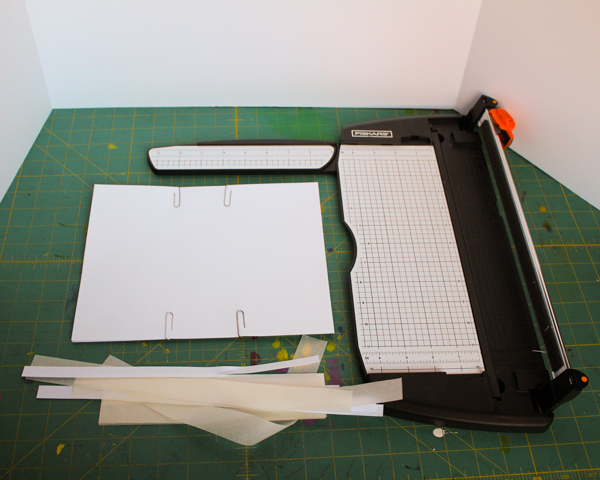
To make a five-hole pamphlet, you will need:
paper As you can tell in the above image, you really can use anything. One of the journals pictured is made from brown paper bags, and another has pages made from old sheet music.
heavier-weight paper for the pamphlet’s cover Think cardstock rather than cardboard for this. The cardstock should be .25″ to .5″ longer on both sides than the regular paper.
paper clips and paper cutter I use a guillotine paper cutter to keep all my cuts perfectly even.
awl, sewing needle, embroidery floss Waxed thread is the typical go-to for bookbinding, but you’ll find embroidery floss much easier, and it’s perfectly fine for these books. Upgrade to the good stuff if you want to make heirloom-quality journals.
1. Cut your paper to size Imagine the finished size of your journal–what are your ideal dimensions? 4″x 6″? 5″x 7″? The inside pages of your journal should be cut to twice that width by that exact height; the cover of your journal should measure an extra .5″ on both the width and the height.
Also, imagine your journal’s pages–how many would you like? The number of pages that will comfortably fit in a pamphlet depends on the thickness of paper that you’re using. The brown paper bags, for instance, are pretty heavy-weight, so I’ve cut seven of them for my pamphlet. Play around with what feels comfortable to you, but 6-10 pieces of paper will give you plenty of pages in your upcycled journal.
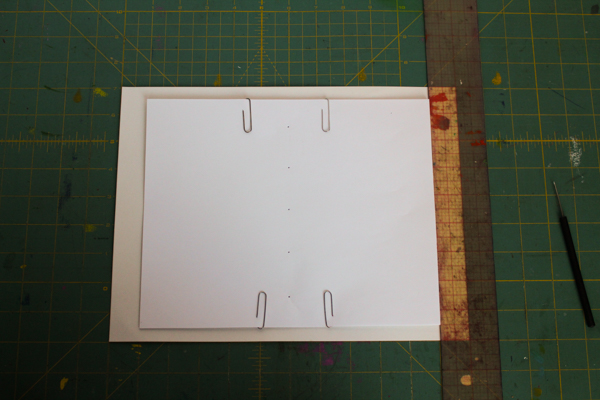
After you’ve got your inside pages cut to size, align them perfectly and hold them together with paperclips on each side of the center line.
5. Make a stitching guide Another reason to limit the number of pages in your journal–you’re going to use your awl to put five holes through the paper along the center line, where you’ll be sewing the journal together. Use a ruler to evenly space the five points.
Once you have the five holes pierced, put the cover page centered behind the stack, hold it to the stack with more paper clips, and go through the holes once more with your awl. All of your stitching points should be nicely lined up now!
6. Sew the pamphlet. Start from the inside of your book, and sew first through the center hole, leaving a long tail in the middle. The sewing diagram looks like this:
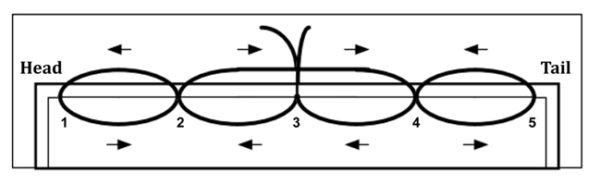
However, it’s almost easier to remember that you start in the center, go in and out the holes all the way up and all the way down, skipping the center hole on your way back down. Go in and out the holes back up to the center, where you’ll find yourself where you started. Both ends of the embroidery floss will be on the same side of the book, so tie them in a square knot and cut off the excess.
Fold your pamphlet in half and it’s complete!
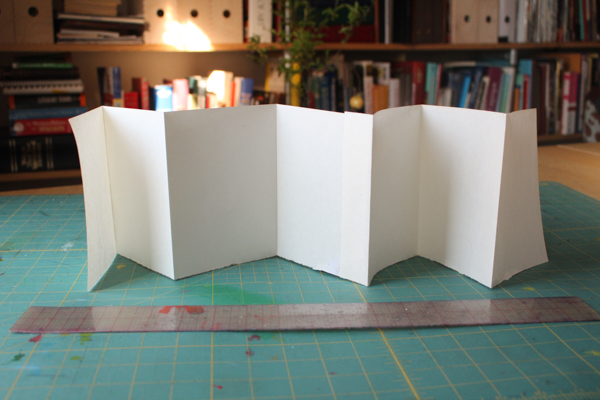
Accordion-Fold Book
This book is not sewn but instead made by gluing. It’s another project suitable for all ages and makes excellent use of upcycled materials.
To make the accordion-fold book you’ll need:
paper Your book will be one looooong piece of paper. You can glue pages together to make this piece–I’ll show you how later!–but still, I like to start off with wide-format paper. Newsprint or pages from large sketch pads are both good choices.
cardboard Food packaging is my favorite material to upcycle for the covers of these books.
glue Use a good-quality white glue; a name-brand school glue is fine. To attach the covers to this book, I used double-sided tape to save time; this is not an archival choice, but it did get my book ready to use in record time!
cutting and measuring supplies
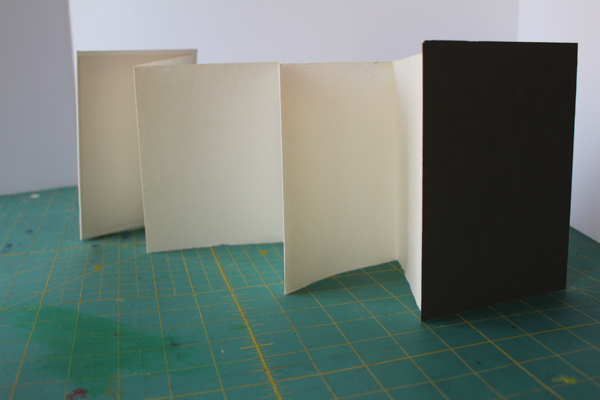
1. Cut and glue the pages of the book. Your book will consist of a front and back cover, with a long, accordion-folded piece of paper sandwiched between. Decide on the dimensions that you want for each page, and then cut several long pieces of your paper that are the correct height. Accordion fold the paper so that the width of each page is correct.
To attach two pieces of paper so that your book can be longer, simply cut the last page of one piece of paper off so that it’s no longer the full width, but instead only 1″ wide. Glue that tab to the first page of the next piece of paper, and continue to accordion fold for as long as you’d like!
2. Glue on the front and back covers. Cut two covers that are approximately 1/4″ wider on each side than the pages, then center the first page on the back of the front cover and glue. Repeat for the back cover.
Pro tip: every time I glue paper, I put parchment paper over and under what I’m gluing, and then a heavy book on top. I let it sit until the glue has dried.
As a quick option, you can use double-sided tape here instead of glue. The tape will eventually erode the paper, but if you’re making an everyday sketch or workbook, you’ll appreciate the time-saver.

3. Glue on endpapers (optional). If you’d like decorative endpaper, you can glue pretty, handmade paper (our favorite is to marble paper with shaving cream!) on top of the page that you glued to the back of each cover. It’s not necessary, but I think it makes the books more decorative.
These books make wonderful family timelines, travel journals, and doodle books. If you use a heavy-weight paper for the pages, you can also make your accordion book into an art journal or photo album.
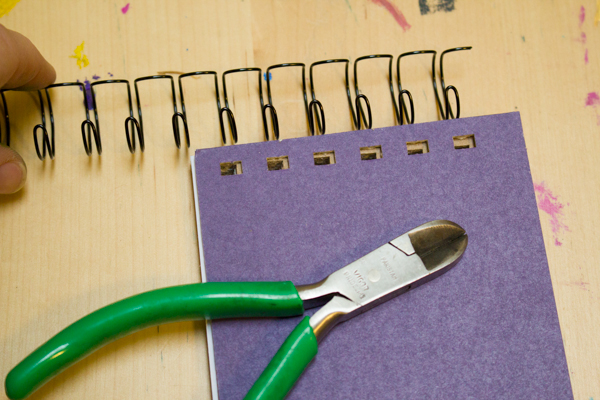
Spiral-bound Book
This method is by far the easiest, although it does require buying or borrowing a spiral binder–I’ve used this Zutter Bind-It-All for years, and I’m happy with it.
Here’s my tutorial for making an upcycled spiral-bound notebook.
This method of spiral-binding your upcycled journal also has probably the most diversity in materials that you can use since a spiral binder generally has the leverage to punch through some pretty tough cardboard that your awl couldn’t handle. I’ve seen vintage books made into spiral-bound notebooks, with the actual book covers punched and spiral-bound, and they end up looking super awesome.
What’s YOUR favorite method for making a book from upcycled materials? Share it with me in the Comments below!