
 When I shared with you my round-up of clothespins embellishment projects, I left out my own personal favorite. These dyed and glittered clothespins are so saturated with color, so sparkly, and yep, so darn useful that I find myself making up a fresh batch surprisingly often. Read on to see how they’re done:
 The majority of my clothespins are pretty weathered from being used on my outdoor clothesline eight months of the year, but this project works best with the nice, new-looking ones, the ones that lived their former lives on the indoor laundry line, or the ones that I’ve picked up at garage sales.
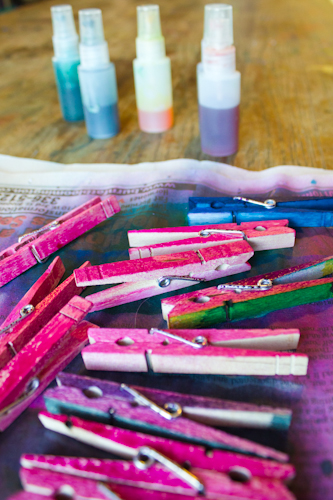
Clothespins are easy to paint with acrylic paints, but my preferred method, as it is for all the unfinished wood that I craft with, is to stain the clothespins using liquid watercolors. You can’t find liquid watercolors just anywhere, but they’re worth the effort to search them out, because a little goes a long way, and you’ll find that it takes just seconds to dye unfinished wood bright pink, or deep blue, or whatever color you want using them.
I’ve previously outlined two methods for using liquid watercolors–staining an object inside a plastic baggie, and staining an object using a small spray bottle filled with liquid watercolors–and both methods work well with clothespins. If you choose the plastic bag method, you’ll find that you have to use a few more drops of liquid watercolors than you do with most other small unfinished wood pieces, because clothespins have so much surface area. If you choose the spray bottle method (which is what I’m using for this particular project), you’ll have the fun of dyeing each clothespin multiple colors, if you wish.
Next >>
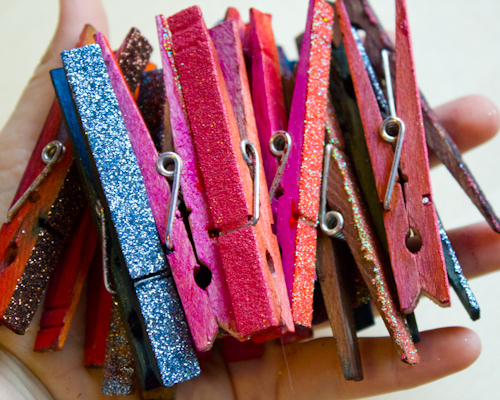
 Let the stain dry completely, then paint one flat side of each clothespin with white glue, and gently dip it into a small tray of glitter (put newspaper on top of the tray, underneath the glitter, so that you can pour it all back into its container when you’re finished).
Next >>
 The interior walls of our house are a mish-mash of plaster and steel lath, painted brick, and wood paneling, so I hot glue these clothespins to most walls (not the wood ones!) to hold photographs and smaller pieces of artwork, knowing that if I ever want to remove them, I’ll just need to pry off the hot glue and touch up the wall paint. My girls have these clothespins glued ALL over the walls and shelves and loft bed in their bedroom, the better to mount play silks and clothesline and other temporary fort/fairy tale structures.
Because if you’re going to make a fairy hideout, then everyone knows that it has to include glitter.


I too have been surprised by how often I make glitter clothespins – at least four times a year and I make a whole package (100?) each time. They are wonderful for attaching tags to gifts, using as magnets, closing bags…
Instead of glitter, lately I’ve been using glitter nail polish. It doesn’t flake off and I already had it on hand. At Walgreens they were less then a dollar a bottle so I bought every color and use it for crafting. Not green, but again, I had it on hand so I might as well use it.
Thanks for a great post 🙂
Pingback: How-to: Make Upcycled Newspaper Popcorn Holders | Crafting a Green World