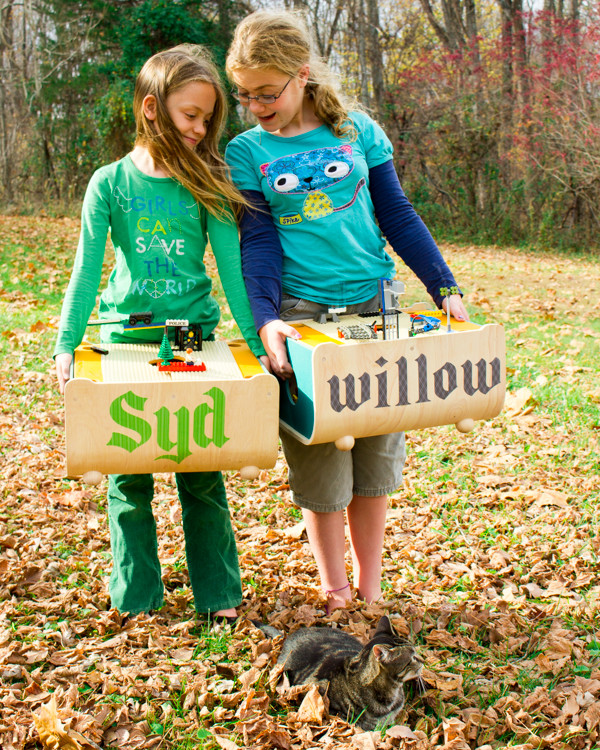
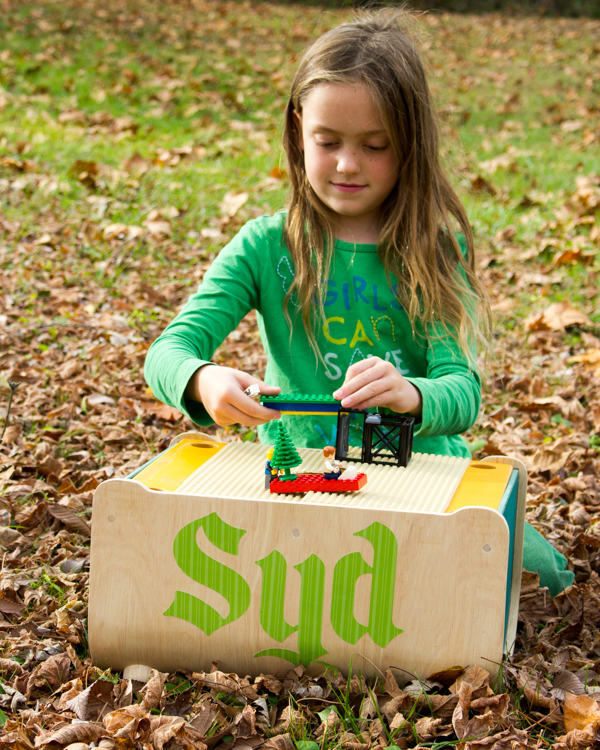
Turn an old toy chest into a DIY LEGO table with plenty of storage inside!
My kids play with LEGOs all over the house and the yard.
This means that we have LEGOs ALL over the house and the yard. The kids act like I’m murdering them every time I call them over to pick up a random LEGO that I’ve found in some random place, I feel like I’m being murdered every single time that I step on one in my bare feet, and who knows how many we’ve lost to the lawnmower and the vacuum cleaner?
When PlanToys gave me two toy chests for free to do something decorative with, I stared at them for a bit, thought many thoughts about their potential, and then decided that these were the LEGO storage solution that I’d been looking for. I monogramed the toy chests so that the kids could tell them apart, and then turned them into portable, DIY LEGO tables with plenty of storage inside. Here’s how I did it!
To make your kids their own DIY LEGO table, you will need:
1. portable toy chests. The PlanToys toy chests work well for this project because they’re wood, not plastic, so the LEGO plates won’t flex and come unglued. They’re also light enough for the children to easily carry around, and there’s a hole in the top center where the children can pop LEGOs back into the chest and fit their arms into to drag out another fistful of LEGOs, all without disturbing the play surface.
2. LEGO plates. I purchased these sand-colored LEGO baseplates as the ones that best-match the toy chests. Why u no make LEGO plates in all colors, LEGO Corporation? To make one LEGO table from this specific toy chest, you’ll need two plates, but to make two tables, you’ll only need three plates.
3. jigsaw. You know I’m a fan of power tools, but only when they do the better job, and if you need to make intricate cuts like the ones that you’ll be making here, a jigsaw is the best tool for the job. If you don’t own one, see if you can borrow one from a friend.
4. measuring tools. I found a gridded surface essential for keeping the LEGO plates squared, but you’ll also need a plain ruler.
5. epoxy glue. E6000 is my glue of choice. You want a glue with a slow drying time, because you’ll absolutely want to squidge the plates around a bit to make sure that they’re correctly spaced. Something like hot glue, which solidifies very quickly, will NOT suit.
5. LEGOs. Essential to this project is the ability to piece together LEGO plates, and that will only work if they’re spaced specifically so that a LEGO can bridge them. You’ll be using actual LEGOs to help you correctly place the plates.
6. bench grinder or sandpaper. You may find that you’ll need to take away some of the cut edge of a LEGO plate, in order to correct its spacing with another plate. A bench grinder or sandpaper is an easy way to sand away this edge.
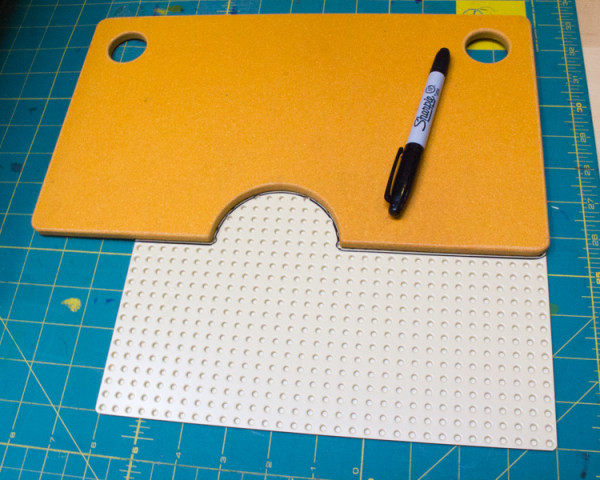
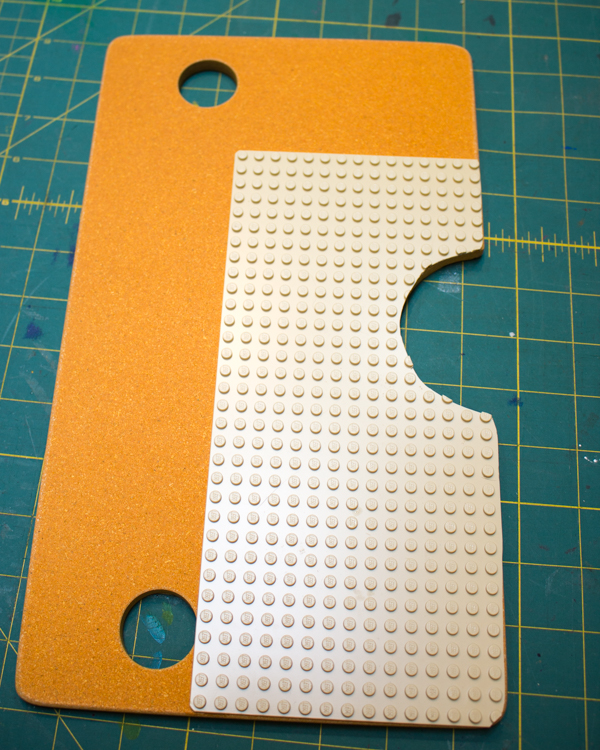
1. Line up and measure your first cut. This PlanToys toy chest has some unique features that I want to preserve. It has two doors on the top of the chest, so my LEGO panels must split there but also keep their correct alignment, so that a LEGO structure can bridge that split.
The toy chest has a large, circular hole in the middle that lets kids get out and put away pieces without disturbing the play surface; I want to keep this hole, so the LEGO panels must be cut to preserve it.
And finally, the toy chest has a circular opening at each corner to make it stackable, a feature that I absolutely want to keep so that the kids can stack their LEGO tables, and anyway, I can’t put LEGO panels too near the hinge edges, or the doors won’t open properly. After fussing with lots of ideas, I finally decided to simply end the LEGO panels 2″ from each hinge edge and solve both problems at once.
If you’re using a different type of toy chest for this project, then you, too, will need to think through all of these structural and design scenarios. In particular, consider using double-sided tape to temporarily stick LEGO panels to the play surface to experiment with the way that they’ll affect any moving or stackable parts.
Another feature of key importance is the alignment of the LEGO plate. If you place it on the table crooked, then every other plate that you place will also have to be crooked. To solve this problem, I first squared the LEGO plate upside-down on my gridded cutting mat, then squared one of the two doors on top of it. Then I could trace the edge of the door onto the LEGO plate, curve and all.
2. Make the first cut. Clamp the LEGO plate to your work bench using C-clamps, and cut along your traced line with a jigsaw:
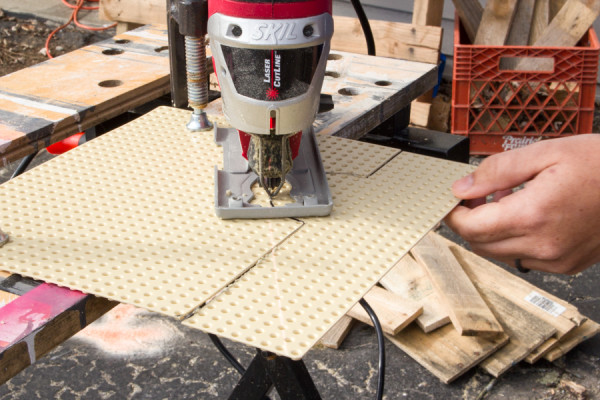
The jigsaw generally gives a clean cut, but you can use sandpaper or a bench grinder to smooth any jagged bits.
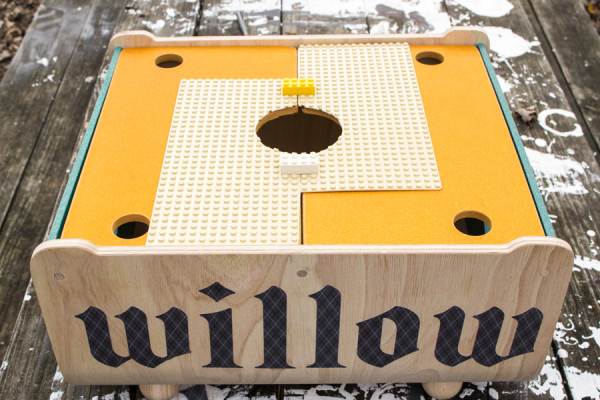
3. Place the first piece. Glue the LEGO panel onto the play surface, double-checking that it’s not overlapping any of the edges:
Take a break to let the glue cure.
4. Add other panel pieces to the first. Now that you’ve got one panel placed, you’ll be relying on this one to keep all of your other panels aligned correctly. Measure, cut, and place your next largest piece, using LEGOs to bridge the gap between the two panels as you measure and as you’re gluing it, in order to keep the alignment between them correct:
Remember that you may need to grind away an edge, or that you may have a slight gap between two panels, in order to keep the alignment correct.
When you’re ready to cut and place the smaller pieces, you may find that you no longer need to measure with a ruler. I filled in those last two corners simply by laying panel pieces there, then eyeballing which two rows to cut between. Again, don’t forget to use actual LEGOs to bridge the gaps between two adjacent panels, on every single panel, at every single edge.
Optional: add a drawstring bag. Not shown in this particular tutorial (I’ll show it to you another time!) are the holes cut into two sides of this toy chest. The holes serve as handles so that the child can carry the chest, but they also let LEGOs fall out. To solve this problem, I sewed up a large drawstring bag that lives inside each toy chest. Open, it simply lines the inside of the toy chest, letting the kids use the handles without allowing any LEGOs to fall out. If I need to clean out the toy chest or use the LEGOs somewhere else, however, I can simply cinch the drawstring closed and carry off the bag of LEGOs.
PlanToys gave me these toy chests for free, because I can’t write about something if I haven’t glued LEGO plates to it!