
In an effort to save money during the remodel of my bathroom, and being somewhat green at the same time, I decided that instead of buying a new bathroom sink and vanity, I would clean up the sink and refinish the vanity.
I purchased an over the toilet cabinet in a rich java color that was my inspiration for the vanity color choice. I couldn’t strip and stain the vanity because only the front is real wood and the sides are some kind of thin wood board with a sticker veneer over them. Yuck, but I worked with it.
I was afraid I’d never be able to sand it down and make it look good. Many times during the redo I was sure it was going to turn out horrible but it didn’t.
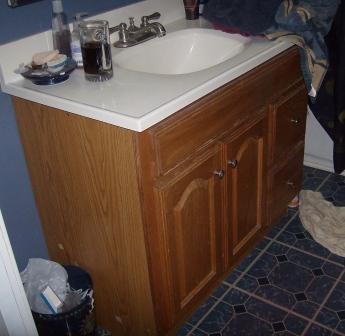
This is what I started with. The vanity and sink are less than ten years old and in remarkably good shape for the abuse my family tends to put things through.
So refinishing was a good option to save money and save something that was perfectly usable.
My husband removed the vanity from the bathroom and hauled it downstairs for me to to work on. I took the off the doors and drawers and the hardware and started sanding.
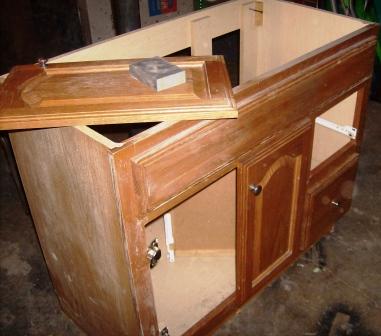
After sanding by hand for awhile and getting nowhere I went in search of a tiny handheld sander. I then finished sanding in no time.
I didn’t completely strip everything, just sanded it enough to get the outer finish off and rough it up so the paint would stick.
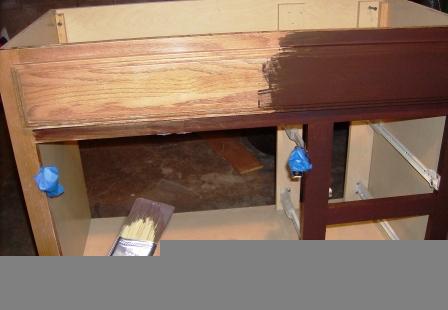
I was worried that the paint wouldn’t match up to the stained cabinet since stain has a variance in color you just don’t get with paint, so I grabbed my acrylic paints and blended black and red into the java paint to give the overall finish a subtle color difference.
After letting the paint dry overnight I applied a clearcoat over the top to protect my paint job.
At first I thought it looked terrible. I didn’t think I got the right clearcoat to use over paint. But after it dried (overnight) I lightly sanded it with fine steelwool and added another clearcoat. (Note: be sure to clearcoat in a well ventilated area because it stinks)
I let the second coat dry overnight and inspected everything. I decided I liked the finish and left it alone after the two clearcoats.
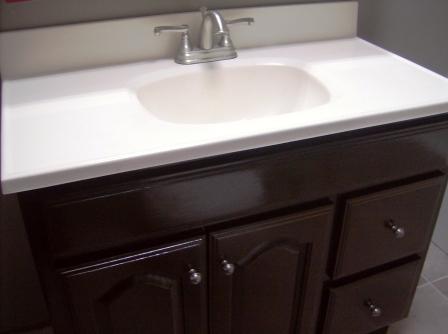
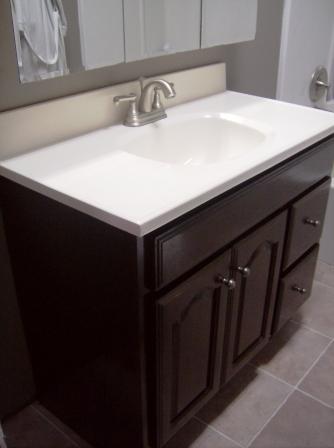
This is the finished product. I am particularly proud of this because it is my first redo that is all mine. I had no help on this one other than the hubby hauling it downstairs for me.
I used satin finish latex paint and a satin finish poly clearcoat. So the end result is a slight gloss that isn’t over glossy. It looks shinier in the photo than it really is thanks to the flash. I added new brushed nickle knobs, they are a pewter color and I got rid of the old gold ones (which I saved, they may come in handy for some project down the line).
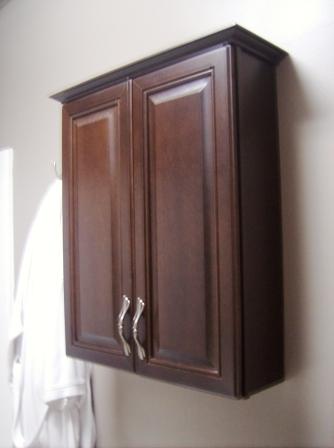
I think the two cabinets ended up matching pretty well even though one is painted and one is stained.
I am super picky yet I’m happy with the results so that’s saying something.


nice !!!!
try the site
http://xmjuli.com
I love the finish you chose! I’ve been looking at a similar finish called ‘espresso’: http://www.tradewindsimports.com/39-la-lune-single-bathroom-vanity.html This one is made of oak. Do you know what type of wood is best? I’ve read oak is one of the best types of wood to use. Do you know what type of wood your vanity is? It looks fantastic!
It looks great! We are looking for an economical option to replacing our circa 1978 vanity which is solid wood, but has been painted over the original stained finish. Removing the cabinet to refinish it is a great idea, to make sure you get a thorough sand without suffocating in the bathroom! Great job!
DecorPlanet.com, the premiere online retailer for luxurious but affordable bathroom vanities and accessories, recently launched a new interior doors section
Great job! I’m going to be redoing mine this summer.
Looking to do something similar… may I ask what paint product(s) you used & how they are holding up? Thanks!
used regular latex paint and a water based clear coat. They have held up pretty good.