
In the fifteen years that my partner and I have been together, he has suffered through many gift exchanges. For Christmas last year, he gave me a new laptop computer and I gave him a scratchblock for an upcoming aluminum pour. For our birthdays last year, he gave me a book I’d been wanting and a gift card to our local indie sewing machine store, and I gave him the promise of a Star Wars T-shirt quilt…that I still haven’t finished (oops!).
Handmade has finally equalized the gift exchange, however. For our recent anniversary, Matt gave me the panini press that I’d really, really, really been wanting, and I gave him a smash book, altered from an old children’s book, that chronicles our fifteen years together.
If you’ve read Mahe’s post on upcycled smash books (if you haven’t, then go do it now!), then you know that smash books are quicker, easier, and more creatively amenable to recycled components than traditional scrapbooks can be, and frankly I much prefer the look of a smash book to that of your typical carefully engineered scrapbook. If you’d like some more examples, then please feel free to take a look below at my own upcycled smash book–it’s by no means perfect, but the beauty of a smash book is that it isn’t meant to be perfect. Instead, it’s meant to be meaningful, fun, crafted with lots of upcycled materials and stash components, and beloved by its recipient.
And that it is!

To make my particular upcycled smash book, I grabbed an old children’s book from my stash, one that I’d acquired for free from some local book sale or thrift store or somewhere. I made sure that the binding was still sturdy and that the pages were still firmly attached to the binding and in good shape–brittle pages wouldn’t hold up to all the stuff I’m going to throw on them, and a book with a broken binding is just going to fall apart on you while you’re working.
Some pages of the book, I gessoed and then painted with artist’s acrylics. Some pages I colored over with Prismacolor colored pencils or markers, to allow the background text and illustrations to show through without being overwhelming. Some pages I completely decoupaged with other paper, such as vintage sheet music or my daughters’ artwork. Some pages I covered completely with fabric or novelty duct tape. And some pages I did nothing to. The rest of the pages, consisting of over half of the book, I cut or ripped completely out, to give more room to the three-dimensional embellishments that I knew I was going to add. Those pages went straight to my vintage papers bin, ready and waiting for a future project.

The next part of making my smash book looked something like planning a scrapbook. I took a dive through fifteen years’ worth of special papers and special memories, finding things like our older daughter’s birth announcement, or some issues of the comic strip that my partner and I used to create for the student newspaper at the university I got my Master’s degree from, or a photo of us taken with our group of friends in my old undergrad apartment. I made lists of the huge number of graphic novels my partner got me into, and all of the very crazy things that happened to us during one cross-country road trip we took the year after we got married, and I had my girls draw pictures of all of us together, and write reasons why they love their Daddy.
And then, roughly one theme to a page, in absolutely no chronological order, I laid everything down onto the pages of my book. In a smash book it’s okay if the glue shows a little, so I used everything from Elmer’s glue to hot glue to staples to wet paint to adhere my main text and images, and if I was ever in doubt about something, I sprinkled some glitter on it.

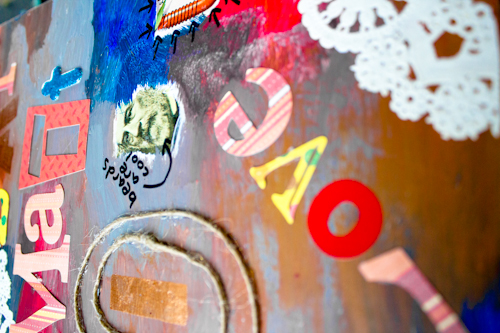
In my world, the more embellishments the better, and adding embellishments to my smash book was by far my favorite part of a very fun project. For about a week, I kept my book hidden when my partner was around, but I hunted for recycled bits and pieces all the time, and added them to my book whenever he turned his back. I fussy-cut stars and flowers from old greeting cards and vintage wallpaper, words from scavenged books, images from my daughters’ artwork, and letters and shapes from stash scrapbook paper. I used an old strand of plastic beads to edge one page, a pipe cleaner twisted into a bow to top another, and stash twine glued down to frame images and text.
Sometimes I wrote directly onto pages, sometimes I stenciled words onto them, and sometimes I used combinations of stickers, die-cuts, stencils, and handwriting to make words. I rubber stamped hearts and letters, glued down random pages of writing and circled in marker the important words, typed memories into my word processing program and printed them on the back sides of my kids’ math worksheets.
I added bits of vintage paper doilies, crayon wax seals, my daughters’ colored dried pasta, old Valentines, pinback buttons, ticket stubs, and yes–lots and lots of glitter. And lots and LOTS of glue!
In the end, my smash book definitely wasn’t perfect. There may, in fact, have been just slightly too much glitter. And glue–I very possibly got a little over-enthusiastic with the glue. The crayon wax dripped where I didn’t want it, and the watercolor on one page bled where glue on the backside of that page soaked through (I used a LOT of glue!). My book is messy, and elaborate, and exuberant just like I am, and has all the good inside jokes, not too much schmoop, and only a couple of embarrassing photos from my partner’s fifteen years with me.
In other words, yeah–it actually is perfect.


That is awesome! What an awesome way to celebrate your time together.
This is tempting me to create a family gathering just to create a few of these. Think of the stories and the laughs. Yep I see a few girls nights coming soon.
Pingback: Crafting a Green World | Use Faber-Castell Pitt Pens to Draw on Wood, Rocks, and Shells | Crafting a Green World
Pingback: Crafting a Green World | The home for green crafts and tutorials!