

We are DEEP into Girl Scout cookie season here in Indiana, my Friends. As the troop leader to several little girls who are very invested in their business goals, I can really only speak to you intelligently about Girl Scout cookies this month–my brain has no room for anything else.
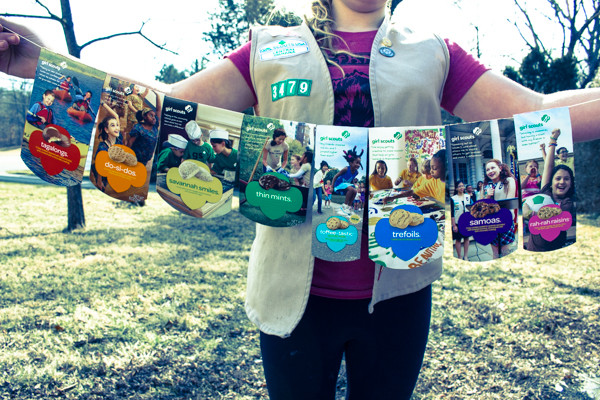
To that end, while helping the girls decorate their cookie booth (cookie booth decoration is a crucial component of the cookie selling business, as I’m sure you know), I came up with this quick and easy bunting that makes use of the empty cookie boxes of Girl Scout cookies already devoured. It’s a cute and colorful decoration for a kid, especially if she’s a Girl Scout, and it’s an excellent one for a Girl Scout cookie booth, as it shows off all the different types of cookies that are on offer.
To make a Girl Scout cookie box bunting of your own, you will need:
one of each type of Girl Scout cookie box. Buy them from your local Girl Scouts, or email me and I’ll send you a link to my girls’ online cookie shop. They accept credit cards, and they ship across the US! I know, I know. Kids these days…
cutting and tracing tools. As you’ll see, I’m simply using a small plate as a tracing template for my bunting. Any kind of shape would be cute, however, especially the bottom of a Girl Scout trefoil.
masking tape. It’s low tack, so it’ll hold during cookie season, but it will be easy to rip off afterwards so that you can recycle the boxes. If you want to keep your bunting longer, consider using a stronger tape.
twine. The boxes are so colorful that the twine doesn’t have to be anything super cute, but if you DO have something cute, such as baker’s twine or ribbon, go ahead and use it.

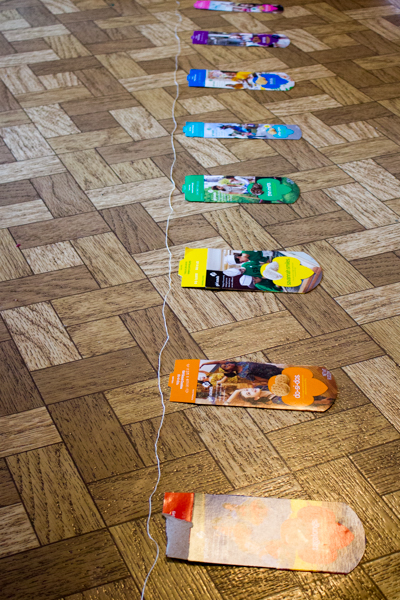
1. Cut out the box fronts. Cut off the entire front of the box as one piece, INCLUDING the top flat. Keeping that top flat attached to the box front is crucial–do NOT cut it off!!!

Do you want to know how many times I kept accidentally cutting off that top flap as I was cutting off box fronts? So many times, sigh.
2. Trace and cut out the bottom edging. You could leave the box bottoms flat, but it’s cuter to make them into some sort of shape, even if it’s just the simple curved edge that I did. You might be tempted to cut the boxes into a traditional triangular pennant, but I tried that, so I can tell you that doing so cuts off most of the picture of the cookie, so it isn’t really cute.
3. Arrange the boxes and lay out the twine. We needed our bunting to go across the front of a six-foot table, so we measured the twine accordingly. If you don’t have a specific measurement in mind, you can instead unspool the twine as you go.
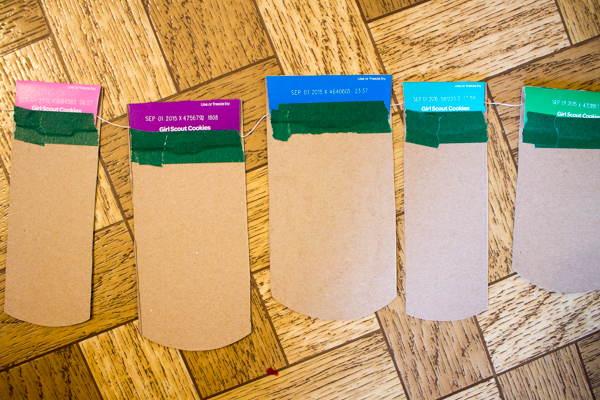
4. Tape the boxes to the bunting using the top flap. This why you had to keep that top flap! Fold the top flat down over the twine, then tape it into place. Your pennant is neatly attached, with no visible tape.
If you’re into some other sort of product with cardboard packaging, you can, of course, substitute that for the cookie boxes called for in this tute. I personally think that a cardboard record album cover bunting would be AWESOME!


It’s not bad