
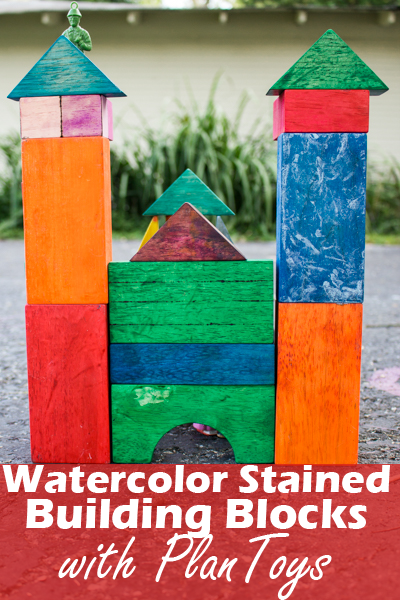
I’m going to show you how to make stained building blocks using one super simple and readily-available art supply: liquid watercolors.
I happen to love undyed, unfinished building blocks–I think they provide a little more scope for a child’s imagination, you know?
However, sometimes you just want something a little more colorful, a little more personalized. A building block makeover, if you will.
Take these particular building blocks. PlanToys gave them to my kids for free specifically so that we could do fun stuff to them, give them a makeover to personalize them. And frankly, I think that’s how all building blocks should come–undyed and unfinished so that you can make them over yourself.
Who wants to buy building blocks already painted, when you don’t know what’s in the paint?
Who wants to buy building blocks sealed and varnished, when you don’t know what’s in the varnish?
Who wants to buy building blocks that are in primary colors, when you know good and well that your kid only likes pink and navy blue?
For instance, we want to give this particular set of blocks to my toddler nephew for Christmas, so we wanted to make them special just for him–a kind of store-bought+homemade hybrid. We stained the blocks in vibrant colors, the kids drew pictures on them that I wood burned, and we sealed them to be toddler-safe. I’m going to show you the entire process this week, but for today, I’m just going to show you how to make stained building blocks using one super simple and readily-available art supply: liquid watercolors.
Watercolor Stained Building Blocks
It’s so easy! Here’s what you need:
building blocks. We’re using this set of 50 unit blocks from PlanToys, and this method is also a great way to make over your own old building blocks that are looking really beat-up–just give the old ones a good sanding to take the stains and dings out.
liquid watercolors. Choose liquid watercolors that are NOT washable for this project. I’ll go into my general beef against “washable” art supplies at another time (and tell you the story of the dad who refused to let his kid do my Christmas craft at a holiday party one year because I didn’t have any washable markers–chill out, Random Dad!), but suffice to say–you don’t want your kid’s blue-stained building block to color her tongue blue if she licks it.
An alternative to liquid watercolors, if you’d like to paint detailed images on your building blocks, is, of course, a set of regular cake watercolors and a paint brush. The effect looks less like stained blocks and more like painted blocks, but that’s also pretty.
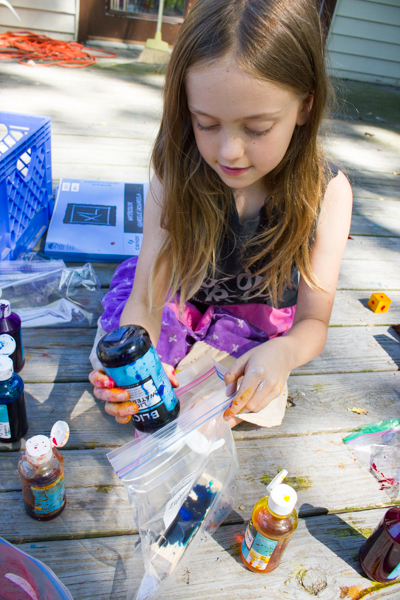
plastic baggie. I don’t love to use plastic baggies, but honestly, it’s the best tool for the job in this project. To make it less of a resource drain, label each bag with the color that you used, seal it up, and store it with your watercolors–it’ll stay fresh for your next project.
old dishcloth, soap and water, etc. This project is messy, messy, messy!
sealant. I’m actually going to discuss the process of sealing these blocks in my Wednesday post, as part of the wood burning tute, but know that these blocks will need to be sealed for a small kid, either with a beeswax polish (less effective, but completely natural) or a clear sealant (most effective, but not natural).

 1. Set up your watercolor staining station. This is a messy project! My younger daughter and I headed out to the back deck for this project, and she and I both needed showers afterwards–actually, I needed two showers, because I didn’t notice the blue stains all over my feet, of all places, the first time around.
2. Pop a block into a plastic baggie. A gallon-sized Ziplock bag works for blocks both big and small; don’t forget to label it with your color so that you can reuse it for all kinds of projects later.
3. Add several drops of liquid watercolor. Obviously, the amount of watercolor that you add depends on the size of your building block; regardless, go easy at first, because a little goes a LONG way. You can always add a couple more drops of liquid watercolor to the baggie, but if you add too much, not only is it even messier, but you’ll have to wipe off the excess from the stained block or it’ll dry streaky.
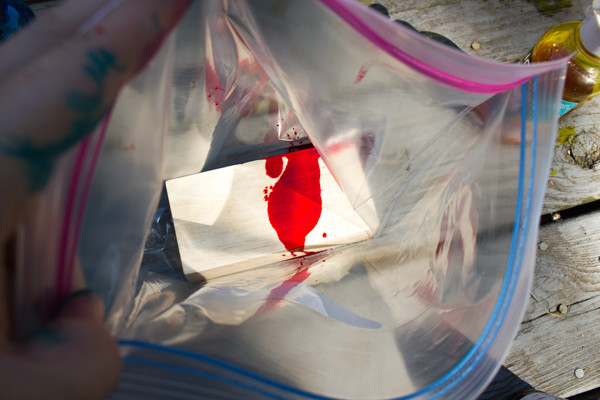
4. Close the baggie, and work the watercolor into the block. This mostly a matter of squidging the dye around the block inside the baggie. A little drop of liquid watercolor really does go a long way, so make sure that you’ve smooshed every single little drip of liquid around your building block before you add another drop of dye.

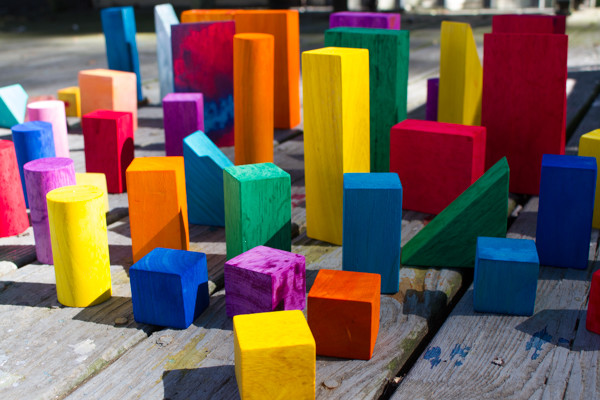
5. Remove the block and pat it dry, if needed. Remove the block with clean fingers or a clean bit of old dishcloth–if you pick it up with fingers that already have another color of watercolor stained on them, you’ll stain this freshly-dyed block, as well–and set it to dry on a clean, dry surface. We’re just using the deck, because the surface of our deck is nothing special, but newspaper also works well, of course.
6. Let it dry. Let these blocks air out completely for at least 24 hours before you embellish them further or seal them.
These blocks are gorgeous and vibrant and fun just as they are, of course, but if you’d like to know how to also add details and entire drawings–especially kid drawings!–to them, then check back in here on Wednesday, when I’m going to show you how to wood burn them for even more awesome results.
I received a free set of 50 unit blocks from PlanToys, because I can’t write about new building blocks unless I’ve stained them, the back deck, and my hands up to the elbow while I’m at it.


Pingback: what watercolors are staining - WaterColor Web