

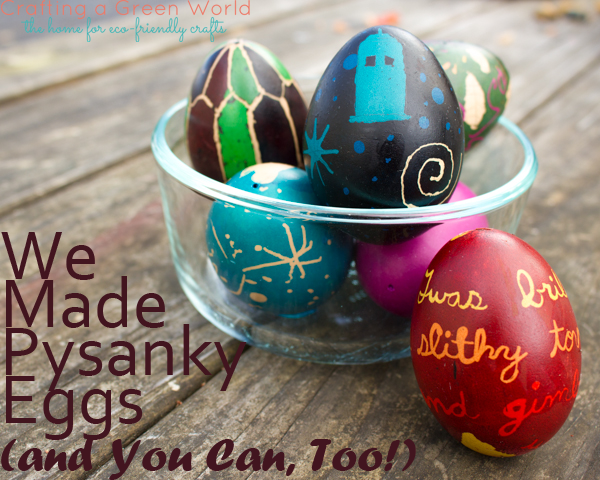
If you like the idea of dyeing Easter eggs, but find the reality of the process a little… I don’t know, basic?… then you’re going to LOVE pysanky.
Pysanky is like Egg Dyeing: Master Level, except that it’s actually quite accessible–my eight-year-old did it, and my ten-year-old, and my husband, and fumble-fingered ME!
Pysanky does take a few specialized supplies, however, and a lot more time than conventional egg dyeing, so it’s definitely not an activity to try to cram in the day before Easter. With a bit of advanced preparation, however, this project made a lovely Sunday afternoon activity that my entire family enjoyed (and much more than the adults, at least, would have enjoyed simple egg dyeing!). We were entertained by it, we were able to do it even though we’re all newbs at it, and we were all pleased with the results of our work.
Here’s what you need to get started with pysanky, too!
1. kistka. These aren’t pricey, so go ahead and buy one for every participant. Normally, I don’t recommend the purchase of tools that you can only use for a single type of project, BUT… I have some other plans for these kistka. I’ll keep you in the loop.
2. pysanky dyes. Unlike the traditional pysanky dyes of old, these dyes are NOT natural. What they are, however, is super-saturated, and they layer well, both of which are key to achieving the vibrant, multi-layered look of a pysanka.
If you’re not comfortable with non-natural dyes, however, you can still do this project; simply substitute the natural egg dye of your choice, then dip the egg for only one color. The results won’t be as elaborate as these pysanka, but they’ll still be really cool!
3. eggs. Since these pysanka take so much time, I like to make them into keepsakes. I use our own chickens’ eggs, and I blow them out so that I can preserve them. If you’ve got access to duck eggs, even better–they’re bigger!
4. beeswax. In my family, beeswax IS a multi-purpose supply. We use it for everything from candles to craft supplies.
5. candles and/or a heat gun. You’ll need a candle to melt the wax in your kistka as you work. Many tutes also use the candle for melting the wax off of the egg at the end, but after trying it both ways, everyone in my family agreed that the heat gun was way easier to use for this.
6. towels. The dyes may stain fabric, even in the washing machine, so we chose to use paper towels, blech.
1. Prepare the dyes. Follow the directions on your dye package for this. I was told that these dyes last for a long time, so the kids and I prepared them early, stored them in glass Mason jars, and plan to use them for all of our dyeing and egg crafts this spring.

2. Prepare your work surface. Lordy, this is a messy project! Your preparations should include covering everything with newspaper, lecturing the children about candle safety (my ten-year-old still managed to burn herself) and finding safe places for the candles, and, if you have more common sense than we do, putting on gloves. We just washed our hands frequently to avoid muddying the eggs–the dyes don’t stain skin.
You can also chop off little bits of beeswax to set aside for each person; the kistka is small, and has to be fed often with small pieces of beeswax.
Finally, it’s a good idea to check out some videos and demonstrations of the process before you begin. This Ukrainian egg tutorial is an excellent (eggcellent?) walk-through for a beginner, and these videos are really good for visual learners.
3. Draw your design. Draw very lightly with a pencil, although I think that my eight-year-old’s pencil marks add lovely detail to this pysanka:

4. Draw the first lines of beeswax. Whatever color that you draw the beeswax on will be the color of the line that you end up with. If you don’t want to start with the white or brown egg as your first color, you may dip dye the egg with another light color first.
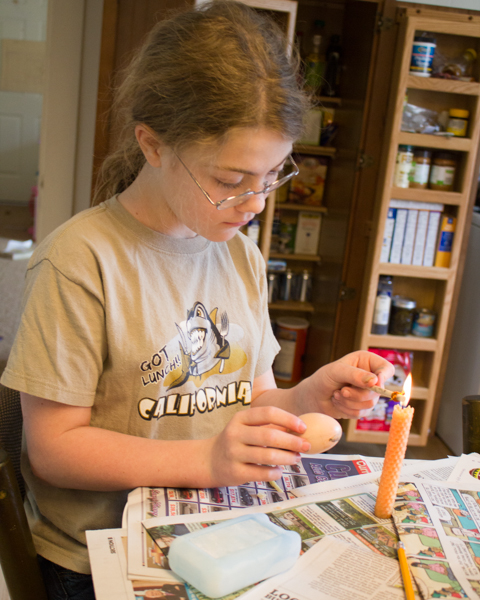
Push a bit of beeswax into your kistka, then hold the bottom of the funnel to the candle flame. When the beeswax begins to flow, you’re ready to draw.
Draw on the spread-out newspaper plenty before you draw on your first egg, so that you get the hang of it.
You’ll need to periodically reheat the kistka as you draw, and often stop to reload it.
If you’ve blown out your egg, also use this time to fill the two holes with beeswax–you don’t want to dye the INSIDE of your egg!
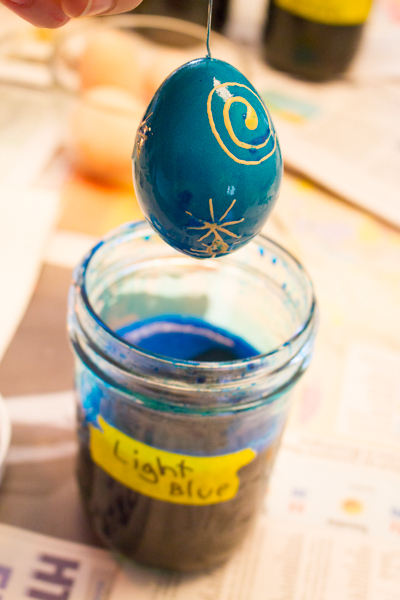 5. Dip dye the egg. Choose the lightest of the colors that you’ll use, and dip dye the egg. Your package instructions will likely recommend a time of 1-5 minutes.
After you remove the egg from the dye, pat it dry, both to keep the color even, and so that this project doesn’t take 14 years to complete as you wait for each successive color to air-dry.
 6. Repeat steps 4 and 5. Draw new lines of beeswax, remembering that the color that you draw your beeswax on is the color that the line will be.
Continue dip dyeing your egg, going from light to dark. Use this color sequence to help figure out the order of the tricky colors.
7. Melt off the beeswax. In my family, everyone found it easier to use a heat gun for this. Instead of the varnish that some tutes recommend, I rubbed a thin layer of the melted beeswax over each egg as I held it over the heat gun–this gave the egg the shine and protection of varnish, without that extra step.
This project was SUCH a big hit with everyone in my family. Even the “kid who doesn’t like art” liked it, and the kid who loves art spent ages happily making several intricate pysanka.
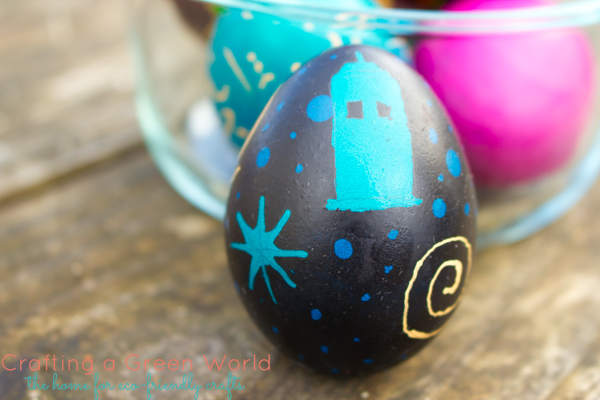
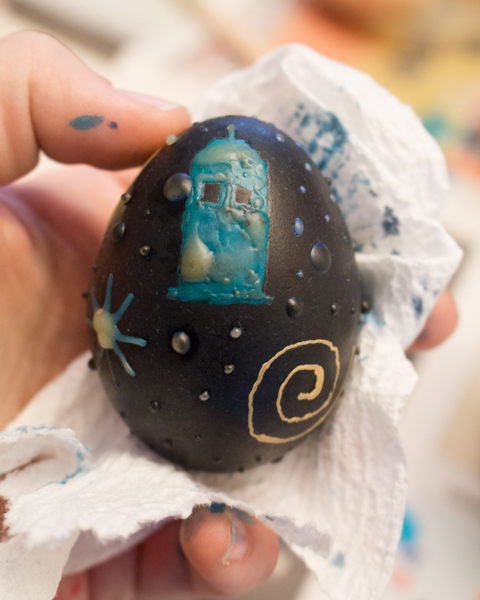
And, of course, my TARDIS pysanka is my new favorite thing.


Pingback: From Our Friends: March 20, 2015 - Organic Authority