The weather is getting colder, and we have a handmade holiday on our minds! Handmade gifts have heart, are better for the environment, and, if you opt to buy, it supports independent artists! Over the next few weeks, we’re going to be posting about recycled gifts you can make yourself and great handmade finds for sale.
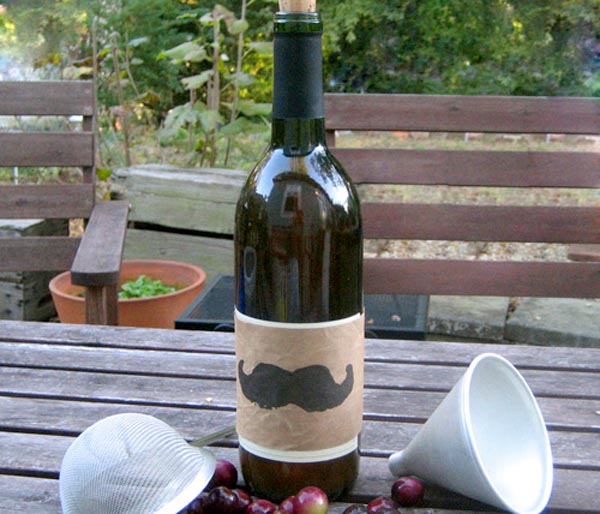
A bottle of wine makes a great hostess gift for holiday parties, but the wine industry is far from green. Between the fertilizer used to grow the grapes, fossil fuels to run farm equipment, bottling, and shipping processes, it takes a lot to get that wine from the vineyard to the package store. Instead, you can pick up organic grapes or berries and make your own with a custom, upcycled labels!
I decided to make my own wine after a trip to a local farm, where we came home with almost a gallon of muscadine grapes. A little searching turned up this home made wine recipe, which you can use with grapes, berries, or even apples! Here’s what you need:
- 1 quart of mashed local and/or organic fruit
- 3 quarts of water
- 6 cups of sugar
- 1 packet of yeast
- a one-gallon, air tight container
- a funnel
- a strainer or cheesecloth
- 4-6 empty glass bottles, for decanting (I collected empty wine bottles and corks from friends’ recycle bins and washed the bottles out)
- recycled paper, for labeling
- tape to attach the label, measuring tape, scissors, and supplies to decorate
These are the directions for Kirk’s Muscadine Wine:
Dissolve the sugar in the water, and mix in the mashed fruit. Sprinkle yeast on top. Do not stir until the next day, then stir the mixture once a day for a week. Strain off the liquid into your air-tight container, and set in a cool, dry place to ferment for 6 weeks. Strain your wine again into the bottles you collected, leaving one empty bottle. Cork them lightly for 3 days to allow for any more fermentation to cease. You’re ready now to strain one last time! Strain the first bottle into the empty one, then rinse and repeat until all of the bottles are strained and ready to be decorated.
Grab your paper, tape, and decorating tools. You’ll want to completely cover the bottles’ previous labels, so use your measuring tape to see how tall the labels need to be. Wine bottles are not all the exact same size, so also measure the circumference. Cut your labels and decorate however you like. I kept it simple, using my mustache stamp on each label. Once you have your labels how you want them, use a piece of tape to attach one end to the bottle, wrap it around, then use either another piece of tape or a glue stick to close it off.
There are some earth-friendly wines out there that have greener packaging or are produced more sustainably, if you don’t have time to whip up a batch of your own. There’s a real sense of satisfaction that comes from drinking that first glass that your made yourself, though!


That sounds like a nice, simple recipe for a beginning wine-maker. Everyone should try making their own wine! I’d also like to add that most home-made wines benefit from aging from 6 months to a year. I personally prefer to wait at least 6 months before doing the final bottling, just to avoid exploding bottles! I know that is a long time, but it really can improve the wine. So if you taste your first bottle and it’s not to your liking, put the other bottles away and let them age for a few months. Also, you’ll have a better chance of success if you wash all of your equipment REALLY well, or better yet, soak it in a bleach solution and rinse. Wild yeasts are everywhere, and having sanitary equipment reduces the chance of contamination, which could lead to sour or funky wine.
That sounds like a nice, simple recipe for a beginning wine-maker. Everyone should try making their own wine! I’d also like to add that most home-made wines benefit from aging from 6 months to a year. I personally prefer to wait at least 6 months before doing the final bottling, just to avoid exploding bottles! I know that is a long time, but it really can improve the wine. So if you taste your first bottle and it’s not to your liking, put the other bottles away and let them age for a few months. Also, you’ll have a better chance of success if you wash all of your equipment REALLY well, or better yet, soak it in a bleach solution and rinse. Wild yeasts are everywhere, and having sanitary equipment reduces the chance of contamination, which could lead to sour or funky wine.
That sounds like a nice, simple recipe for a beginning wine-maker. Everyone should try making their own wine! I’d also like to add that most home-made wines benefit from aging from 6 months to a year. I personally prefer to wait at least 6 months before doing the final bottling, just to avoid exploding bottles! I know that is a long time, but it really can improve the wine. So if you taste your first bottle and it’s not to your liking, put the other bottles away and let them age for a few months. Also, you’ll have a better chance of success if you wash all of your equipment REALLY well, or better yet, soak it in a bleach solution and rinse. Wild yeasts are everywhere, and having sanitary equipment reduces the chance of contamination, which could lead to sour or funky wine.
In the first step, before it gets poured into the air-tight container, does it matter what sort of bowl I use? Metal, plastic, glass…?
And by mashed fruit, does that mean just take a potato masher to the fruit, or should I put it in a blender, or something?
In the first step, before it gets poured into the air-tight container, does it matter what sort of bowl I use? Metal, plastic, glass…?
And by mashed fruit, does that mean just take a potato masher to the fruit, or should I put it in a blender, or something?
In the first step, before it gets poured into the air-tight container, does it matter what sort of bowl I use? Metal, plastic, glass…?
And by mashed fruit, does that mean just take a potato masher to the fruit, or should I put it in a blender, or something?
I’d stick to a wood or glass bowl, so that the juice does not pick up any sort of metallic taste.
A potato masher would be perfect! We don’t have one, so I just used my hands. My sister joked that I should have mushed them up I Love Lucy style!
Hmm. While it seems like fun -this could be a dangerous idea!! Definitely avoid anything metal – use wood or glass as previous poster suggests. Avoid plastics or metal when working with liquids and/or doughs! 🙂
Hmm. While it seems like fun -this could be a dangerous idea!! Definitely avoid anything metal – use wood or glass as previous poster suggests. Avoid plastics or metal when working with liquids and/or doughs! 🙂
Hmm. While it seems like fun -this could be a dangerous idea!! Definitely avoid anything metal – use wood or glass as previous poster suggests. Avoid plastics or metal when working with liquids and/or doughs! 🙂
i live on the lake and stubled upon a very overgrown vine but the ripe ones fall into the lake.i will try this bacause all the other recipes call for like 30 lbs which i do not have acess to
i live on the lake and stubled upon a very overgrown vine but the ripe ones fall into the lake.i will try this bacause all the other recipes call for like 30 lbs which i do not have acess to
i live on the lake and stubled upon a very overgrown vine but the ripe ones fall into the lake.i will try this bacause all the other recipes call for like 30 lbs which i do not have acess to
Pingback: Home Made Soda is Fun, Fizz, and No More Plastic Bottles
Hi – I just stumbled on this because I’m interested in trying to make my own wine & this seems SO SIMPLE!! I really want to try your recipe & i appreciate you sharing! What type of airtight container would you suggest using? Also when you say a “packet of yeast” – is this literally the regular yeast you find in the baking aisle at the grocery store for bread? I guess I thought I needed more complicated ingredients & supplies! TIA for your help!
Pingback: 10 Scuppernong Recipes and a Farewell to Laurel | Vegetable Husband
Pingback: Eat Drink Better | Healthy recipes, good food: sustainable eats for a healthy lifestyle!
Pingback: Eat Drink Better | Healthy recipes, good food: sustainable eats for a healthy lifestyle!