

 Technically, my girls do have enough clothes. Frankly, thanks to my loves for thrifting and sewing, they have a shameful amount of clothes, from vintage band shirts to hand-sewn bloomers. However, every now and then one child or the other suffers a lack of some thing in her wardrobe.
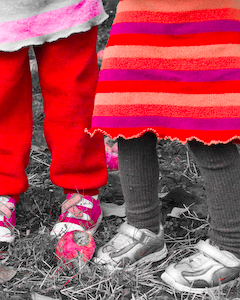
For my younger daughter, Sydney, who is as roughneck as any little kid but who adores skirts and dresses, this lack came about with the chill autumn breeze, when I realized that she didn’t have any skirts or dresses that were made for cool weather.
Fortunately, if there’s one thing that I have a shameful stash of, it’s vintage or thrifted fabric and clothing for reconstrution.
Sweaters are so nice and soft and comfy, why on earth should they be worn only on one’s top half? I often felt wool sweaters that I thrift or am given to make everything from stockings to stuffies, but for the sweaters that are especially beautiful or especially soft (mmm, vintage cashmere), I have a special use—if they’re big enough, and while my girls are small enough, I make skirts for my girls out of the sweater torsos.
Mine is certainly not the only sweater-to-skirt project in the world (check out Whip Up and Second-Time Cool), but like all my favorite projects, my skirt is quick to sew and quick to wear, and forgiving in method and forgiving in fit. It’s easy to make, easy for little girls to slip on and off, sports an elastic waist that will fit both my three-year-old and my kindergartner, and is comfy worn with thick tights or layered over pants. Here’s how to o it:
You will need:
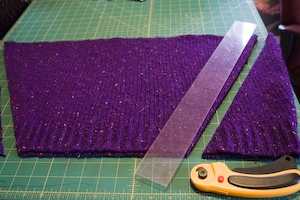
- An adult-sized sweater. The bigger the sweater is, the more flare you’ll have at the bottom of your skirt. A nice, supple wool sweater works well here (definitely not felted), and I’ll even use acrylic if I really like the pattern, but a cotton sweater works the best.
- Self-healing cutting mat, ruler, measuring tape, and a rotary cutter or fabric scissors.
- Sewing machine with a stretch needle installed and capable of doing a zig-zag stitch (and, ideally, an overcast/blanket stitch)
- Length of half-inch-width elastic
 1. Measure your child’s waist. Depending on the width of your sweater, you can add anywhere from just three-quarters of an inch or so for ease and seam allowance or a couple of inches for growth to this measurement.
2. Lay out your sweater upside-down on your cutting mat, centered. Divide the waist measurement for this skirt by four, and measure out that distance on both sides from the center point, at the waist hem of your sweater. This is the waist of your skirt.
3. On each side, cut a straight line down and out from either end of the waist measurement to a point that is the appropriate length and width for your skirt. I like my skirts to flare out as widely as possible, and I make them as long as the sweater allows to allow for maximum growth.
4. Now you’re at the bottom hem of your skirt, and you should have what looks like three-fourths of a trapezoid. Connect the two lines to finish your trapezoid and make the skirt’s bottom hem. A straight line is the easiest to get symmetrical , but a line that curves slightly outward and then back in will give a nicer shape to your finished skirt.
5. Facing the two fronts of the skirt together, sew them together at both sides. For the best results, use an overcast or blanket stitch. Otherwise, set your machine to a wide zigzag and a narrow length between stitches, and position the seam so that the zig-zag wraps around the seam. I like to do this because it’s quick but leaves the seam looking pretty finished and neat.
6. Using the same type of stitch, sew all the way around the bottom hem of your skirt. To put a nice lettuce edge on the hem, stretch the fabric as you’re sewing it.
 7. Turn the waist of your skirt about three-quarters of an inch to the wrong side (I often eyeball this), and sew it down with a zig-zag stitch, leaving an opening to thread your elastic through. This looks best if the thread that will show on the front side of the skirt matches the fabric really, really well.
8. Measure out elastic that meets your child’s actual waist measurement or your preference. I always cut my elastic a little on the small side, because it seems that otherwise, pants and skirts always fall off my narrow, always running and jumping girls. If you do this but you’ve left room for growth in the waist of the actual skirt, you can always cut open your elastic casing and replace your elastic with a longer piece later.
9. Pin a safety pin to one end of the elastic and thread it through your casing. Sew the ends of the elastic together with a VERY sturdy stitch, finish sewing up the casing, and you’re done!
I also make diaper covers and children’s pants out of old sweaters. What do you make?


Pingback: Tutorial: Make a Child’s Skirt from an Adult Sweater
Pingback: Tutorial: Make a Child’s Skirt from an Adult Sweater - Zidee.com
great idea – I’m always finding great men’s sweaters at Thrift stores. Usually I buy them for myself and take them in with my serger!
Pingback: Tutorial: Child’s skirt from an adult sweater · Sewing @ CraftGossip
Great idea, especially this time of year! Can see making leg warmers and fingerless gloves with the sleeves as well depending on the size. If you’re looking for coordinging fabrics, check no further than http://www.jofabrics.com. And thanks for the blog!
Pingback: Tutorial: Adult Sweater to Child Leggings
Pingback: Tutorial: Adult Sweater to Child Leggings - Zidee.com
Pingback: Make a child’s skirt from a sweater « My First Bub!
Pingback: 5 Fun Holiday Craft Ideas - Earth911.com
Did you cut off just under the shoulders at some point? I missed that I think.
Also, when stitching the bottom edge are you running off it with your zig zag?
I am a complete novice!
You want to measure out the length that you want the skirt and cut it to that length–if you can’t cut it to that length using only the torso of the sweater, not the sleeves, then the sweater’s too short for the skirt that you want.
When you finish the bottom edge of your skirt, use the same type of stitch that you used to sew the front and back of your skirt together–any of the choices that I laid out work; it just depends on what type of sewing machine you have and what stitches it will do.
Pingback: I’m Goin’ to the Thrift Store! Or My Husband’s Closet… | snugglebugblog.com
Pingback: Clothing Remade: Sew a Child’s Skirt from an Adult T-Shirt : Crafting a Green World
great idea! seems simple enough. thanks for sharing! would love to hear more ideas from you. what stitch do you use to sew the elastic together?
You are an absolute genius! Why are sweaters ONLY for the upper half?!? I’ve been looking for great warm dresses for the girls but felt as if it wasn’t going to happen. It’ll happen NOW! Thanks! We hit Aunt Sally’s and Uncle Will’s (Salvation Army and Goodwill) quite often as I felt up the sweaters for the girls play mats I’m making for them. Now….some lovely skirts for all those nonwool cotton sweaters I’m ALWAYS finding in beautiful designs!
Honey
http://www.mondorfment.blogspot.com
When Mon(tessori) (Wal)dorf (and Attach)ment Parening meet in our home.
If you do this but
you’ve left room for growth in the waist of the actual skirt, you can
always cut open your elastic casing and replace your elastic with a
longer piece later.
Pingback: How to Felt Wool Fabric