
 In the way that crafting trends come and go and come again (and perhaps stay for a while), buttons have hit the big-time. And I’m on the button bandwagon just like everybody else–I bought over four pounds off vintage buttons off of ebay, I did some cool projects from Susan Beal’s Button it Up!, I made up a list of some other cool vintage button projects to do in the future. And yet…
I completely agree with etsy seller Letter Perfect Designs, who says that some buttons are mini works of art. I can hardly stand to do something useful with my buttons, or even to wear them as jewelry around my neck, because then I can’t just sit and stare at them!
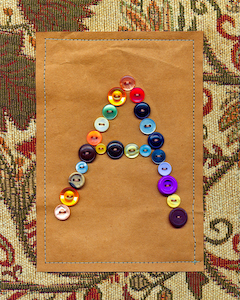
Instead, one of my favorite things to do lately is to make these button monograms–I have an entire alphabet that I’ve made out of vintage buttons, brown paper bags, upholstery remnants, and archival mat board. And while I don’t think that the idea is so complicated that you need a whole step-by-step tutorial for making your own vintage button alphabet, I have learned some strategies that work really well for this particular craft project:
- Choose an unusual backing for your button monogram. With a thimble and a nice, sharp needle, you can poke through a heck of a lot of materials, so you needn’t confine yourself just to quilting cotton. I’ve been mostly using brown paper bags, but you could also use cereal boxes or other thin cardstocks, vinyl or felt or other unusual fabrics, or even, if you use something sturdier than a sturdy needle, plastics or wood veneers or basically anything you can imagine.
- Give yourself a pattern to work from. Whether you freehand a monogram letter or design one digitally to print and then cut out, having a stencil will make the finished result look much cleaner. Consider drawing your design on the back side of your material, or draw it on the front side with something like chalk or a wash-away marker, or even lightly in pencil if you’re certain that your buttons will completely cover it.
- Fabric is easier to stitch buttons to accurately. If you’re working with a non-fabric or other stiff material, take the time to arrange and glue your buttons to your material, then go back and hand-stitch them on again when the glue is dry. Simple white glue is generally sufficient.
- If you’re stitching into something non-fabric, such as paper or vinyl, hold the material up to the light to see on the back side where the buttonhole is. If the material is too thick to tell, just use your needle to prick your hole from the front, then turn your material back over to stitch from the back, in order to hide the tailing thread.
- If you want to attach your monogram to an additional backing, such as a scrapbook page or archival mat board for hanging, follow the button metaphor–machine sew it (even a regular home sewing machine can stitch through archival mat board, given a sturdy, sharp needle) to its background, or handstitch more buttons around the edges to hold it in place.
And then give it to your mom for Mother’s Day.


Oh how pretty! Thanks for the tips, I’ll be linking!
Lovely!
Pingback: DIY Buttons: Make Your Own Buttons from Natural or Recycled Materials