
Repairing a broken toy is the WORST! Here’s how to fix a broken plastic toy so that it stays fixed.
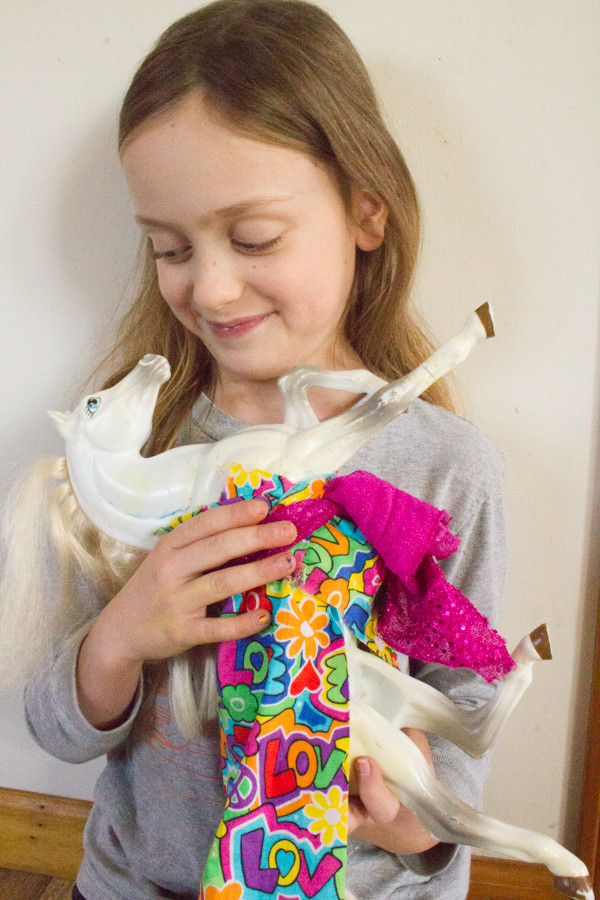
So, let’s say that your kid comes to you, inconsolably weeping, because her favorite toy horse has just broken its leg.
Now, you and I both know that repairing a broken plastic toy is the WORST. No matter how much glue you put on the dang thing, it’s going to break again the second that your kid gets her hands back on it, and then more glue, more tears. Sigh.
Therefore, you might be tempted to promise to fix that toy horse and then, as soon as the kid’s gone, send it on a one-way trip to the bottom of the trash can, but not only does that mean that a beloved toy that a kid was JUST playing with is now landfill-bound, but also?
My kid is totally wise to that move by now. “Did you fix White Party Pony?”, she’ll ask me in a few minutes. And then again a few hours later. And then again the next day. And then every hour upon the hour until either the end of time or the return of a mended White Party Pony into her arms.
It was pure desperation that led me to finally invent a way repair a broken toy’s leg, and this way works. It’s more involved than simply sticking the leg together with glue and hoping for the best, but this method also won’t result in the kid coming right back to me five minutes later, the re-broken leg back in her hands, more glue, more tears, etc.
You can also make this method work with other, non-horse toys, IF the toy isn’t hollow. I’ve got a different method for hollow toys. Buy a couple of boxes of my kid’s Girl Scout Cookies and ask me really nicely, and I’ll tell that one to you, too, but this method I’ll tell you about for free.
How to Fix a Broken Plastic Toy
You will need:
nail. You’ll need to hammer the head down on this nail so that it lies flat to the nail, so look for one with a small head. These headless nails work well, although even they have a very slight head that will need to be pounded down.
power drill with drill bit that matches the diameter of the nail. That’s why you need to pound that head down!
clamp (optional). I just hold the toy in my hand while I drill it. I’m baller like that.
epoxy glue. Yes, you’ll still be gluing, so choose your favorite epoxy glue.
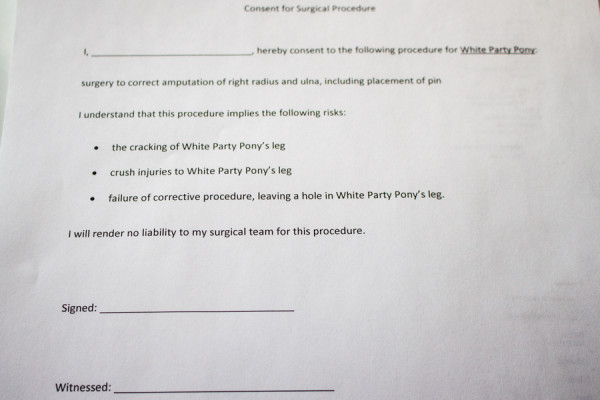
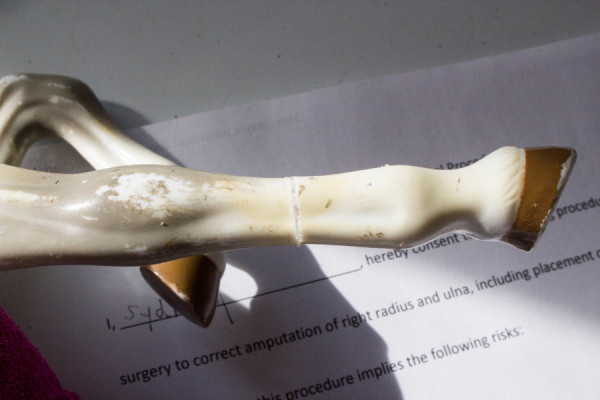
1. Write up a contract, and make your child sign it. Every operation has intrinsic risks, and you do NOT want your kid putting you in a crappy nursing home one day because of that one time that you ruined her favorite toy when she was eight. I write up a contract for all major repairs, listing everything that I can think of that could possibly go wrong; the kid who owns the toy signs it, and her sister witnesses it.
If the kid reads the contract and decides against the operation, that’s totally fine, too. You can move on with your day, and Magic Party Pony will do just fine with three and a half legs.
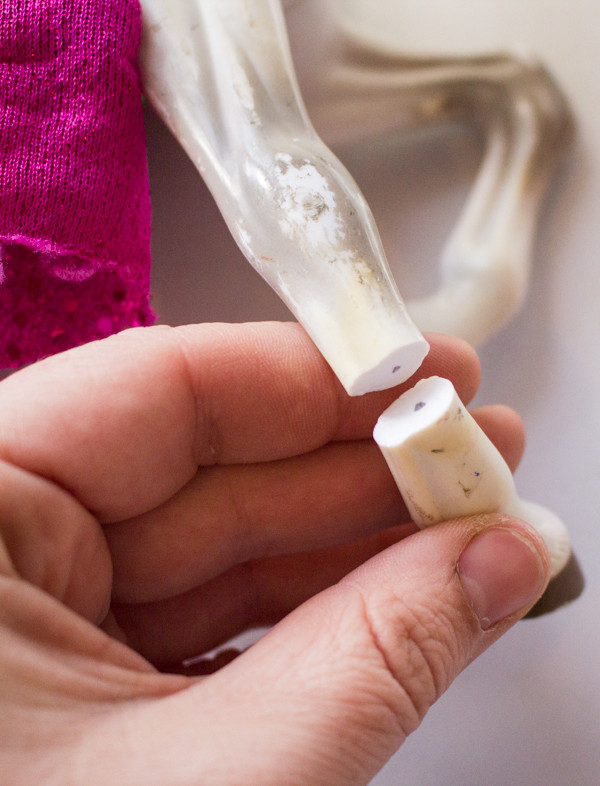
2. Is there room for the nail? You are going to drill a hole into the toy horse’s leg at both broken ends, and insert the nail as a pin into the leg. Measure the nail against the leg–it’s not too long, is it?
You can also cut the nail to the size that you prefer using a Dremel with a cut-off wheel.
While you’re at it, double-check that the diameter of the nail, and therefore of the drill bit that you’ll be using to place the nail, isn’t too thick for the leg. Is accidentally drilling through the other end of the leg in your contract? It probably should be!
3. Mark the center point of both broken ends. This is tricky, because for the leg to come back together perfectly evenly, the hole that you drill for the pin must exactly match on both halves of the broken leg. And, of course, the diameter of the leg narrows as it goes down to the hoof, making it impossible to measure the center point correctly.
Check out my photo below for a way to make the mark that’s easy to eyeball:
4. Drill both ends. Drill a hole for the pin into both broken ends of the leg. The hole must be long enough for the nail to to fit completely, leaving the two broken ends flush against each other:
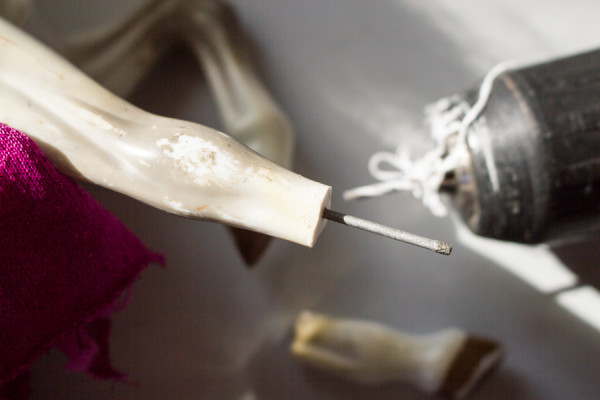
Remember that with a hacksaw or a cut-off wheel, you can always trim the nail, if needed.
5. Fit the broken pieces together, using ample glue. Using the nail to help you, dispense epoxy glue onto each broken end, and then shove it down into the drilled holes.
Fit the pin into one hole, then dispense another thin layer of epoxy glue over that broken end. Fit the other broken piece onto the nail and flush against the seam, wiping off any glue that seeps out:
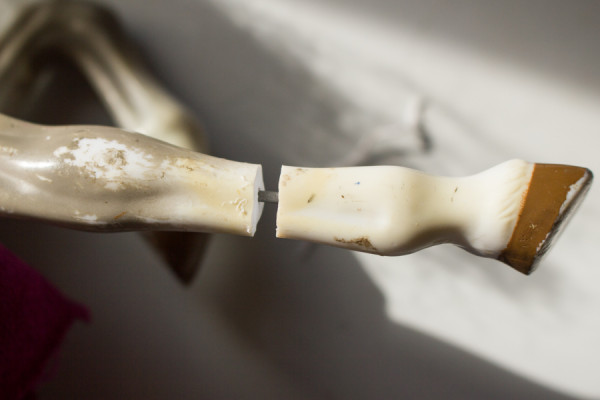
I like to keep a little bit of seam, however, just to make sure that there’s glue remaining between the broken bits:
Hand the toy back into your child’s loving care, reminding her that her toy requires strict bed rest, with absolutely no weight put on that broken leg, for at least 24 hours. My child also requires her mended toys to undergo a full week of convalescence, to alleviate any lingering soreness.
This repaired toy will still show a seam at the broken edge, and it’ll look funky when it goes through metal detectors at the airport, but at least when your kid comes back to you in five more minutes, weeping inconsolably?
It’ll be a different toy that she’s broken, not this one!


That’s genius! We have not had this problem yet, thankfully, but I will keep it in mind for the inevitable. I LOVE the contract idea even more than the actual repair job. Such a great way to stay out of the lowest priced nursing home.
I can’t believe your kid hasn’t had a pony leg amputation yet! She must play with them REALLY well! Pony leg pin-setting and repair is my most common surgical procedure, but my kids’ ponies do tend to be trompers.
I think when you have two kids playing with things (or fighting over them) toys tend to be played with a bit harder. That, and Emma is weirdly cautious with her model horses.
Pingback: Dry Eyes By Fixing That Plastic Toy
Why don’t you open a Horsepital ?