
I’ve only ever shot with Canons, so maybe it’s the brand, but I swear that I cannot keep a lens cap on my dang camera!
Whether it’s my regular lens, my telephoto lens, my Lensbaby… you get the idea. Perfectly normal camera, perfectly normal lens, and if my lens cap isn’t tied physically to my camera, there it is on the floor.
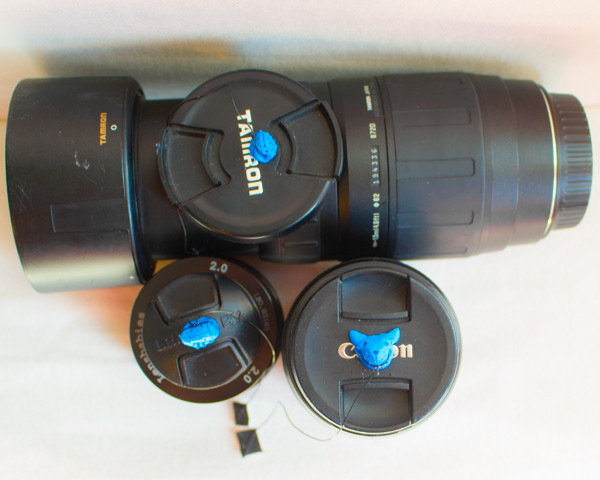
This is why I’ve rigged all my lens caps so that they’re tied physically to my camera.
A lens cap leash is nice if you’ve got a wandering lens cap, like I do, but it’s also extremely handy for keeping track of your lens cap for you while you’re busy shooting photos. With this leash, there’s no more searching through every pocket, scanning the ground, asking your partner and/or child if you handed him/her your lens cap a minute ago, etc.
This lens cap leash also keeps a fairly low profile. It’s not bulky or showy, and it’s not going to bug you. Here’s how to make it:
How to Make a Lens Cap Leash
Materials
+ Sugru. This stuff is pricey, but a little goes a long way, and it’s dead useful for safely repairing frayed electrical cords–my microwave and my vacuum cleaner both currently sport Sugru repairs, as does my kid’s nature vest. Anyway, if you don’t want to throw down any bank on it just for this project, a pea-sized ball of polymer clay and some epoxy glue will replace it satisfactorily.
+ elastic jewelry cording. This stuff has the lowest profile of any of your possibilities, so even if you don’t have elastic jewelry cording on hand but you DO have ribbon or twine or elastic sewing thread or any other cording of any other type, I’m still going to say go find yourself some elastic jewelry cording.
Instructions
1. Sculpt yourself something small but adorable. My husband has an art degree, the main use of which is allowing me to make random requests of him, such as “Draw the kids riding dinosaurs for their birthday party invitations,” and, “Design me a set of pinback buttons that feature Girl Scout cookies looking like Girl Scouts.” And this particular task, entitled “I want small sculpted animal heads, with holes through them for the elastic cording.”
Matt made me one freaking AWESOME sculpted cat head, but then flat-out refused to spend the same amount of time on the other five lens caps that I handed him and instead made all the rest of the sculptures into ladybugs. Only I’m not really into ladybugs, so I’m just calling them beetles.
The key feature of your sculpture should be a hole through the middle for the lens cap leash. Use a toothpick to poke the hole, and it will be plenty wide enough for your elastic jewelry cording.
If you’re using Sugru, you can sculpt this directly onto the lens cap, and it’ll stick. If you’re sculpting in polymer clay, however, bake your finished piece according to the package’s instructions, glue it to your lens cap with your epoxy glue, and let it cure for a day.
2. Tie the elastic cording through the hole in the sculpture. Cut off a piece of cording that you know is too long–you’ll fiddle with the length later. Thread it through the hole in your teensy sculpture and then tie the cording into a loop using a double overhand knot. Dab the knot with a bit of jewelry glue, and it’ll stay secure.
You’ve got options for how you want to attach this leash to your camera, so choose either 3a or 3b to continue.
3a. Stick the leash to the camera with Velcro. I use this method for most of my lenses. I have a small square of Velcro (actually, it’s a bit of one of these Command strips, but you get the idea) stuck to my camera’s body, on the front but near the bottom where it’s not going to get in my way. The other half of the Velcro is attached to the leash.
Measure out the elastic jewelry cording to a length that isn’t going to stretch when the lens is on the camera, but that also isn’t going to, you know, cause the lens cap to hang to your knees when it’s off the lens. Take the other Velcro square, peel of the backing, and stick the end of the elastic cording to the sticky back.
Cut out a small piece of stash fabric to fit the Velcro square, then use white glue to glue the fabric scrap over the sticky back, securely sealing the end of the cording inside.
3a. Tie the cording to the camera lens. My telephoto lens is too long to attach its lens leash to the camera; the lens practically would dangle to my knees if I did! The other option, then, is to tie the other end of the elastic cording around the lens itself, someplace that’s not going to get under your fingers and not going to get twisted into the lens body and not going to fall off. Tie it off with another double overhand knot, and secure it with another dab of jewelry glue.
For me, the dangling lens cap actually did take a little time to get used to, but it’s well worth it to not have my lens cap constantly popping off and running away. Anyway, I’d rather deal with a dangling lens cap than replace a scratched lens, so there’s that.


Great idea, pinned for later!
Pingback: Diy Camera Lens | Photographers - Zone