
Yes, I know it’s not Christmas, but we did LARP Candyland at my kiddo’s recent ninth birthday party (candy-themed–you know the other parents hated me!), and LARP Candyland requires not only a life-sized molasses swamp and a life-sized gumdrop mountain and a life-sized peppermint forest, but also a life-sized licorice castle.
The kids and I built our licorice castle out of a giant box, with some structural and decorative mods, including a peaked roof, to make it look like a giant gingerbread house.
Here’s how to make your own giant cardboard gingerbread house:
You will need:
- giant cardboard box. Anything that a kid will fit inside will work–you can see that for this particular cardboard gingerbread house, we’re using a rather narrow box, but it’s tall and wide, and the narrowness makes it work as an obstacle in a life-sized board game like we’re doing. For first dibs on all the giant boxes that you could ever dream of, I highly recommend regular volunteering at your local food bank.
- measuring equipment. We’re going to use trigonometry to make that peaked roof! You’ll need a nice ruler or tape measure, and a sharp pencil.
- box knife. My kids can use a box knife independently, but I did wield it myself for this particular project, because I didn’t have a back-up box on hand in case they did something crazy with this one.
- tape. I used clear tape for this project. I briefly considered hot glue, but I wanted to be able to easily break the box down for recycling later, so I settled on tape that I can pull off.
- decorative supplies. My kids chose to use acrylic paint to decorate their gingerbread house, but I was secretly hoping that they’d also choose to cut out decorative paper embellishments–don’t you think that candy wafer shingles would have looked really cute? I silently did. If you’ve got your Christmas bin handy to raid, I also think that tinsel and twinkle lights would be lovely.

1. Make the peaked roof. A gingerbread house has to have a peaked roof, and this is fortunately simple to engineer from the flaps at the top of the box.
Turn the box top-up and open up all the flaps. See the triangle that I’ve marked in the photo above? We’re going to be cutting down that side flap into an isosceles triangle whose legs are equal to the width of the adjacent box flaps (FYI: trig is essential for woodworking and construction of all sorts. Get started with isosceles triangles here).
First, measure the width of that side flap and mark the center at both top and bottom. Use a pencil and your ruler to draw a straight line down the middle of the side flap. The top of this straight line, after you cut it down, will eventually be the vertex (or top) of your isosceles triangle.
Now measure the width of both of the adjacent box flaps–hopefully, they’re the same width! If they’re not, you can choose to either cut one down or just go with it and have a crooked peak. I promise that your Candyland LARPers aren’t going to notice.
The width measurement of these adjacent flaps should be the length measurement for the legs (or sides) of your triangle. To create the legs from this measurement, place the end of your ruler at one of the bottom edges of that side flap, then adjust the ruler’s angle until the length measurement intersects with the straight line –use your pencil to draw that line, which is now one of the legs of your isosceles triangle, with a length equal to the width of its adjacent box flap.
Repeat to make the other leg of the triangle.
Use your box knife to cut away the excess cardboard from the legs of your isosceles triangle.
Repeat to make an identical isosceles triangle out of the other side flap.
Fold the front and back box flaps up against the side flaps and tape/glue them there. Now you have a peaked roof on your cardboard gingerbread house!
2. Make the door. I’m a big believer in letting my kids do as much of the design/construction work in our projects as possible, so my birthday girl drew the template for the drawbridge door on our licorice castle. Cutting out the door is as simple as wielding your box knife–remembering, of course, to leave one side of the door attached to the box. Fold it back and forth, and it will crease enough to serve as a fine door hinge:
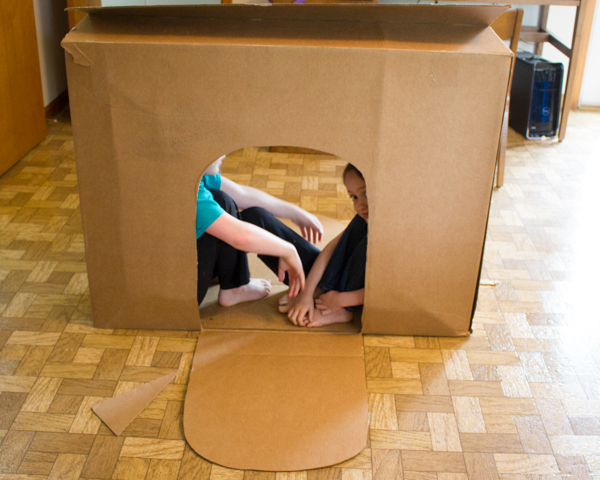 Because our licorice castle was part of our Candyland game board, and the party guests would need to crawl through it as their first obstacle, I cut a matching door into the opposite side of the box. If your own house is meant to be a playhouse, however, you may need only one door, and if it’s meant to only be decoration, you may not need a door at all.
If you want windows that open, or other decorative cut-outs, now is also the time to create them and cut them out.
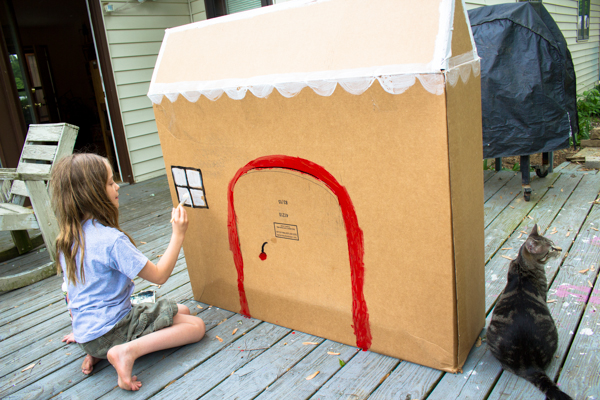
3. Decorate your giant gingerbread house! A giant cardboard box makes the perfect gingerbread house because it’s already the color of gingerbread; all you have to add is the fun stuff!
My kids chose to decorate their licorice castle entirely with acrylic paints, which is an easy way to add the larger details, especially. I think that the icing eaves and the licorice door frame, in particular, look extra cute:
If you happen to have stash colored paper on hand, however, I think that this project would look extra, EXTRA cute with some dimensional details. I stand by my original claim that colored paper shingles would be perfect on this castle, as would peppermint flowers, M&M embellishments, and all the other cute things that you can do with pretty paper.
If you’re looking for ways to include even more upcycled components, however, then you could also make candy-colored flowers out of recycled soda cans, and you could upcycle newspaper to make papier-mache wrapped candies or other large decorative components.
4. Enjoy! We used our licorice castle for our LARP Candyland game, yes, but since then it’s become a regular old playhouse for the kids, one that they’ve both spent hours in every day since we’ve built it.
It’s looking pretty worn by now, which is no wonder since my kids play rough, but one of the many nice things about this playhouse, in my opinion, is the fact that when it breaks down completely, all I have to do is tear off the tape and toss it into my recycling bin, and I’ll have our living room back!
Until the kids talk me into taking home ANOTHER giant box from our weekly volunteer gig at the food pantry, that is…


