

My kitchen used to be a 1970s nightmare. Ugly brown and yellow floral paneling in the dining area. The paneling was ugly, uneven in some areas and completely outdated. It was hideous.
But when it was time to remodel we didn’t have the time or budget to tear it out and drywall everything. What could I do to update the walls without spending a fortune?
I decided on texture painting with a faux finish.
Texture painting and faux finishes can help cover and transform not so perfect walls. I couldn’t believe how fabulous my walls looked when I was finished. Since then I’ve learned that this technique can be used to hide uneven drywall, cement walls, cover old paneling and even wallpaper.
Want to know how I did it?
I knew just painting over the paneling would not look good as all of the seams would still show. I did some research and spent a lot of time at the local Home Depot looking at products and scanning through books. I finally figured out a way to make it work.
Here are the step by step instructions on what my husband and I did to make our kitchen look more like an Italian country kitchen than a 1970s nightmare.
First we cleaned out the room. For us this meant removing everything from cabinets to appliances because we were giving it a total makeover. Clear it out as much as possible so you can get to all the wall space. If you have any divider strips between the paneling you’ll want to remove them if you can. If you can’t remove them you’ll have to deal with them and paint over them. This won’t give your walls an even finished look, but sometimes you just have to work with what you got. The strips are underneath the sheets of paneling and taking them out means ripping up the paneling which usually leads to damage and the paneling breaking. This defeats the purpose of trying to paint over the paneling.
Spackle: Start filling in all the seams with a sandable putty or spackling paste. We used a spackling paste made for wood or masonry and it worked great. Be sure to purchase a product made for the type of surface you are using it on. There are different formulas for wood, cement, concrete and drywall.
Apply a good thick coat to all the seams, dents, holes and any other imperfections in the wall. Let it dry for a day or at least overnight. Do not sand it until it is completely dry.
Sand: Use a mid grain sandpaper, not too course. You don’t want it to rip off all the spackle. A fine grain sand paper won’t do much good until the surface is evened out. Use the fine grain during the final sanding.
With the mid grade sandpaper sand all the spackle down to the point where it is even with the rest of the wall surface. Do not go too far down or you’ll expose the seam lines, holes, and dents again. Try to make it as even as possible. I also recommend using a small handheld electric sander. It will save you a lot of time and energy. They make several great ones perfect for small hands now.
Once you finish sanding and all your seams, holes, and dents are repaired, you will need to prepare the rest of the wall surface for primer.
Primer: If you are painting over paneling you will want to lightly sand the entire surface of the walls so paint will stick to it, especially if the paneling is shiny. If you have a shiny or very smooth texture paneling you will want to sand it a little past gently so it roughs up the surface. Otherwise your primer will peel off.
That happened to us. We lightly sanded it and used Kilz primer. It peeled right off. So we peeled off all the Kilz, roughened up the paneling a little more, then we used a primer called Gripper. That didn’t peel off. The primer Gripper works well on any surface. It really sticks to it. It may not be really eco but it saved our walls.
Once all of your sanding is complete you’ll want to gently wipe down the surface of the walls with a damp (but not too damp) cloth to get off all the dirt and dust left over from sanding. Let the walls dry completely then you are ready to prime.
Apply primer evenly with a roller. If you use a product like Gripper, only one coat is needed.
Paint: Now is the fun part. You get to decide how you want to paint your walls with texture.
You can buy texture paint, but I wasn’t thrilled with the options available. It only came in five gallon containers and the color choices were not very extensive. Also the way it was described made it seem thick and very difficult to use.
So I searched the paint department and found a product called Paint N Tex by Homax. It was a texture additive that could be added to any regular latex paint. It came in a box with enough texture for at least two gallons of paint and it only cost around $4 which was a heck of a lot cheaper than buying actual texture paint.
The Paint N Tex is available in fine, medium, and course levels of texture- which gave me options. Plus I could control how much texture I wanted the paint to have by how much of the additive I actually added to the paint. We quickly discovered it is best to mix the paint and texture in a bucket or other container separate from your paint can. You don’t want to ruin a whole can of paint by dumping in too much texture.
Experiment with the amount of texture you use. Start out adding just a little at a time and testing it on a scrap piece of wood or cardboard until you get to your desired level of texture. When you get to that point you can mix up a gallon or half gallon, or however much you need for your size of room.
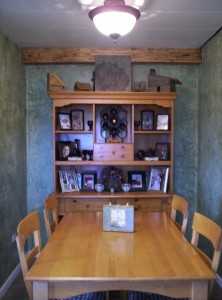
Once it is all mixed you can start painting. I did a base coat of a light green with the texture paint then painted a faux finish on top of the texture. I used two colors of green at the same time with a double roller that had small designs imprinted on the rollers. I used the same color green as the base coat and a dark green both mixed with glaze. The glaze slowed the dry time so I could blend the faux finish on the wall before the paint dried. It also gives the walls a hint of shine so stains can easily wipe off.
The result: My use of a faux finish combined with two shades of color helped disguise any left over unevenness from the paneling seams. The combination of texture and the faux tricks the eye so you don’t see any minor wall issues. I was so happy that my walls turned out so beautifully. Using the texture and faux finish really hid all the imperfections in what was once a very ugly mess of old paneling.
I now have a stylishly updated room with no more ugly, cracked, uneven walls or outdated paneling. I still love my kitchen makeover. It’s my favorite room in my house.


AWESOME! We have tacky wood paneling all throughout out house. My fiance’ has painted over it, but it’s still SO terrible looking. He finally agreed that I could paint this spring/summer (before finishing up the floor, which is being postponed since I’m out of work). We have a LOT of paneling, but I’m thinking this would be worth it! Especially since we eventually plan on selling the house – we won’t have to tear down the walls!
I love this idea but it doesn’t seem like the putty will work on the corners. I think I need to use the metal corners they use on drywall or at least tape to clean up the seams on the corners??? What did you do?
Pingback: dress your home – Indian interiors, Bangalore home decor shops, apartment living » Texture Wall Paint: How not to spend a fortune
what kind of paint roller did you use?
Excellent work great finish
great idea thanks for sharing with us. i will definitely try this…