

 My little girlies and I are participating in a handmade card swap with some other families through Kids Craft Weekly, and and I’ve been using the activity both to kick-start the Christmas card crafting for our own family and friends and to inspire my own paper crafting.
My goals are to incorporate recycled materials into all our work, and to come up with some card-making ideas that are engaging and enjoyable for the children, that utilize our creativity, and that look nice whether completed by a preschooler or an adult.
And I have to have a lot of ideas, because preschoolers won’t do more than a couple of copies of any one thing before they are done and DONE!
Yep, I’ve come up with a couple of misfires, but the collaged window card is a good go-to activity. It looks good with anything–labels from soup cans, pages torn from ratty old books, wrapping paper, scrapbook paper, newspaper–and it looks equally good whether it’s done by a five-year-old or a 33-year-old.
Well, okay…usually my five-year-old’s looks way better.
You will need:
- A piece of cardstock three times as wide as the finished width of your card, and the same length as the finished length
- a self-healing cutting mat, x-acto knife, and ruler
- pencil
- regular white glue
- strips of recycled paper–feel free to be really creative here. I like to challenge my girls to take at least some of the paper for this project not from the recycled papers we’ve already set aside to re-use in crafts, but from the actual recycling bin.
1. Using the BACK of your x-acto knife, NOT the blade, score your sheet of cardstock so that you can fold it into thirds width-wise. You will end up with three panels.
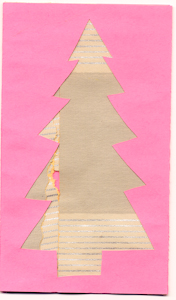
2. On the center panel, on the side that will be the inside of your card, draw a very simple shape to cut out–an evergreen tree for Christmas, or a heart for Valentine’s Day, or the initial for somebody’s name. Make sure there will be enough room between the cut-out shape and the edges of this center panel to anchor your strips of recycled paper in a few steps.
3. Use your x-acto knife and self-healing cutting mat to cut the shape out from the center panel of your card.
4. Tear or cut your recycled paper into strips.
 5. Still working on the side of the card that will be the inside, run a bead of white glue around the edges of your cut-out shape.
6. Arrange your strips face-down so that they run from edge-to-edge across the open space of the cut-out shape, to reach the glue on each side. Cover the entire open space of your cut-out shape with strips of recycled paper. Trim them to fit the panel if they’re too long.
7. Cut a very narrow strip from the end of the panel to the left of this center panel. After it’s folded and glued down in the next step, this will give your card enough room to close completely.
8. Run a bead of glue around the edges of the panel to the left of the center panel, and fold it down over the back side of the center panel. Let the whole card rest underneath a heavy book until the glue is dry.
9. When the glue is dry, you should have a card that opens easily and shuts completely. You should be able to see the collage through the cut-out window on the front of the card, and the back side of this collage, with the messy raw edges of the strips of paper, should be completely covered by that glued-down left flap. The entire inside of the card should be blank, ready for you to add your holiday greeting.


Pingback: green rebates » Blog Archive » Tutorial: Make a Collage Window Card from Recycled Papers
Pingback: green rebates » Blog Archive » Tutorial: Make a Collage Window Card from Recycled Papers
Pingback: Tutorial: Re-Cycled Christmas Card Craft · Lesson Plans @ CraftGossip
Pingback: Tutorial: Re-Cycled Christmas Card Craft · Lesson Plans @ CraftGossip
Pingback: Tutorial: Make a Collage Window Card from Recycled Papers
Pingback: Tutorial: Make a Collage Window Card from Recycled Papers
Pingback: crafthis.com » Blog Archive » Collage Window Card from Recycled Papers
Pingback: crafthis.com » Blog Archive » Collage Window Card from Recycled Papers