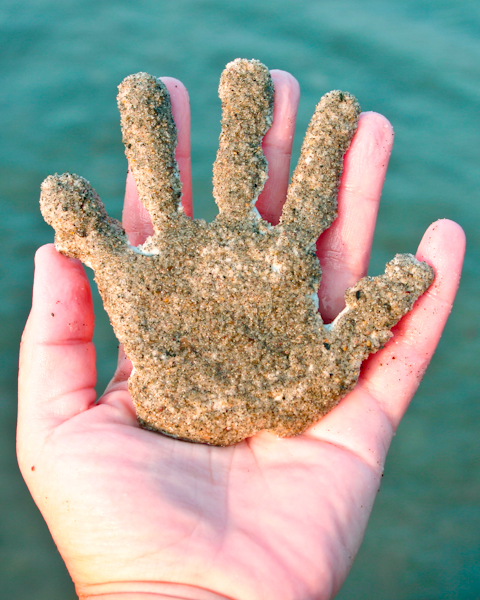
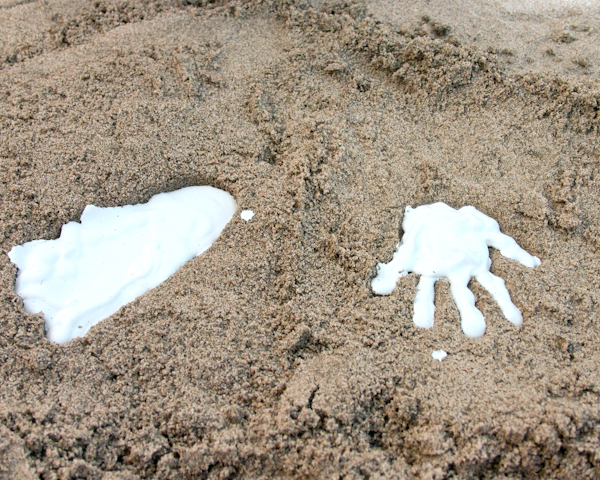
 The beach is one vacation spot that ensures that you come away with beautiful souvenirs.
A handful of sand, the choicest of clam shells, rocks worn smooth by the waves, as much driftwood as your trunk will hold- any of these free natural objects make for timeless, treasured souvenirs.
But how can you record something just as precious, but just the opposite of timeless? How can you take home and treasure something as ephemeral as a footprint in the sand, or the smallness of your child’s hand the day that she first saw the Atlantic Ocean?
My girls and I have been very into plaster of Paris projects this summer. It turns out that plaster of Paris forms just as well in an easy mold of beach sand, one that you can create right on the beach, and it mixes just as well with sea water as it does tap water, and it leaves on the surface of your print a fine layer of embedded sand, perfect for recording a special trip to the ocean.
Tools & Supplies
You will need:
- Plaster of Paris: One-and-a-half cups of plaster of Paris is enough for four handprints of a small child, two footprints of a small child, one child’s handprint and one adult’s handprint, or one adult’s footprint.
- Resealable plastic bag that’s at the end of its useful life. This is a good project to finish off the bag from yesterday’s lunch, or the bag that your deli cheese came in, or the bag that the treat came home in from the last birthday party that your child went to. Plastic bags, when used sparingly and only when they’re really useful, will help you do this project neatly and efficiently and with as little trash as possible.
- Measuring cup
- Watertight pail
Directions
1. Measure Out Your Plaster
Before you go to the beach, measure out the appropriate amount of plaster of Paris and put it into a resealable plastic bag. Read the directions on your container of plaster to be sure, but generally, the ratio is 1:1.5, water to plaster of Paris. Sometimes I write how much water I’ll need to add directly onto my bag- otherwise, I tend to reverse the ratio and ruin my batch.
2. Pack Up Your Beach Bag
When you pack for the beach, bring that bag of plaster of Paris, a measuring cup for adding the seawater, and a pail for toting the water.
3. Find a Clean Spot in the Sand
At the beach, find a spot of clean sand. For a handprint or footprint, you’ll want to use somewhat damp sand, like what you get below the high tide line. This sand will hold an impression the best and make the clearest, sharpest mold.
If your little child is having trouble making a firm impression into the damp sand, till it up and smooth it back down to make it easier to shift.
4. Make the Impression
Put a hand or foot firmly down into the sand, then lift it straight back up. You want a relatively deep impression here, or your finished mold will be very thin. You will likely need to gently but firmly press down on a child’s hand or foot to help him or her make a deeper impression than she or he has the strength to do on his or her own.
Alternately, you can also dig and draw into the sand to make your own artistic mold.
5. Mix the Plaster and Seawater
Carry up some seawater in your pail, then add the appropriate amount of seawater to the plaster in your bag and seal it closed. Knead and agitate the plastic bag until the plaster is completely mixed. This is even easier than mixing your plaster in a bowl, since you can easily feel if there are any lumps remaining in your bag.
6. Pour the Plaster Into the Sand Molds
Open one end of the plastic bag, then pour the plaster to fill all your molds.
7. Let it Harden
Use the directions that came with your plaster to determine how long you should wait before you unmold your handprint. Depending on the temperature of the sand, you may have to wait longer than the directions indicate before your plaster has cured.
8. Remove Your Print
Gently excavate your print, give it a quick rinse in the ocean, and you’re done!
Now you have your beach sand souvenir and a keepsake for the grandparents, as well.


Pingback: Beach Craft: Make a Sandy Handprint Keepsake
I love this. It would be so cute framed in a shadow box.
My daughter absolutely treasures her handprint, and she loves the sculpture that she made, too.
how long does it take to dry… my kids and grandkids are grown but my sister n law has little grand babies and she would love this
It depends on the brand of plaster of Paris, but unless the day is humid and overcast, you ought to be able to move the handprint after about an hour and take it someplace else to finish curing. If it’s a hot, sunny, dry day, your wait time could be substantially less.
Pingback: 10 Hands On Crafts For Kids | Homemade Frontier
Pingback: 10 Hands On Crafts for Kids - Homemade Frontier
Pingback: 15+ Beach Crafts for Kids
Just did this on our beach vacation – turned out great. The kids were so excited! Is there anything I can do to seal it and make it more durable?
It’s not a very eco-friendly option, but I think that any spray sealant or varnish would be the best option for preserving the print while keeping its unique look intact.
mod-podge or50% elmers glue 50% water mix and paint on with brush then use clear acrilic spray paint once dry
Pingback: GreenSelector.com » Craft Recycled: 10 Super Fun Beach Crafts
What a great idea! I will definitely be trying this in the future. (I do want to point out that it is illegal to remove driftwood from most beaches in Washington, because it disturbs the ecosystem, so you may want to check the regulations in your area before loading up your trunk. It would be a major bummer to get a ticket on your vacation.)
So cool!!!
We used to take plastic dishpans to hold the sand, that way you can move them if necessary. We also did impressions of toys!
That’s pretty cool, I just had to re-pin it 🙂 Gotta try @ the seaside this summer.
I was also thinking of substituting plaster with something else. Maybe sylicone sealant-type of thing or wax… Not sure yet.
Great post!
I am so excited about this! We’ll be doing this on our trip and making keepsakes to give to relatives that live far away. Thank you for the inspiration!
Pingback: Crafting a Green World | 10 Eco-Friendly Kids’ Crafts for Summer | Crafting a Green World
how much plaster & water do u use?
You should follow the directions on your package of plaster of Paris, because different brands sometimes have different ratios.
sounds like such a cute idea, can’t wait to do this on my beach summer vacation
Very nice Idea to remember the moments of awesome past..
Pingback: 18 Fun Things to Do Before Going Back to School
I am most definitely going to share this idea with my daughter, would love to have this adorable keepsake from my first grandbaby;) Thanks for sharing
Does it hold just as well using salt water instead of tap water? We will be at the Atlantic and want to make sure it holds:)
The photos of this project were taken at the Atlantic Ocean, north of Boston.
Pingback: Crafting a Green World | The home for green crafts and tutorials!
I want to attach these handprints inside shadow boxes. Any tips on attaching them? They are quite fragile.
If you can get your kid to press her hand pretty hard into the sand, that will make her handprint thicker and help with the fragility. When I mount things, I always use those Scotch-brand wall hangers that look like plastic Velcro, and I feel like those, or something similar, would work well for this, too.
Put a piece of string or wire in the plaster when it is damp, when it dries, the hanging string will be solid.
Pingback: 75+ Summer Activities - Busy Moms Helper
Pingback: 10 Unique Beach Activities - Naturally Teaching
Pingback: 25 Summer Bucket List Activities for Kids - Look! We're Learning!
Pingback: 21 Fun Beach Crafts For Kids – Baby Candy Land
Pingback: 20 Fun Summer Handprint Crafts for Preschoolers