
 Mom always said, “Get your feet off the coffee table!” and “Use a coaster!” Why not give her some new coasters for that precious coffee table this Mother’s Day? These stitched cork coasters are an inexpensive and super easy gift. Read on for a complete how to for making your own.
 Supplies
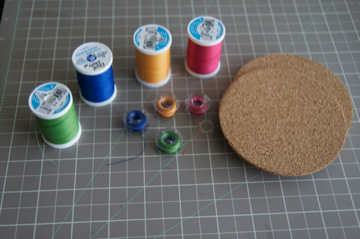
- 3mm thick cork coasters
- Heavy Duty thread (multiple bold colors)
- Sewing machine with decorative stitches
- Water-soluble fabric marker
Step-by-step:
- Choose a decorative stitch setting on your sewing machine. The stitches that work best on cork lay down a lot of thread, doubling over most stitches. Thinner more delicate stitches will sink into the cork and disappear. Make sure you siwtch out your presser foot to one that is appropriate for the decorative stitch.
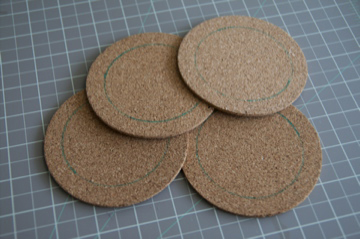
- To stitch a circular pattern (like the pink and blue ones shown above) draw a circle about 1/2 inch in from the edge of your coaster using a water-soluble fabric marker. This will be your guide while stitching. (Note: While stitching it is easiest to concentrate on keeping this guide line in line with the center of your presser foot. Don’t focus on the needle because it will be bouncing around a lot.)
- Place your cork coaster under your presser foot. For the circular design line up the center of your presser foot with the guide line. For straight random lines (as shown on the green coaster) start your stitch a little bit in from the edge so your presser foot is level with the cork under it. If you want the stitch to start right on the edge you will need to prop up the back of your presser foot so it is level when you start stitching.
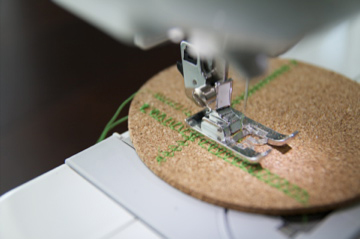
- Stitch! With decorative stitches it is best to let the feed dogs do all the work. If you push the cork through you will mess up the stitch. For the circular designs you will have to guide the cork to stitch around the circle, but guide it gently and do not push. For straight lines you could almost walk away and the machine will do it all for you, but you should stick around to stop the stitching when you reach the end of the cork.
- Trim loose thread ends.
- Use a damp cloth to gently blot away the fabric marker lines.
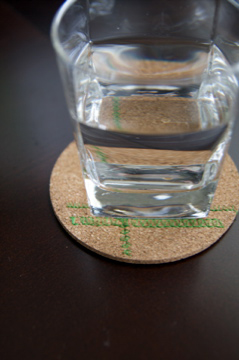
- Enjoy! Mom is sure to love these.


Pingback: Tutorial: Stitched Cork Coasters
Where did you get the cork?
The cork coasters are widely available at craft stores in both squares and circles. I got a set of 4 at Michael’s. I can’t recall the price, but they are really inexpensive.
Wow, this is such a good idea. You have so many choices as to color and design without needing to spend lots of money.
Pingback: Tutorial: Stitch up some cork coasters · Sewing @ CraftGossip
Pingback: Crafting Around the Web : Blisstree - Family, Health, Home and Lifestyles
Pingback: thelongthread.com » Quick Crafty Round-Up
What a great idea for a gift for mom or other family and friends. Thanks for the great idea!
Pingback: How-to Tuesday: 6/23/09 « Firefly Skys
Very cute! I’m curious if you have to backstitch to secure the end of your stitch? If not how are you keeping it from unraveling? Also, do you have a special heavy-duty machine or are you using a basic machine?
Thanks for the great idea!