
 I’ve mentioned before that one of my New Year’s Resolutions is to have an organized and awesome craft room. An ability to walk through it without slipping on colored pencils and felted wool and the odd button would be nice, but I also want quirky decorations and cheerful accessories and inspiring color schemes–have you seen Yummygoods’ craft room? Basically, I want Yummygoods’ craft room, only I want it to belong to me, not her.
In our last makeover, we talked about how nice it is to store your craft supplies in vintage containers instead of mass-market plastic bins–this was basically an excuse for me to show off my thrifted Pyrex, the Fiestaware coffee mug that the handle broke off of, and the other mug that PROVES that I did, indeed, go to Space Camp.
Today, however, we’re getting our inspiration board on. We are going to cover a ratty corkboard with a rockin’ T-shirt (Funny story: I never lost the baby weight after my second baby, and now my entire pre-baby rockin’ T-shirt collection basically gets to be turned into other stuff. Sigh). With a rockin’ T-shirt corkboard, you get to remember your rockin’ days, and not have to see how teeny-tiny slim your T-shirts used to be.
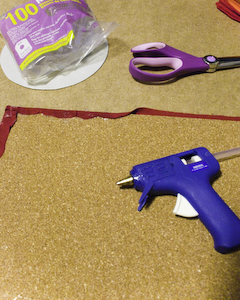
 You will need: a corkboard panel (any shape will work), a T-shirt with a great image on the front, scissors for fabric, a seriously sturdy glue (I’m using hot glue, but something like E6000 would also suffice. Elmer’s? No.), your preferred method of adhering your finished corkboard to the wall (I’m a hammer-and-nails lady, myself, but I won’t judge you if you prefer those floofy little Velcro tab things)
1. Lay your corkboard panel over the top of your T-shirt front, adjusting it until it seems as if the image is probably pleasingly arranged or centered underneath, and then cut around your panel, leaving about an inch on all sides. Set aside the rest of your T-shirt for a later use–a baby cap, perhaps?
 2. Lay the T-shirt panel that you just cut out face-down on your work surface, and iron or smooth out by hand any wrinkles.
3. Center your corkboard panel, also face down, on top of your T-shirt panel.
4. Working on a small section at a time, place a line of glue on the face-up edge of the corkboard, firmly wrap the edge of the T-shirt panel up and around, and press it into place until it’s set.
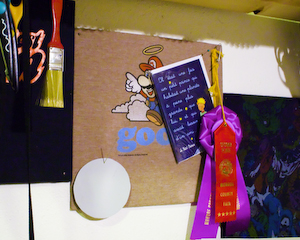
5. Adhere your corkboard to the wall in your favorite fashion, and immediately begin to trash it up with postcards and county fair ribbons and whatever junk inspires you.
What junk does inspire you, by the way?


Is there a photo of the finished product??
What a cool idea. Love the fact that you used a Super Mario t-shirt.
I know–Mario rocks!
Look up top–that’s the photo of some finished ones. I took my tute pictures as I was making a bunch of these for the two walls that border my desk, so in total I’ve got the following T-shirt corkboards up now: Mario, Bowser, “World’s Best Mom”, Arkansas Razorbacks, “Professor”, an old transfer of my Mama as a young lady, and “I Heart France”.
What a great idea. I’ve been planning to do a full wall of cork in my craft room. Maybe I’ll incorporate some fabric covered cork squares in the mix.
Pingback: Favorites Friday: Get Organized! | FaveCraftsBlog
The freshly introduced iPad of Apple is brilliant, fantastic and fabulous electronic computer. It is superior, super responsive and super processor. This technology is most advanced version ever developed.
Apple iPad has topping browsing speed as you can quickly flick through multiple pages tapping each on a block. And unlike the iPhone you now have complete webpages without much effort.
Click Here to Win FREE Apple Ipad at Cheap Price