
 Y’all, it turns out that there are a lot of us shorties out there! I am clearly not the only one who’s found herself standing in front of the mirror hours before a hot concert date wearing brand-new jeans that are at least six inches too long.
Thank god there’s a solution, or we’d all end up looking like me in my sixth grade class picture, with those big ole’ cuffs on my jeans and the ugliest hairstyle you’ve ever seen on a 12-year-old.
And sure, the controlled fray is quick and easy and awesome, but let’s say you’re looking for something a little more polished. Friends, I have that something: it can look invisible or stand out, it’s also fairly quick and fairly easy, and it leaves no fray.
I introduce to you the Bias Tape Method.
You will need: jeans to be hemmed; a marker for fabric; scissors for fabric; at least two inches off of the part of the jeans that you’ll cut off; a 1″ double-fold bias tape maker (these are small and inexpensive); an iron; a sewing machine with matching thread and a sturdy jeans needle installed.
 1. Mark your jeans where you want to hem them. Put on the shoes you’ll usually want to wear with your jeans for this, and if possible, enlist a buddy. The best look is said to be a hem that reaches just almost to the floor at the back of your foot, but I actually tend to hem my jeans a little shorter than this to keep them out of the snow and mud that I stomp around in all the time. But hey, I am clearly no fashion plate, so mark yours where you will.
2. Lay your jeans out flat and draw a line all the way around both legs at the point you marked.
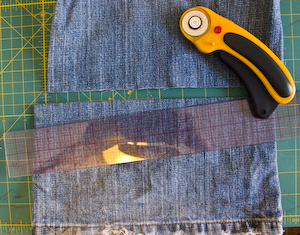
3. Cut your jeans off at this point.
4. Take the bottom parts of your jeans that you’ve just cut off. Lay them out nice and flat, and from each piece cut a 2″-wide strip straight across. When you pick each strip up you’ll see that it’s now a loop of fabric. Cut out just that part where the side seam is, and you’ll have a nice, long strip just the perfect length for the bottom hem of each leg of your jeans.
5. Follow the instructions of your bias tape maker to turn each of your nice, long strips into a nice, long piece of 1″ double-fold bias tape.
NOTE: The instructions for making your bias tape will require you to iron to form the folds in your tape. Denim won’t do a great job at holding this fold for long, so finish hemming your jeans right after you make the bias tape.
6. On the inside of your jeans, line up the raw edge of your cut-off jeans with one of the raw edges of your denim bias tape, and sew all the way around.
 7. Now fold the bias tape over so that it looks nice and neat on the front side and the second raw edge is tucked neatly inside, and sew all the way around again.
8. Show off your concert ensemble in its entirety. Don’t you look hot?
Once you’re familiar with this process, the beauty and real point of it is that you can instead choose to make your bias tape out of any other sturdy fabric you own (may I suggest burlap?), going for either a complementary or contrasting color for effect.
Making and sewing bias tape is, on the whole, pretty simple, although it looks tricky. If you don’t want to buy a bias tape maker, try using a tutorial for making your own bias tape without a bias tape maker.


Neat idea, I’m in the same boat to need to hem pants and jeans. I’d like to see what the jeans look like with the bias tape added. Could you add a picture of the finished product??
Neat idea, I’m in the same boat to need to hem pants and jeans. I’d like to see what the jeans look like with the bias tape added. Could you add a picture of the finished product??
Neat idea, I’m in the same boat to need to hem pants and jeans. I’d like to see what the jeans look like with the bias tape added. Could you add a picture of the finished product??
Pingback: Hemming Your bJeans/b 102: The Bias Tape Method : Crafting a Green World | JeanQueen.co.uk
Pingback: Practically Crafty: How to Mend a Hole in Your Pocket : Crafting a Green World
Pingback: Practically Crafty: How to Mend a Hole in Your Pocket
Pingback: Think Outside the Fabric Box: How to Sew with Knitted or Crocheted Fabrics : Crafting a Green World
Pingback: 8 Great Bias Tape Project Ideas | Whipstitch
The tape you have made is not bias tape. Bias tape is cut on the bias. You have cut on the straight weave of the fabric. It may still work as long as it doesn’t pucker.
Pingback: Great things to make with bias tape. | Whipstitch