
 I rarely ever come across a piece of fabric that is in perfect shape.
I gather almost all of my fabric from thrift stores, yard sales, recycling centers, and the occasional dumpster, and its condition generally ranges from very well-loved to near-pristine with the odd red wine or tomato sauce stain.
A lot of vintage fabrics can be restored, but some stains, or fading, or damage from long-term folding, can’t be restored to the same color or strength of the the original fabric.
And that’s an additional challenge to the fun of working with thrifted or vintage fabrics. Here’s how to work around the blemishes:
The only big thing NOT to do is to cut the stain out of the fabric before you put it on your shelf. Cutting will allow the fabric to ravel or stretch, and it’ll be a big pain when it’s time to cut out a pattern from it. If you’re worried that the stain might spread to adjacent pieces of fabric as it’s folded up in storage (which is valid), then you can layer some clean, white, archivally-safe paper on either side of the stain.
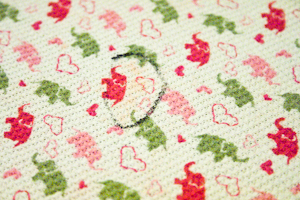 My go-to technique for regular fabrics, stuff that’s thrifted but not necessarily vintage, is a fine-point Sharpie. My biggest problem with these fabrics is that when I’m cutting out a pattern, I’ll get so focused on what I’m doing that I’ll fail to notice, until it’s too late, that there’s a stain on what I’m using. So I circle the stain with a permanent marker, one that won’t wash out even if I pre-wash the fabric again, so that I simply can’t miss the blemish.
If I don’t want to mark on the fabric but I don’t mind putting a pin through it, I’ll pin a piece of paper with a little note on it on top of the stain (the note often reads, “Stain here”).
If I don’t want to mark on the fabric OR pin it, I’ll lightly iron some freezer paper smack on top of the stain, also with a note.
Any of these strategies will alert me as I’m working to the locations of blemishes that I need to work around. What special strategies do you use when you’re working with vintage fabric?

Great tips! I’ve definitely realized too late that I forgot to compensate for a stain on my vintage fabric. Sometimes, a well-placed applique is a good solution to that problem.
Great tips! I’ve definitely realized too late that I forgot to compensate for a stain on my vintage fabric. Sometimes, a well-placed applique is a good solution to that problem.
When scanning for stains, don’t forget to hold the cloth up to the light. Some grease stains are translucent and hard to detect in a flat-survey.
Another marking technique is a sticker. This is only good when you are using the fabric immediately. You don’t want adhesives in storage.
When scanning for stains, don’t forget to hold the cloth up to the light. Some grease stains are translucent and hard to detect in a flat-survey.
Another marking technique is a sticker. This is only good when you are using the fabric immediately. You don’t want adhesives in storage.
Such wonderful yet simple ideas!! Dangit, another “why hadn’t I thought of that?” moment. So much better than my usual “where was that stain, oh crap, it’s there – smack dab in the middle of the main piece that I already cut out” method.
Thank you!
Such wonderful yet simple ideas!! Dangit, another “why hadn’t I thought of that?” moment. So much better than my usual “where was that stain, oh crap, it’s there – smack dab in the middle of the main piece that I already cut out” method.
Thank you!
Pingback: Avoid the soils and stains when using vintage fabrics · Sewing @ CraftGossip
Pingback: Avoid the soils and stains when using vintage fabrics · Sewing @ CraftGossip
This is definitely a reminder of the simple things we can do to salvage those fabric treasures found along the way. Will surely be of use to our customers who have found their perfect fabric between our walls, and underestimated the creativity that occurs when a child is left with colored markers unattended. The resulting question….” OMG!, Now what?!”
This is definitely a reminder of the simple things we can do to salvage those fabric treasures found along the way. Will surely be of use to our customers who have found their perfect fabric between our walls, and underestimated the creativity that occurs when a child is left with colored markers unattended. The resulting question….” OMG!, Now what?!”