Upcycle old pallets into wooden children’s toys. It’s actually a lot easier than you might think!

Have you ever seen lovely wooden children’s toys, cut into fanciful shapes, stained in bright colors, perhaps with woodburned accents, and wished that you could make something like that yourself?
It’s actually not that hard!
My kids and I make toys like these out of the lowliest material imaginable: pallet wood. And let me tell you, you are going to be SHOCKED at how well pallet wood cleans up! Our pallet wood wooden children’s toys may not be impeccably crafted–the swords always come out a little crooked, and you can definitely tell that it was a kid who held the wood burner–but they 100% hold their own against store-bought wooden toys.
DIY Wooden Children’s Toys Made from Pallet Wood
You will need:
+ wood pallet. Look for one that has an HT stamped on it; that means that it’s been heat-treated, not treated with chemicals.
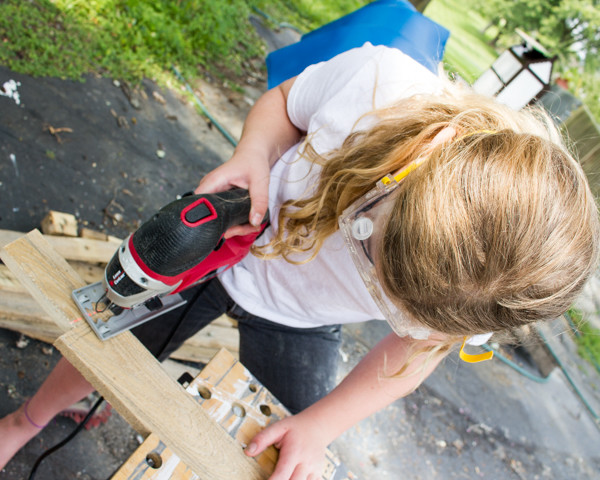
+ jig saw. This tool is a deal-breaker; you simply must have it to make toys like the ones that I’m showing you. If you don’t want one of your own, ask around your friends to see if there’s one you can borrow, or go in with a few like-minded friends who also want to make wooden toys. If you can’t beg or borrow a jig saw, you can still make plenty of toys with a straight saw–just think of all the things that you can make with simple, straight cuts.
+ sandpaper or sander. We use this palm sander, and it makes short work of the loads of sanding that you have to do with pallet wood. You can definitely do the sanding by hand, though–just plan to devote plenty of time to it.
+ watercolors. That’s how you get the lovely effect of a colored wood stain.
+ wood burner or Sharpie. Either work to add extra details to your toys.
+ clear sealant. Some people choose to use a beeswax sealant, but unless you’re worried about a kid mouthing the toys, a clear polyurethane sealant is going to do the best job.
+ workbench, pencil, ruler, etc. You know the types of accessories you’ll end up needing.
1. Check your pallet wood, and mark or remove nails. I mentioned before in my tutorial for deconstructing wood pallets that this is an important first step, especially if you’re working with a kid. My usual first step is to cut those nails right out of the wood.
2. Draw your design. Draw the design in pencil right on the pallet board. Some toys, like the torch in these photos, you can freehand, and other toys, like the lance, you’ll want to measure and mark with the help of a ruler.
You can also, of course, use stencils or image transfers to help you with your design.
While you can do cut-outs and holes with the help of a drill, and you can do super-fiddly curves–really, you can do anything!–I like to think of ways to keep the design simple. It’s so easy to stain and burn the toys to add embellishments that you don’t really need to go all out on complicated cuts.
3. Cut the design out with the jig saw. My eleven-year-old can handle the jig saw, but it’s a lot of work for her, and it’s still too difficult for my nine-year-old to handle, so I do most of the cutting, with the kids there to steady our portable work bench and help me rearrange the piece in the vise.
The jig saw can’t do angles, so for those kind of cuts, cut both rays in so that you meet at the vertex.
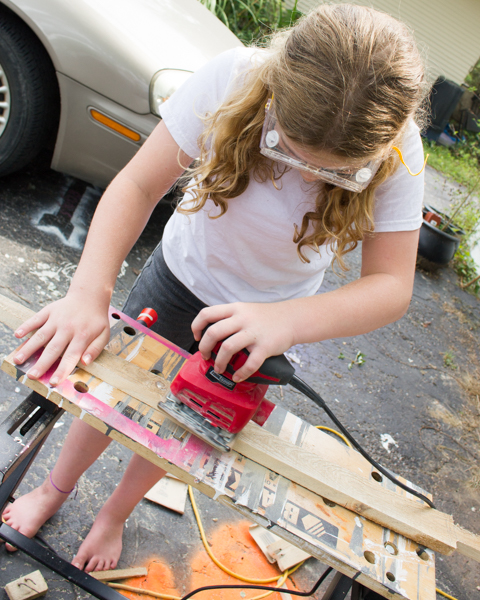
4. Sand the piece. This step is magic! You will be amazed at how quickly, and how drastically just sanding the surface of that pallet wood is–in seconds the piece turns from junky to lovely. Sand the toy all over, beveling all the corners and making sure there are no splinters.
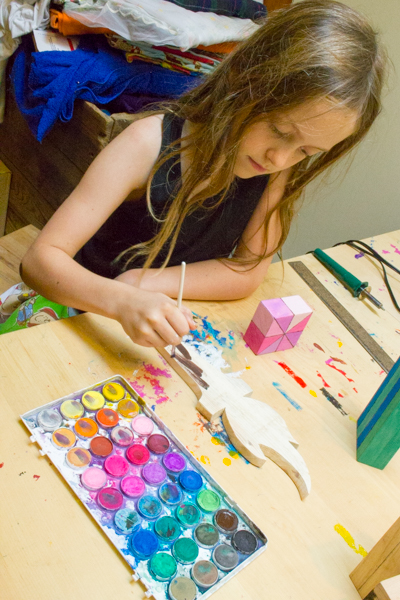 5. Paint. Use a regular set of watercolors to paint the pallet wood wooden toy; keep the paint pretty thin to give the effect of a wood stain.
6. Embellish. You can add details with a wood burner or a Sharpie.
If you mess up the painting or embellishing, simply sand off the top layer of wood and start again.
7. Seal. The sealant will really make those watercolors pop, and will protect them from bleeding if the toy gets wet.
And there you go! Now there’s no limit to the toys that you can make!


Pingback: Crafting a Green World | The home for green crafts and tutorials!
I’m delighted, it looks so cute! I also want to recommend the site https://woodencaterpillar.com/ maybe it will inspire you! Good luck!
A super pointy impaling device for kids? Now run along and play children. What are you thinking? SMH.