 It’s unlikely you’ll need to do much to prepare your molds in any special way. Silicon molds can be turned inside-out to unmold your finished chalk. Regular muffin tins can be turned upside-down and given a good thump. Cardboard containers used as molds can simply be peeled off of the finished chalk.
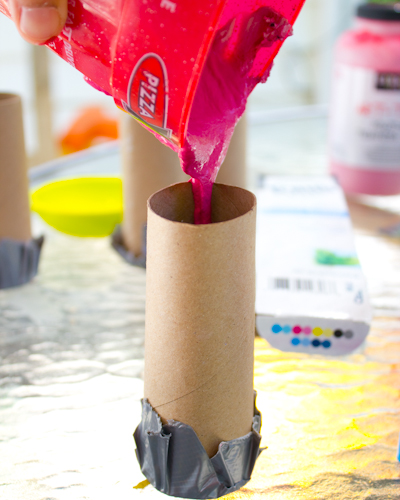
To make a nice, big chalk stick, seal one end of a toilet paper tube, a cut-down paper towel or wrapping paper tube, or the long, narrow box that a tube of toothpaste comes in with duct tape. To make other shapes of chalk, search your recycling bin for other likely containers–if the container can be ripped or cut, then you’ll be able to unmold your finished chalk just fine when it’s set.
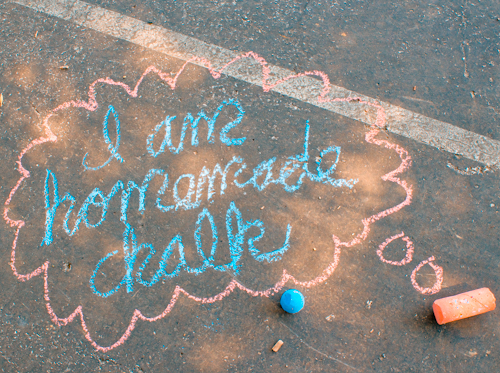
When you have your molds and your plaster of Paris mixture ready, simply pour the dyed plaster into each mold, thump the mold onto your work surface a few times to release any bubbles, and let it rest until it’s set, which will likely take longer than indicated by the directions on your plaster of Paris package, since you’ve added in that pigment.
Next >> Step 3


This is a great tutorial. I would never have thought to use tp rolls for the mold. Does it wash off the sidewalk easily?
Oh, yeah, it washes right off. One of my girls’ daily chores is to hose down our front porch and sidewalk every morning, because they’re the ones who’ve drawn on it and had picnics on it and let their dump trucks pour dirt all over it all the previous day, and the sidewalk chalk always comes off with the hose. We also draw a lot on the basketball court in the park by our house, and if those drawings haven’t worn off by the next rain, they’ll be gone afterwards.
i love your website…it’s been a long time since i have had a child in school…but now we have two young grandsons’ ages 4 and 2. They are busy little farmers, hunters and gatherer too. they enjoy going out for a drive to see if they canspotany animals moving. I love your site, i truly do. how wonderful this would be for my children.
we are Grammie and Pops
This is awesome. I have tons of tempera paint that I’m going to recycle into this project, which I hope works as well as the powdered. Thanks for sharing!
Pingback: Crafting a Green World | Snow that Won’t Melt: DIY Snowflakes Crafted from Eco-Friendly Materials | Page: 1 | Crafting a Green World
This post is perfect for the Monday Kid Corner Weekly Linky Party. The next party goes live Sunday morning and this week’s theme is SIDEWALK CHALK. Be sure to brush off those archives as well and link them up at http://thejennyevolution.com/category/linky-parties/monday-kid-corner/ See you there! Jennifer
Thinking of making some chalk, but also thinking that with the limited amount of time I have, I might as well just buy some. Grr, I can’t wait for my college classes to be done! One more year. One. More. Year.
But what if I reminded you that sidewalk chalk uses up toilet paper tubes? There goes the rest of your toilet paper tube hoard!
The rest of it? I plan to just send it all to you :0)