

We needed a way to store and display our family photos.
We own an antique card catalogue.
We combined the two, and came up with a card catalogue photo drawer, an accessible, out-of-the-way, organized, dust-free way to store photos. Here’s how we did it:
1. Print photos. I ordered photos online, cropping them in my own photo editor to 3.25″x5″ (card catalogue card-sized), but printing them as 4x6s with a white border that I cut off later. The savings of printing the photos as 4x6s made the extra work of cropping them later worth it, but if you can find a place that will print you 3x5s at a good price, then more power to you!
When you order photos, I think that you should always take advantage of your digital camera’s auto calendar and use the date the photo was taken as part of its filename. The company that prints your photo will nearly always print the photo’s filename on the back. It’s a crucial piece of information to have about your photos, and it couldn’t be easier to record it this way.
When the photos arrived, I cropped them all using a guillotine paper cutter, making sure that each photo would fit in the card catalogue drawer.
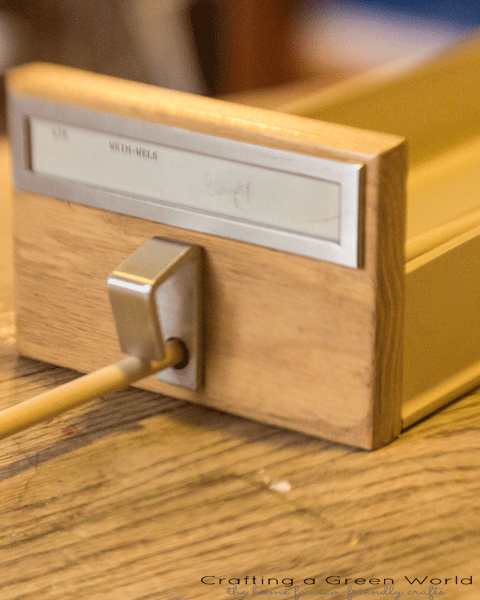 2. Restore missing hardware. My card catalogue no longer has its original rods (I can’t imagine what would have been done with them, unless they were sold for scrap?), so I am having to remake them as I restore the piece. The holes for the rods are the perfect size to substitute a 5/16″ diameter dowel. For the knob at the end of the rod, I glued on an unfinished wood drawer knob with the end reamed out to insert the dowel and give it a better grip.
The dowel and unfinished wood knob aren’t my favorite looks for this piece, but they were cheap and easy enough that they’ll be painless to discard if I ever come up with the perfect replacement.
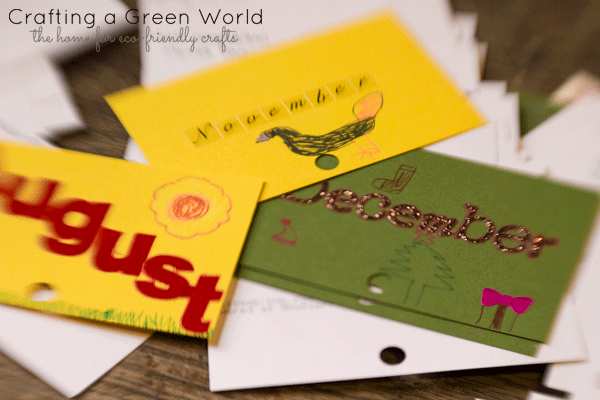
3. Make month and year dividers. The beauty of the card catalogue drawer is that there is plenty of room to store and display probably a decade’s worth of photos at a time, but this makes organization very important.
I cut year and month cards to size using cardstock, and then gave them to my kids to decorate with stickers and acid-free gel pens. I didn’t include any three-dimensional embellishments on these cards, because I wouldn’t want them to make an impression, over time, on the other photos.
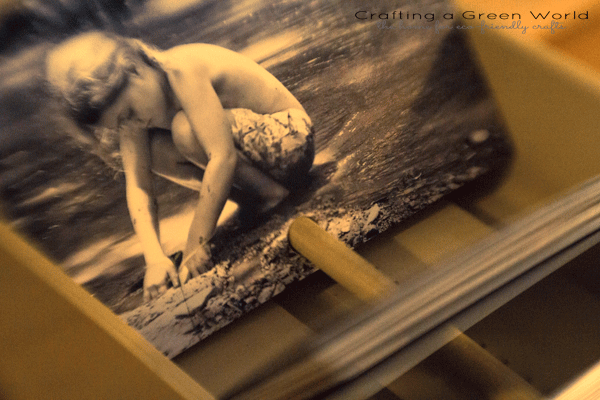
 4. Hole punch all cards. The rod size that I used, 5/16″, requires a 3/8″ hole punch
 to give the cards a little wiggle room to slide back and forth along the rod. I made a punching template out of cardboard from the recycling bin, then used that template to make sure that each card was punched in exactly the same spot–that way they’ll look tidy in their drawer. This does mean that each photo has a hole punched through it, of course, but since the hole is small and centered at the bottom of each photo, and since these punched photos are going to bring us a lot of happiness, AND since I do have digital backups of all the photos, it’s a sacrifice that’s well worth it.
5. Sort all the photos into chronological order. Using the dates on the back of each photo, I put them in chronological order behind their month and year cards.
As I was doing this, I also took an acid-free felt-tipped pen and wrote down on the back of the photos any information that anyone might want to know about them when I’m no longer around to tell their stories. This information includes people and places, but also brief versions of the little stories that the photos bring to mind. For instance, on the back of one photo that consists simply of two children sound asleep in two theater seats, I wrote, “Willow and Sydney both fell asleep about two seconds into Stomp, the loudest musical performance EVER.” Another photo, taken during Will’s pirate-themed birthday party, has the first and last names of all the children who attended that party in case, you know, any of them ever become famous.
 6. Insert all the photos and cards into the drawer. We slid all the photos and cards onto the card catalogue rod, and put the drawer back into place. The beauty of the rod is that the cards can be taken out and the rod can be removed, so we can keep adding the photos of each year after it passes.
After I get all our several years’ worth of photos archived (as you can tell, archiving each year is a many-stepped process), I plan to write down longer versions of the stories behind some of the photos and file them together with their photographs. I’ll encourage my kids to do the same, and I’ll teach them how to make altered cards (think smash book-style) to intersperse (inside archivally-safe plastic sleeves, those) throughout the cards.
There really is nothing more symbolic of our family, and more appropriate for storing its history, than this antique card catalogue.


So, while you want to steal my bowl, I want to steal this. I have a feeling you would have better luck getting away with it!
I love this idea. I love photos but keeping them jumbled in the plastic tub in my closet really doesn’t show that love. I am working on making them more accessable, but it’s tough with so little wall space (for hanging pictures), and shelf space (for albums).
I am now on the lookout for a card catalog thingy.
i want to say that i am big fan of photos. i always capture a photo of every moment in my life to keep my keep my memory fresh. And thanks to give an idea that how to make photo folder from template and store as a safe, dust free.