Do you use cloth pads? If you’ve been wanting to give this a try – or need to bulk out your current stash of pads – this quickie tutorial will have you sewing your own cloth pads in 30 minutes or less.
Cloth pads might seem a little bit gross, if you’re new to the idea of reusable menstrual products. Companies that make disposable pads and tampons spend big bucks to make us feel like our periods are something to be ashamed of, and that’s no accident. They make big money with their disposable products that clog our landfills and cost you money every single month.
Really, once you start using cloth pads, they’re no more gross than paper ones. And unlike paper pads, all of those used menstrual products don’t pile up in a landfill, which in my opinion is way more gross than a reusable pad that you wash in the machine!
Using a Cloth Pad
You can basically treat your cloth pads like paper ones in a lot of ways. Keep one stashed in your purse – you can even get cute carrying cases for them! – when you change your pad while you’re out and about, just slip the used one in the carrying case to wash when you get home.
Cloth pads will get stained with use. If you’re OK with that, just give them a rinse when you change your pad at home, and toss them right in the hamper or machine. I tend to toss my used cloth pads directly into the washer, so they won’t stain my clothes in the hamper. If you want to prevent stains, you can soak them after use in water with a little lemon juice and salt, then was as usual.
I find cloth pads much more comfortable than their cotton or paper cousins. They don’t feel so much like wearing a giant diaper, and unlike paper pads, they don’t fall apart on you if you go a little too long without changing them. The snap-together wings on a cloth pad are also a lot more reliable than the sticky wings on a paper one. Don’t you hate how the wings on paper pads bunch up if you don’t stick them just so?

DIY Cloth Pads
Materials
- paper or cotton pad with wings that you like the size and shape of
- reclaimed t-shirt
- reclaimed dish rag or towel (clean, of course!)
- sewing machine, thread, pins, iron
- small snaps and snap kit
Directions
1. That disposable pad is your pattern, so carefully open it up and trace the shape onto your t-shirt material and your rag or towel. If you’re careful not to remove the tabs that cover the sticky part, you can stash that pad away for an emergency.
2. Cut two pad shapes out of your t-shirt and one out of your towel. Cut one more pad shape out of the towel, but leave the wings off of this last piece.
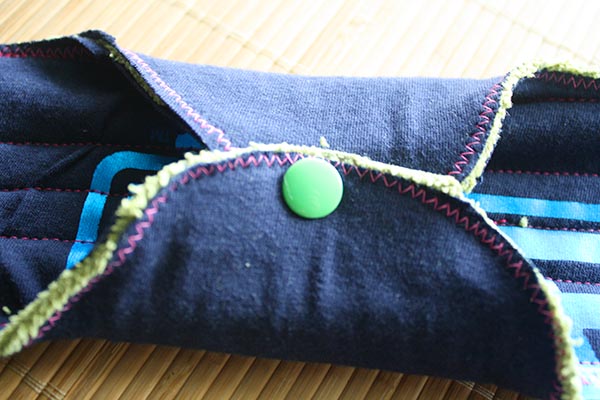
3. Iron all of your pieces, and layer them up like this: t-shirt piece on the bottom, towel with wings, towel without wings, second t-shirt piece on top. Pin everything in place.
4. Use a serger or your sewing machine’s zig-zag stitch to sew all the way around the outside of your pad.

5. Use a straight stitch to quilt the middle of your pad. This will secure the extra padding in place. You don’t have to do a ton of quilting: 4-5 rows of stitches are fine.
6. Iron your pad, add your snaps, and you’re all set!
Want to make more disposable menstrual products? Julie’s got a great roundup of DIY projects just for your period!


I’ve been contemplating diving into the world of reusable pads. How does this design hold up on medium to heavy flow days? Other patterns for cloth pads I’ve seen use pul, which has a thin plastic coating that stops fluid from seeping through. Buying the pul has been one of my “excuses” for not giving them a try. If these hold a decent amount, I will definitely be trying these!
I’ve made a few versions of these for different days. I’ve used this one for light to medium days. For a heavier flow, you can add more of the non-wing towel layers. For a super heavy flow, you could probably up it to 4 or 5 instead of the 1 called for here. I also have been put off by the plastic in other tutorials, so I was excited to develop a design that works for me!
This is probably TMI, but I haven’t been using these for my period yet. I’m in my third trimester of pregnancy, and it’s…er…a messy time. The design in the tutorial is one that’s worked as an overnight pad for me except for one incident that was frankly a little scary – I thought my water had broken!
Thanks for the info! I think I’ll be raiding my stash and see what I have that I can try these with. I’ve been wanting some new kitchen towels anyway. 😉
I have been using cloth pads for about 2 years now. I really need to make some more, but I’ve been too lazy.
For those ladies that need more padding, there are some pretty easy tutorials out there for making a pad that you can add inserts too (that’s what I started with).
I have a light flow for my entire period, so I can get away with a really thin pad, but I still like the idea of being able to increase my protection if needed.
I’ve been using cloth pads for over 10 years. They are not stained at all. I keep a lidded bucket the bathroom about half full of water and about 2 T each of laundry soap and a no-name brand of powdered peroxide (similar to Oxyclean). I change the water every 2-3 days and soak until there are no stains left, then wash with my regular laundry. The pads are as clean as the day I bought them.
That is so awesome, Rachelle. Thank you for the cleaning tips!
For those who are worried about the absence of waterproof fabric, I make mine with old polar fleece. No need to buy PUL, just use what you have around the house. If you don’t have any, your fabric store should be able to sell you an 8 inches stripe for a only few bucks.
You just need to pay attention not to quilt the fleece. Fleece is not 100% waterproof but I didn’t have any problems so far. And also, it’s respirant.
You can use no pill fleece (or an old fleece sweater) as the waterproof backing. Many ladies don’t want pul so they use fleece.
There is also zorb fabric if one wants to use that as absorbent material as it’s very thin. 1 layer is needed for regular flow and the thickness is about as 1 layer of terry.
Love these ideas, Ana!
I use wool as a backing, I bought some as well… I am having fun here, for I had too many allergies which would cause my skin to burn and feel like my lady parts were on fire.I made about 40 pads out of materials which are cotton and fleece and wool (still working on adding them to all of them as a backing upgrade!) Really they will be a little thick from the wool layer but I can always wear my yoga pants to force them to hug my skin, also baggy jeans which are my favorite. These are the best things and last forever, not to mention they save money!