
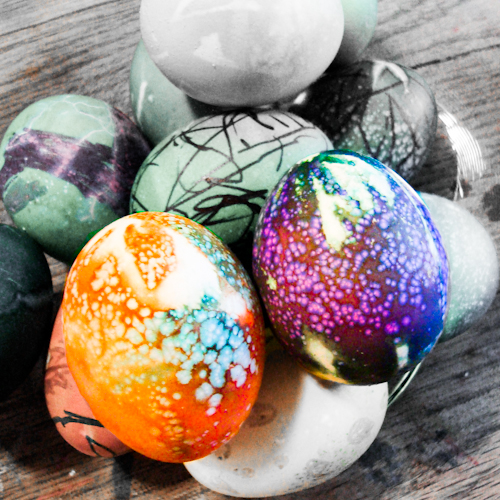
Use your stash fabric to make cool tie dyed Easter eggs with your kids.
I don’t know about your kids (or you!), but my kids want to dye Easter eggs every day. Seriously, everyone is required to eat at least two hard-boiled decorated eggs for lunch every day, and we’re still not getting through them as fast as they’re getting made.
It’s my opinion, however, that repetition encourages creativity, in that everyone has long since grown tired of simple vinegar + food coloring preparations, and we’ve launched into the wide world of more unusual egg decorating projects. We’ve dyed eggs with silk scarves, blown them out, decorated them with stickers and Sharpies, and added wax to the mix.
Tie-dyeing eggs is another simple decorating activity, since the only materials that it requires over and above the dye are some rubber bands and some stash fabric just about ready for the compost heap (Yay, stash-busting!).
I’m really fond of the unusual color application that tie-dyeing your eggs results in, however. Yes, they really do look tie-dyed when you’re done. And here’s how to do it:
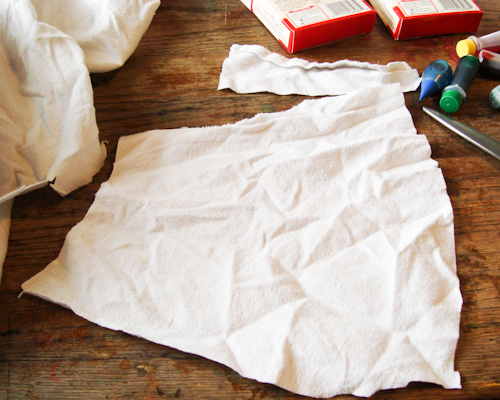
For each egg you want to tie-dye, you’ll need a piece of trashed-out stash fabric large enough to roll the egg up in and tie it off at each end.
Any medium-or light-weight natural fabric will suffice for your purposes. I’m using an old flannel bedsheet that I’ve already cut just about every usable part off of–it’s otherwise destined to be shredded with scissors and sent to live in the compost heap.
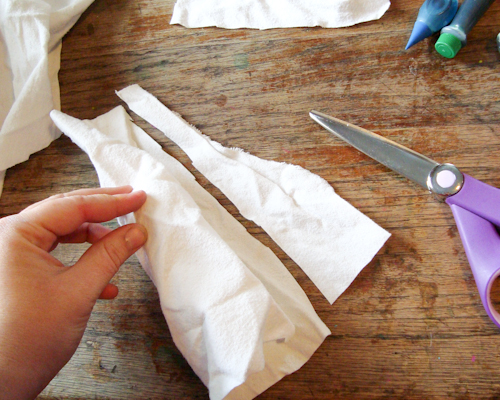
Roll the fabric up tightly around the hard-boiled egg, cutting off the extra that remains after a little overlap.
Wrap each open end of the fabric very tightly against the ends of the egg, using a rubber band, stash yarn, or twine. The wrinkles in the fabric are what will make your tie-dye interesting.
Of course, you can roll and wrap this fabric in any direction that you’d like.
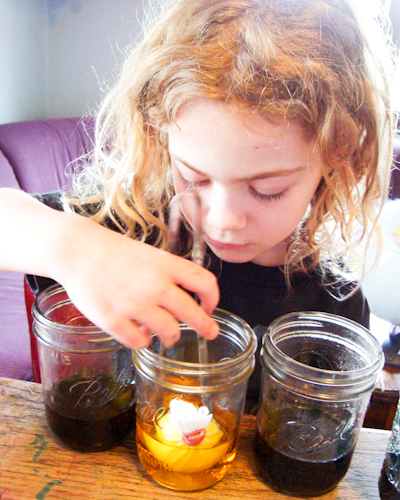
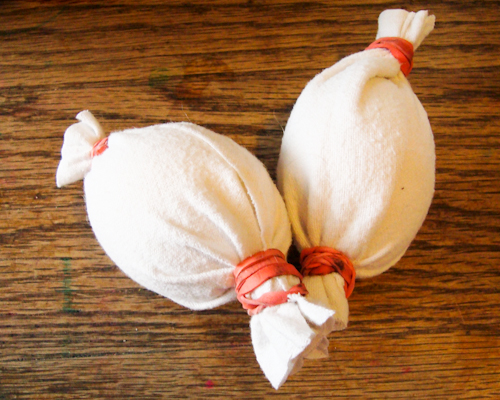
Dip the wrapped egg into your dye solution long enough to completely saturate the fabric. You can dip your egg in a variety of colors and in a variety of ways–think of the methods used to tie-dye fabric and you’ll often be able to figure out a way to mimic it with the eggs.
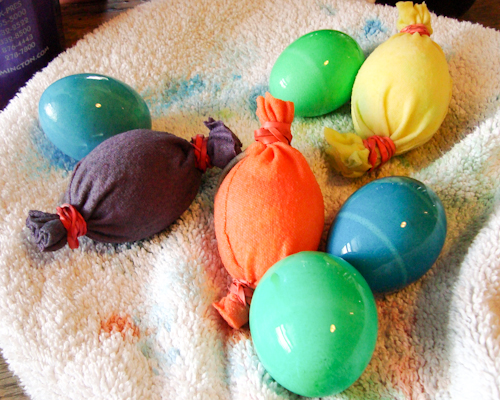
Just as with tie-dyed fabric, you’ll need to allow the eggs to remain in the saturated material for at least 24 hours to allow the dye enough time to transfer. Put the eggs in the refrigerator on a towel-covered platter (don’t confuse the wrapped tie-dyed eggs with the regular dyed ones in this picture–there’s room in an Easter for all sorts of eggs!), and at the end of the 24 hours let them dry at room temperature for absolutely no longer than two hours. I, personally, keep our eggs out of the refrigerator as little as possible until they’re consumed, because I’m not a fan of food poisoning.
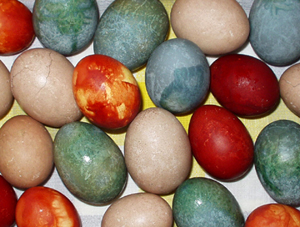
When you’re finished, you’ll have Easter eggs that are interestingly streaked and mottled, tie-dyed and ready for your hippie egg hunt.


Is that first picture of eggs that you dyed using this technique? Because they don’t look like the ones on the last page and don’t understand how you got all those gorgeous colors.
it looks to me that to get the eggs to look like in the first image you need to put stuff inside the wrapped fabric, not just soak it… Very misleading article, I really hoped that the instruction is for eggs on the front page, thanks for wasting my time :/
Wait a minute. Those are not the “Hubble” eggs I thought I was learning how to make.
I agree, how did you get the mottled/spotted effects on the eggs on page 1 of the article? I’m guessing the ones in the last page were only dipped in one color and not multiple, thus not getting the tie-dyed effect that we were reading along for…?
Pingback: 5 Fantastic New Ways to Decorate Easter Eggs: Holiday Decorating
Calm down, people–Easter is a happy holiday! Not only are the eggs in the picture the ones that were made during the course of the tutorial, but they were also made by a six-year-old and a four-year-old. I’m not sure what you’re confused about, but this is how to make those eggs, my friends.
Oh, I get it now, perhaps–is it the fact that in the last pic, there are some other Easter eggs mixed in with the cloth-covered ones? That photo just shows the last step in the tutorial, which is to leave the eggs tied up for 24 hours. You can then feel free to use the dye to color your other eggs more traditionally, if you wish.
Pingback: Easter Crafts & Similar Madness | Oh Waily Waily
Pingback: Easter Eggs | {live laugh celebrate}
Pingback: Earth Day! « aisforaspire
Pingback: Happy Easter. « The Blargosphere.
Pingback: A Technicolor Wedding Idea | Wedding Ideas Blog | Once Wed
hmmm, could i use a little spray of wax on the eye to give me some resistance…. a liquid dropper to apply my colors and then leave them to transfer!? i like this idea of tye dying! could be awesome! will try!
I could definitely see wax working well. The liquid dropper, though, might need some experimentation to get the effect that you want–the fabric needs to be completely saturated for the dye to bleed through. It would definitely work if you dyed the fabric before tying it onto the egg, but I think you’d get better control over what colors go where if you saturate the fabric after it’s tied on.
Im sorry, but I am still confused. in the last picture above the eggs look one solid color, as mentioned above the ones at the beginning of your post are multi-colored, with splotches etc. It seems as though there is another step?? The ones in the beginning look celestial and speckled.
Any clarity would be great,
thanks!
The last image shows the last step in the tutorial, that of keeping the fabric wrapped around the egg. My kids were also dyeing Easter eggs the more traditional way, and using the same work area to do so. Every image in which you see traditional-looking dyed eggs along with the tie-dyed eggs is just that–traditionally-dyed eggs and tie-dyed eggs.
Our family followed these directions last year, 2011, and they turned out AWESOME! Just like the picture at the beginning of the article. We dipped in a 2 or three colors and even spooned some dye over the cloth. I too was skeptical but they were as beautiful and incredible as the opening photo..promise!
the easiest and best way to make beautiful multi colour eggs !!
“Eggs-pert” Tip: Hard boiled eggs work better for this style because they are less fragile to work with.
1. Over a sink, place one hard-boiled egg in a colander and coat with vinegar.
2. Choose 2 to 3 colours maximum. Starting with the lightest colour, drip food colouring on the egg and gently roll in the colander for a few seconds to help spread the colour. Let the colour sit for minimum 30 seconds (more depending on your colour preference).
3. Repeat step two with remaining colours, allowing each to set for minimum 30 seconds.
“Eggs-pert” Tip: To make the eggs extra psychedelic try wrapping them with two or three elastic bands before dying.
I think the eggs were great my brothers and sisters whant to make your eggs every day.
Well I tried making the tie dye eggs and might turnd out very light, I used a tephlon pan would that be the reason, or too much/not enough vinegar.
You don’t need much vinegar–in fact, too much vinegar will eat away your eggshell! I’d suspect the saturation of the dye–either perhaps there wasn’t enough dye saturating the cloth and therefore touching the eggshell (which could be a problem with the amount of dye OR the thickness or material of the cloth), or the dye was of poor quality or old. I don’t think the type of container could be the problem, but I’d love to hear anyone else’s ideas!
Do you completely submerge the egg in each different color, or do you dip parts in different colors and then let it dry? I think people in the comments are confused on this one because they, like me, can’t fathom how an egg wrapped in a piece of fabric that is dyed one color can turn out so many colors! But I still want to try it–I just want to make sure I get it right! Also, what kind of dye do you recommend?? Thanks for sharing this awesome tutorial! (:
You can do as many colors as you’d like, as long as you completely saturate the fabric each time. The folds and gathers in the fabric that naturally form as you tie it around the egg are what create the interesting patterns of color.
Pingback: Crafting a Green World | How To: Eco-Friendly Wreath for Easter! | Crafting a Green World
Pingback: 20 Eco-Friendly Easter Egg Ideas | What About Pollution
Pingback: Crafting a Green World | The home for green crafts and tutorials!
Pingback: Easter Bunnies | Bounce Photography