
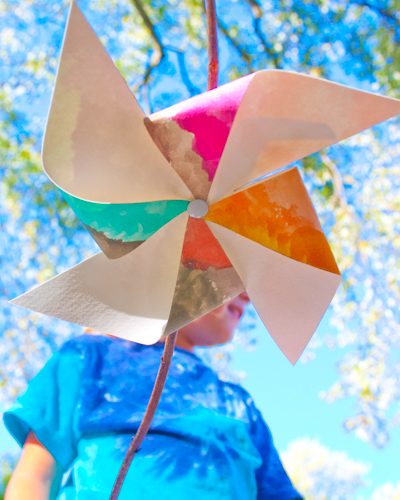
When I craft by myself, I tend to focus on recycled crafts like record bowls, wreaths upcycled from felted wool sweaters and home decor decoupaged with vintage wallpaper samples. However, when I craft with my two little children, it’s nature crafts that we do together. Children and nature are easily at one, and this simple pinwheel, made with a child from one of her own watercolor paintings and a twig from a favorite tree, is sweet and beautiful and will fascinate your child anew with every breath that she takes.
You will need:
- Watercolor painting. Use the best tools that you can afford to buy. We paint with Stockmar watercolor paints onto Strathmore watercolor paper. Let your painting dry completely before you begin, or get your child’s permission to use one of her previously-painted pictures for this project.
- Pencil, ruler, and scissors suitable for paper
- Thumb tack
- Tree twig
- Glue or tape
1. Cut your watercolor painting so that it is a perfect square. A six inch square will make a nice pinwheel, but any size will work, providing that your twig is also long enough.
2. Mark the exact center of your square. You can do this by measuring the square from one corner to the opposite corner, and marking the middle point.
3. Draw a line from each corner to a little more than halfway to the marked center point of the square.
4. Cut down this line. The cuts will turn your square into a shape reminiscent of a four-petalled flower.
5. Decide whether you want to fold down each right corner or each left corner of every petal to make your pinwheel. There’s really no difference, but of course you must be consistent.
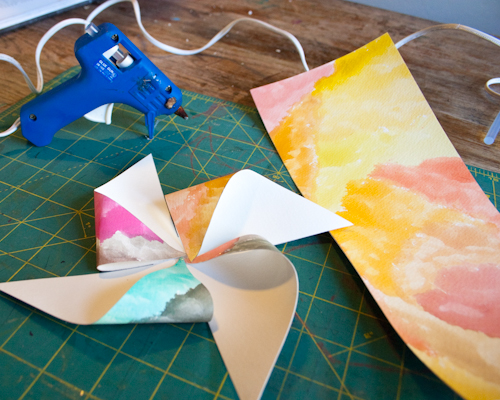
6. Fold down each right or left corner of every petal, moving either clockwise or counter-clockwise around the square. Take care not to crease the folds.
As you fold each corner down, glue or tape it to the center point of the square. Glue will last longer, but tape is easier for a child to manage.
7. Poke the thumb tack through the center point of the square, then remove the tack and use the point of your pencil to widen that hole. The hole should be wide enough that the pinwheel can spin freely around the thumb tack.
8. Put the thumb tack back in the pinwheel, so that the head of the tack is at the front of the pinwheel, then push the tack partway into the straight twig.
9. Make sure that there aren’t any rough spots or points on the twig that will cause the pinwheel to stick as it spins.
Now that the flowers are dying down in your garden, wouldn’t these pinwheels make nice blooms?


This is so cute. I will surely try it.
That’s the prettiest pinwheel ever! Thanks so much for the great idea, I’ll be linking.
Pingback: Sticky Business: Posts We Liked This Week | An Eclectic Blog