
This week I have been spending a good deal of time in the kitchen, cooking up natural dyes. I am actually surprised that after 7 years of art in college I had never learned to make paints, toxic or non toxic. But after reading Autumn’s post about how to make your own milk paint, I got to thinking even deeper into how to make pigments since the colored pigment can be as toxic as the binder. What I found out was a creative revelation that I can not stop cooking up! My personal criteria for creating pigment/dye is this:
- It cannot be toxic in any way, even if the substance is natural.
- It has to be in abundance and easily gathered in nature (don’t ever take so much that the plant can’t survive or make seeds.)
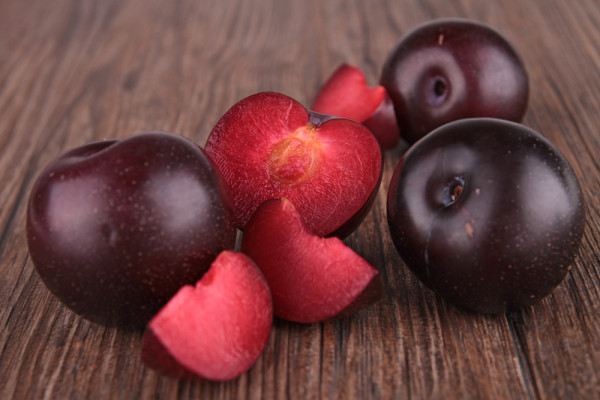
I totally hit the jack pot when I walked outside to find that my landlady next door has a plum tree with a gazillion plums that had already fallen to the ground and were being eaten by bugs, rotting, fermenting, gushy etc…
Editor’s Note: The plums here are red plums – the kind with bright pink flesh (as you can see in the photos below). You will not get the same bright pink color from other varieties of plum, so make sure the ones you use are red!
The natural organic dye experiment begins…
I began by skinning the plums and using only the dark burgundy red skins – I left the fruit for the wild critters, and kept the seeds and planted them – in hopes to grow some of my own plum trees.
I used salt as a dye fixative, since I was using fruit for dye but if you are making your dye from flowers, leaves, plants etc – then it is suggested to use vinegar.
The recipe I found was this:
- SALT FIX: 1/2 CUP SALT TO 8 CUPS COLD WATER
- VINEGAR FIX: 4 PARTS COLD WATER TO 1 PART VINEGAR
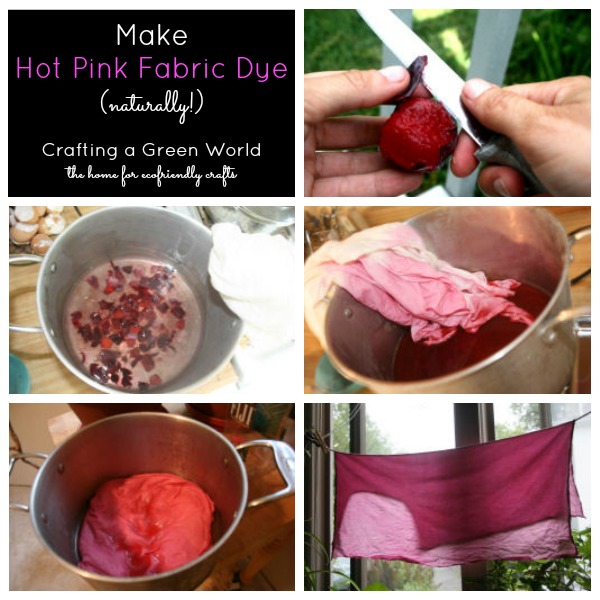
How to Make Natural Fabric Dye in Hot Pink
Materials
- Water
- Salt
- Cooking pot ( a spare that you don’t use for cooking food)
- Measure cup
- Strainer
- White, off white or light colored natural fabric (linen, organic cotton, wool and silk are best)
- enough red plum skins to cover your fabric in the pot
1. Simmer your fabric in the salt fixative for approx. 1 hour (see above), then rinse and ring it out before putting the fabric in the dye.
2. Once the fabric has the fix in it, dump the plum skins in some fresh water and simmer those for another hour. It is so amazing how red and beautiful the water turns within minutes of light warm simmer! Even though these are long stretches of time, you do not have to loom over the cooking process those few hours, you can cruise the Internet and read Crafting A Green World posts while your dye is brewing.
3. Strain out the skins and return the dye to the pot. Then start dipping the locally woven organic cotton into the plum dye! How freakin’ awesome, cause it started turning almost hot pink right away and stuck right to the fabric.
4. Let the fabric simmer lightly in the dye for a richer color for about an hour, all steamy, hot and sooooo pretty!
5. Allow the fabric to sit in the dye overnight to make sure it has the darkest outcome possible since when it is rinsed and dried the color will be alot lighter.
6. Rinse your fabric until the water runs clear, then hang it to dry.
Isn’t it pretty in pink ?!? (Almost as pretty as Molly Ringwald but I like my naturally dyed fabric even better then her prom dress!) All that from a couple discarded plums, Yay! It’s really easier then it looks and the whole process was totally relaxing and fun- not to mention I felt like I was part scientist, part witch! There are fantastic lists of natural stuff you can use for dye in just about every cool shade of color you can imagine. Go to Pioneer Thinking for a complete list of plants, berries, nuts and bark that can make a rainbow of fun, safe colors. For even more pigments a simple google search for “make your own natural dye” turns up plenty a colorful brew waiting for you to experiment with.
Have you ever tried a natural or non toxic dying process? What has been your experience?


That’s really awesome. Does anything work? Like watermelons or carrots?
That’s really awesome. Does anything work? Like watermelons or carrots?
That’s really awesome. Does anything work? Like watermelons or carrots?
Hey Nick!
I think anything is worth a try, but i would experiment with darker colors like carrots first before trying watermelon which might not give alot of pigment. We all know some veggies and fruits that totally stain, like beets and blackberries, so those are a sure bet for dye.
Hey Nick!
I think anything is worth a try, but i would experiment with darker colors like carrots first before trying watermelon which might not give alot of pigment. We all know some veggies and fruits that totally stain, like beets and blackberries, so those are a sure bet for dye.
Hey Nick!
I think anything is worth a try, but i would experiment with darker colors like carrots first before trying watermelon which might not give alot of pigment. We all know some veggies and fruits that totally stain, like beets and blackberries, so those are a sure bet for dye.
When I was in high school, I did a chemistry project on natural dyes, and their effectiveness on a variety of different fabrics. I wish I had a copy of it – it was really good.
turmeric (don’t need much), berries, beets. I wish I remembered what foodstuffs I used! Fun stuff!
When I was in high school, I did a chemistry project on natural dyes, and their effectiveness on a variety of different fabrics. I wish I had a copy of it – it was really good.
turmeric (don’t need much), berries, beets. I wish I remembered what foodstuffs I used! Fun stuff!
When I was in high school, I did a chemistry project on natural dyes, and their effectiveness on a variety of different fabrics. I wish I had a copy of it – it was really good.
turmeric (don’t need much), berries, beets. I wish I remembered what foodstuffs I used! Fun stuff!
I’m thinking of trying this with some natural wool yarn. Has anyone here dyed wool before? Wool yarn is so stinky when wet! However, I bet this makes it smells great. Oh geez. Can’t wait to try! Great idea Leslie!
I’m thinking of trying this with some natural wool yarn. Has anyone here dyed wool before? Wool yarn is so stinky when wet! However, I bet this makes it smells great. Oh geez. Can’t wait to try! Great idea Leslie!
I’m thinking of trying this with some natural wool yarn. Has anyone here dyed wool before? Wool yarn is so stinky when wet! However, I bet this makes it smells great. Oh geez. Can’t wait to try! Great idea Leslie!
Wait, before I get too too excited, first I have a question. Would your fabrics be washable after dyed, like if I wanted to felt something knitted with fruit-dyed wool? Does the dye set as if you were using Rit or Kool-Aid?
Still gonna try it. I might eat my yarn if I use blackberries or something 😛
Great Tutorial Leslie! This should work with wool, but I think the vinegar would work better than salt with that. Someone correct me if I’m wrong 🙂
Great Tutorial Leslie! This should work with wool, but I think the vinegar would work better than salt with that. Someone correct me if I’m wrong 🙂
Great Tutorial Leslie! This should work with wool, but I think the vinegar would work better than salt with that. Someone correct me if I’m wrong 🙂
Anglea -I washed my fabric in cold water – which I read is what to do. I think hot water would probably fade it pretty quick depending on what natural substance you used. Something like orange clay/dirt would last more warm washes then the plum skin dye I used.
Autumn- I think you are right, or maybe experimenting with different batches of fix would be fun too- like a little salt and a little vinegar.
Naomi – Your highschool must have been way cool, and you were way cool in highschool – my highschool sucked, we could have been BFF !
Onion skins work great (yellow) and you can use Alum as your mordant.
Onion skins work great (yellow) and you can use Alum as your mordant.
Onion skins work great (yellow) and you can use Alum as your mordant.
Is an alum mordant toxic though? Does anyone know about those types of mordants?
Is an alum mordant toxic though? Does anyone know about those types of mordants?
Is an alum mordant toxic though? Does anyone know about those types of mordants?
I’m really liking this site, with all the great info here!
I remember my mother being upset with me once, when i had ripe chokecherries in my blouse pocket and crushed them climbing over a fence–she ended up embroidering a flower over to make it look deliberate :} Natural dye-ing by mistake lol.
I’m really liking this site, with all the great info here!
I remember my mother being upset with me once, when i had ripe chokecherries in my blouse pocket and crushed them climbing over a fence–she ended up embroidering a flower over to make it look deliberate :} Natural dye-ing by mistake lol.
I’m really liking this site, with all the great info here!
I remember my mother being upset with me once, when i had ripe chokecherries in my blouse pocket and crushed them climbing over a fence–she ended up embroidering a flower over to make it look deliberate :} Natural dye-ing by mistake lol.
I am so excited I found this website… I have been trying to find organic dyes but they are extremely expensive! I was thinking about trying dying like this but i thought if the fabric was washed it would immediately wash out! but now i cannot wait to experiment with all of these! I have coffee and tea dyed fabric before but then the fabric cant be washed but maybe darker or fruit teas may set in better. I will definitely be writing more when after i experiment!
I am so excited I found this website… I have been trying to find organic dyes but they are extremely expensive! I was thinking about trying dying like this but i thought if the fabric was washed it would immediately wash out! but now i cannot wait to experiment with all of these! I have coffee and tea dyed fabric before but then the fabric cant be washed but maybe darker or fruit teas may set in better. I will definitely be writing more when after i experiment!
I am so excited I found this website… I have been trying to find organic dyes but they are extremely expensive! I was thinking about trying dying like this but i thought if the fabric was washed it would immediately wash out! but now i cannot wait to experiment with all of these! I have coffee and tea dyed fabric before but then the fabric cant be washed but maybe darker or fruit teas may set in better. I will definitely be writing more when after i experiment!
Hey Krystina!
Please please share what experiments you try and what works out- it will be great to learn all this together. My next experiment is going to be with all the fallen Hybiscus buds around my house! 🙂
Hey Krystina!
Please please share what experiments you try and what works out- it will be great to learn all this together. My next experiment is going to be with all the fallen Hybiscus buds around my house! 🙂
Hey Krystina!
Please please share what experiments you try and what works out- it will be great to learn all this together. My next experiment is going to be with all the fallen Hybiscus buds around my house! 🙂
Pingback: Yearn Worthy Yarn: Peace Silk : Crafting a Green World
Pingback: Carnival of Green Crafts #1 : Crafting a Green World
I once stained crunched up cardstock with turmeric–just stuck it in a zip bag with a turmeric and water bath, squished it around, then set it in the sun to dry. Beautiful golden color and crumpled texture, and you can do a lot of cardstock with one bag’s worth of “dye.”
I once stained crunched up cardstock with turmeric–just stuck it in a zip bag with a turmeric and water bath, squished it around, then set it in the sun to dry. Beautiful golden color and crumpled texture, and you can do a lot of cardstock with one bag’s worth of “dye.”
I once stained crunched up cardstock with turmeric–just stuck it in a zip bag with a turmeric and water bath, squished it around, then set it in the sun to dry. Beautiful golden color and crumpled texture, and you can do a lot of cardstock with one bag’s worth of “dye.”
Okay, I gave it a go! I should’ve followed your timing a little more, but it still worked and best of all it was fun! Here are my results.
Okay, I gave it a go! I should’ve followed your timing a little more, but it still worked and best of all it was fun! Here are my results.
Okay, I gave it a go! I should’ve followed your timing a little more, but it still worked and best of all it was fun! Here are my results.
Bree- you totally rock! Your fabric looks great!!! I left mine soaking in the dye for a crazy amount of time – overnight maybe for 12 plus hours. It took patience to not take it out right away. I LOVE love love that you tried it on paper too!!! Everyone go check out Bree (commenter above)’s dye experiment.
We are now dye buddies! Yay! 🙂
Leslie, I tried it myself, see the results.
http://naptimequilter.blogspot.com/2008/08/natural-dying-black-currants.html
Oh, and on the alum front. Most literature I found said that in the amounts you need it is non-toxic. But it wouldn’t say that it is entirely non-toxic. But after seeing the results right out of the dye it is quite tempting to try it…
does onion skins make a bright yellow? i need a neon yellow. i mean, just bright.
does onion skins make a bright yellow? i need a neon yellow. i mean, just bright.
does onion skins make a bright yellow? i need a neon yellow. i mean, just bright.
I have enjoyed reading all these types of dyes which were done. I am interested in finding out more natural dyes that are found here in Kenya. thanks for sharing the information.
when using the fixative… you say ‘simmer’. does that mean the fabric sits in the water for an hour or does it mean simmer on the stove for an hour?
comment to Maj: I found a recipe online for a mustard dye. it turned out pretty yellow. it’s just water and mustard. turned out great and even survived the best so far in my experiments for natural dyes through the washing machine! 🙂
alum is non-toxic and is traditionally used as a pickling (sp?) preserve- you can buy it at the supermarket! while youre there pick up some cream of tartar powder too as it helps brighten the color of the dyes and helps fix the mordant…it’s the heavy metal mordants you should stay away from (e.g. chrome, tin, copper). aprox 4 tbls of alum will mordant a lb of wool or silk fiber- but dont use too much or it will leave your fiber feeling rough and sticky!
alum is non-toxic and is traditionally used as a pickling (sp?) preserve- you can buy it at the supermarket! while youre there pick up some cream of tartar powder too as it helps brighten the color of the dyes and helps fix the mordant…it’s the heavy metal mordants you should stay away from (e.g. chrome, tin, copper). aprox 4 tbls of alum will mordant a lb of wool or silk fiber- but dont use too much or it will leave your fiber feeling rough and sticky!
alum is non-toxic and is traditionally used as a pickling (sp?) preserve- you can buy it at the supermarket! while youre there pick up some cream of tartar powder too as it helps brighten the color of the dyes and helps fix the mordant…it’s the heavy metal mordants you should stay away from (e.g. chrome, tin, copper). aprox 4 tbls of alum will mordant a lb of wool or silk fiber- but dont use too much or it will leave your fiber feeling rough and sticky!
I am hoping to do this craft with kids in grades 5-8. I was hoping that the dye could be made in advance and used cold. Any advice on whether or not (or how) this could work?
Thanks!
I am hoping to do this craft with kids in grades 5-8. I was hoping that the dye could be made in advance and used cold. Any advice on whether or not (or how) this could work?
Thanks!
I am hoping to do this craft with kids in grades 5-8. I was hoping that the dye could be made in advance and used cold. Any advice on whether or not (or how) this could work?
Thanks!
I was hoping to do this project with 5-8th graders. Would it work if I let the dye cool?
I was hoping to do this project with 5-8th graders. Would it work if I let the dye cool?
I was hoping to do this project with 5-8th graders. Would it work if I let the dye cool?
Pingback: Leader Lobby » Blog Archive » Crafting a Green World
hey, this is great i tried the strawberry dye on cotton…
do anyone had tried to do pigments to be used as watercolors??
thanks alot for the ideas in here!
hey, this is great i tried the strawberry dye on cotton…
do anyone had tried to do pigments to be used as watercolors??
thanks alot for the ideas in here!
hey, this is great i tried the strawberry dye on cotton…
do anyone had tried to do pigments to be used as watercolors??
thanks alot for the ideas in here!
I love this information. I am new to making natural dye. I have a few questions I hope someone can answer. I want to store the dye and use it for stamp making. What is the best way to store it. And how long can I store it for? Does it go bad after a while
Also has anyone used this dye as a pigment for non toxic paint?
Thanks
OK kids, I’d like to add a new dimension to your eco-dyeing. I have only been doing this for a few months and learned it from a friend who attended a week long workshop in New Zealand given by world famous India Flint of Australia. Anyway, the technique is to make parcels with your fabrics – they can be old stained or worn out cotton shirts that are going to the Good Will or silk pieces the size of scarves – even wool fabric (silk works best). You start by gathering leaves and flowers and other plant matter in your garden and lay it out on the fabric. Roll the fabric in any pattern or direction very tightly and bind it with rubber bands or ribbon or hemp and follow the dyeing methods that you are currently doing. It is important to let the parcels sit in the dye for several days off heat after they are simmered and then let them dry completely (which can take a week or more) in a warm airy place that is not in direct sunlight. Your results when you undo the parcels will knock your socks off. The plant matter will leave either a dyed print or a resist print or both on your fabric and your possibilities are endless.
Another method of preparing your parcels is to roll them onto a tree branch that is about 3 or 4 inches in diameter and short enough to fit into your cooking vessel. Just keep placing items from the garden into your roll of fabric and keep it tight while rolling. The bark from the wood assists in making interesting results. Lichen will give you amazing colour transfers and will vary depending on the tree or plant that is its host.
As a side note, using copper pots will react to your salt, vinegar or other colour fixatives and give a nice patina to your colours.
Lastly, I have been cold dyeing with blackberries that I picked the other day and they are magical! I mashed the berries in a deep pitcher and wrapped my scarf with plant matter tightly around a stick and tied the bundle with cotton string up and down the entire length and let it sit in the dye bath for a few days. The trick with fruit is to freeze it first thus allowing the pigment cells to burst so that the colours are more vivid and intense. I think any berry or fruit with deep colour should work fine.
Sorry for such a long and detailed post but I’m so addicted to my eco-dyeing that I just want to share it with others and I seem to have a captive audience here so I hope this helps for some of you who wish to experiment some more.
Quick question regarding dying with food sources, why do you have to have a dedicated dying pot if the dyes are non toxic/food in origin? I am thinking of using blue berries.
Quick question regarding dying with food sources, why do you have to have a dedicated dying pot if the dyes are non toxic/food in origin? I am thinking of using blue berries.
Quick question regarding dying with food sources, why do you have to have a dedicated dying pot if the dyes are non toxic/food in origin? I am thinking of using blue berries.
Beets, strawberries, and purple kale works too. I hear yarrow makes a nice yellow.
Regular kale makes a light brown.
What a great bunch of comments.
Beets, strawberries, and purple kale works too. I hear yarrow makes a nice yellow.
Regular kale makes a light brown.
What a great bunch of comments.
Beets, strawberries, and purple kale works too. I hear yarrow makes a nice yellow.
Regular kale makes a light brown.
What a great bunch of comments.
This is very encouraging, I’d like to try it! Thanks!
This is very encouraging, I’d like to try it! Thanks!
This is very encouraging, I’d like to try it! Thanks!
Glad I found your blog! I made my own dye for the first time last month. I used marigolds that the maintenance men at my school were going to throw out and they were more than happy to give them to me. It turned out a light yellow, very pretty. Next time I will use a fixer.
Glad I found your blog! I made my own dye for the first time last month. I used marigolds that the maintenance men at my school were going to throw out and they were more than happy to give them to me. It turned out a light yellow, very pretty. Next time I will use a fixer.
Glad I found your blog! I made my own dye for the first time last month. I used marigolds that the maintenance men at my school were going to throw out and they were more than happy to give them to me. It turned out a light yellow, very pretty. Next time I will use a fixer.
Hi,
I was looking for more information on natural dyes and came across your blog. Great tutorial! Thanks!
I was thinking of dying my white denim pullover pink, will the dye be able to stay on denim material?
Hi,
I was looking for more information on natural dyes and came across your blog. Great tutorial! Thanks!
I was thinking of dying my white denim pullover pink, will the dye be able to stay on denim material?
Hi,
I was looking for more information on natural dyes and came across your blog. Great tutorial! Thanks!
I was thinking of dying my white denim pullover pink, will the dye be able to stay on denim material?
wat fruit do i use for orange
wat fruit do i use for orange
wat fruit do i use for orange
hi, i love this! i want to use this with a sort of stenciling technique, would it work if i was to “paint” it on?
i’ll be bleach dying a grey cotton t-shirt and wanted to paint on or sponge the dye onto the newly bleached parts.
hi, i love this! i want to use this with a sort of stenciling technique, would it work if i was to “paint” it on?
i’ll be bleach dying a grey cotton t-shirt and wanted to paint on or sponge the dye onto the newly bleached parts.
hi, i love this! i want to use this with a sort of stenciling technique, would it work if i was to “paint” it on?
i’ll be bleach dying a grey cotton t-shirt and wanted to paint on or sponge the dye onto the newly bleached parts.
Pingback: Fab Fabrics: Why Earth Friendly Dyes are Important – World Denim Clothing
Pingback: How to Dye Fabric With Natural Dyes | Earth Divas' Blog
Pingback: Poly Hobby Mommy » Blog Archive » Natrual Dyes & Paints
Pingback: Fab Fabrics: Why Earth Friendly Dyes are Important – Crafting a Green World
Do you that the same could be made with beetroot.
I wanted to say: Do you think if…
Beets work great! Just like with the plums, you want to choose ones that would stain your clothes, so purple beets will make good dye.
I wish that it could be so much shorter. I mean if I used a smaller peice if fabric could it be dont in less time?
Ya, I had the same question.
thank you very inspirational, will give it a go to do some felting. All good things take a long time and what is time anyway?????
very helpful! i am doing this for my science project1 i admire ur environental patrionism!
Pingback: Fab Fabrics: Vegetable Dyed Organics from Eden – Crafting a Green World
If you let the fabric sit in the dyepot overnight, then you don’t need to “simmer” it for so long. Just bring to a boil, simmer about 10 minutes, andturn off the fire. It sits in the pot longer, but it uses less fuel.
I have used onionskins for dyeing. A few handfuls of skins into 2 litres of water simmer for few hours untill it looks dark brown. Then I dissolved a 2 tablespoons of salt into diy. Let the fabric simmer for another hour. It turned out golden yellow. Beautiful colour! Same way I used a beet root. It has to be peeled and sliced. Beet root gives a beige colour with light pink shade. Intense of colour depends on how much beet root you use.
Does anyone know what plants to use to get a deep/dark olive or moss green?
I want to dye cotton or silk yarn
I haven’t tried it, but moss might produce a color like that.
different varieties of moss will give different colours. so you would need to research what type of moss you use.
for green, grass clippings would be good for greens. some flowers will give a green colour – here in australia i have a beautiful pink hibiscus that gives a gorgeous green. it’s all trial and error and lots of fun!
maybe lots of grass cuttings?
Ooh yes! Grass is notorious for staining fabric, why not make it work for you? Love it.
Red Onion Skins! Great olive green, no mordant required, quite lightfast, and easy to find. (Just tidy up the supermarket display, they’ll probably love you for it.)
I would like to know the best (deepest) I should say, dyes I could use for dyeing cotton. Im working with high school students in an after school program and need some good tips on using non toxic dyes. I don’t want to take a chance with making anyone sick with the chemicals. Can you help me?
charlotte
I found this to be very helpful. There’s a full list of plant material that you can get different dyes from on the bottom half of the page.
Berries from the Poke plant dye wonderfully deep,rich shades from burgundy to purples.Lighter hues are easily achieved by shortening soak time.Soft pinks,lavenders,lilacs,and more…all from the same berries! Can’t think of the true name of the plant we call “Poke Salad”. Mulberries are another producer of strongly colored dyes.
Mulberries are great for dyeing, but must be fermented, not boiled. If you boil them, even for a short time, the fabric/fiber comes out gray! Finally a Navajo weaver told me to use the fermentation process to hold the color, and it worked! Google fermenting natural dyes to find various methods. It takes longer, but uses very little energy. You can experiment with additives to change the ph for different colors: Borax, salt, vinegar or copper nails or pennies. Fun stuff.
Not to be rude to Eileen about her suggestion of the using Poke, but please – a warning to all about the Poke plant – the juice of the berries is fatally hallucinogenic to humans, even to the touch. Only the first tender leaves of the plant that rises in late March-April in certain parts of the country & which is used to make Poke Salad are not fatal. After the plant has matured even the smallest bit, all other parts, including adult stalks, leaves and especially the berries can possibly kill you. I grew up being taught this by my grandmother almost 50 years ago which plants were kind to us and which were not. Poke is not.
I later made an effort to study my grandmother’s information about plants and shrubs and found that most everything she had taught me was true. If anyone doubts the veracity of this, please read entries on Poke in the Peterson Field Guides or other field guides of a similar nature. Be extremely cautious before using certain berries. Poke berries can often be mistaken for less malign plants and the mistake can be deadly,
here in australia, we call them Ink Berries, but they’re still just as toxic as what you have there!
we must be different sisters from the same grandmother…she taught me every plant and what it was for…now I have 100% cotton thermal underwear I want to dye non toxic. researching RIT dye shows toxic cautions. Do you know an easy, natural dye for 100% cotton? thanks much, melissa-nashville,tn
Turmeric spice will give color to any fiber — even a synthetic. You could try that on your cotton! I have used it on cotton many times. 🙂
sweet! LOVE it!!!
Is the dyed fabric washable?
Will the colors stay in the fabric even if you wash the fabric? If I were to use this for clothing…?
how much water do you put inside the pot when you put the fabric (w/ the fix) in?
ITS REALLY NICE TO MAKE THIS NATURAL DYE N WANTED TO TALK TO YOU SOMETHING ABOUT MY OWN PROJECT…..PLZ MAIL ME IF POSSIBLE ON MY ID
My
personal favorite for summer is Raspberry cast-off. No matter if you are making
jelly or ice-cream all those seeds and red pulp make and excellent die. I
typically use it like tie-dying. Treat eh shirt as normal, put it in a bag and
add the red-pulp. I work it in the fabric for a few minutes and then let sit
for a little while and rinse.
Colors
vary in the shirts as in the fruit, but that is the magic. When completed, they
look like an old favorite tie-dye shirt I’ve had for years. I typically tie-dye
the shirts i ruin while canning.
I just visited a women’s coop weaving group in Guatemala and they use the entire plant and let it soak for 12-30 hours before even putting in their yarn. Then they soak the yarn for another 12 hours. The colors they got were very rich and vibrant, also some were quite unexpected (basil made a very pretty purple according to them, using the flowers, stem and leaves)
Hi Emily,
I love the idea of using natural materials to dye. What color shade of purple resulted
from using the basil plant???
Thank you fory our reply,
Susan
PS. I’m searching for a rainbow chart of colors 🙂 Did you discover other produce or
botanicals that created a nice color for dyeing? tx.
can this work on polyester (teddy bear fur)?
No. Natural dyes don’t work on synthetics, except sometimes for nylon.
I wanted to turn my faded jeans a dark blue…what would you suggest using and do you think it would work on jeans?
Indigo.
This past summer I used perilla to dye some fabric. I wrote a post about it here: http://www.bloombakecreate.com/2011/07/dyeing-with-perilla/
Hi, i was writing up the procedure for this and i was wondering… When your simmering the salt fix, do you put on the stove?
Yep! You’d simmer it on the stove.
Wow! Great post. I’m a knitter/beginning spinner trying to step into a more sustainable kind of lifestyle. We are starting to look into foraging and planting and using what we have locally for eating, etc. I can’t wait to use your technique on some hand-spun wool!!
Thanks for these great tips! I dyed cotton wool balls with iron oxide and the varying shades of grey and black were interesting. When I tried to fix it with soda bicarbonate and vinegar, the colour rubbed off on my hands. Maybe I should’ve used salt and heated like you did. Next I’ll try henna, coffee and powdered paint and tumeric.
Baking soda, vinegar, and salt are not mordants for natural dyes. Mordants are metal compounds like alum and iron. Iron oxide leaves a gray residue on fiber, but there’s nothing you can do to keep it there (it’s not bonded, it’s just on the surface). Iron by itself makes tan.
I have pink cotton i want to dye a mid blue what fruit can I use please
Pingback: 5 DIY Projects :: Earth Day Round Up « Flee Fly Flown
i really liked your eco-dyeing.
love from sewden
Pingback: 7 Art Supplies Made Directly from Nature | Crafting a Green World
Pingback: How to Make Natural Fabric Dye | Glue and Glitter
Pingback: Naturally Dyed Shirts « I Create Stuff Sometimes
High,
Do you know if this process would Dye wood? Thank you for spending the time to post this blog in detail. Peace
i tried plums/salt and my fabric looked pale pink after 24 hours of soaking, but after one wash, it was just gray. :/
Oh no! What ratio of plum skins to water did you use? Maybe more is the answer? It also sounds like she simmered for an hour and then let it soak – I wonder if that heat makes a difference!
Most fruit dyes are not very fast. Your result is not unusual.
can you classify what other fruit or things can be used please
What substances have you had success (no severe stripping of colour) using to wash your naturally-died cloth ? I assume there’s more than cold water to it.
Wonderful article, by the way. I fortuitously have a bucket of these plums already sitting in the room that were previously dedicated to the making of fruit leathers.
I just wash like normal with eco-friendly detergent. The color will fade a bit on the first washing but it should hold steady after that. How much it fades depends on the type of fabric. Something more absorbent will fade less, because it should hold on to the dye better.
I am just decided to try natural dyeing. I have collected red onion skins and rose of Sharon flowers. I will let you know how it turns out. Colleen
Yay! Looking forward to hearing how it goes.
I used red onion peels to dye cotton. Love the muted red. I got all my onion peel at my fruit stand by cleaning out the onion bin. Of course I asked first. Most people are ready to help when they know what your doing. I got old wool jackets at the salvation army at a reduced price when I told them I was going to use them for felting.
Thanks for all the info! I am trying to figure out how to dye my white couch covers (heavy cotton) beige? Thought of black tea or coffee- but so afraid it will look spotty- any thoughts????
Make sure you use a HUGE pot, big enough for plenty of water and dye to move around the fabric.
Have been looking for ideas on how to make my own vegetable dyes when i stumbled across your site, a few other sites mentioned allum as the fixative which i didnt want to use. So I was excited to find this all natural way! Thanks so much for sharing…. can’t wait to dye my wool for felting yay 🙂
Salt and vinegar aren’t fixatives (mordants) for natural dyes. Salt changes the rate the dye moves into the fabric, and vinegar changes the pH which can change the color of the dye, but neither actually help to bond the dye to the fabric and make it more color fast.
There are DIY mordants though. You can make an iron mordant by soaking rusty iron in vinegar-water for a month. You can make a copper mordant the same way (but be careful the fumes are toxic). Tannin, found in coffee, tea, dock root, bark, etc is a mordant. So is soy milk (esp for cotton) and rhubarb leaves (be careful the fumes are toxic). Even urine is a mordant.
Some natural dyes don’t need any mordant. Indigo and tannin-rich dyes are colorfast without any mordant. The plum dye in the post gave the pink color without mordant. However, many natural dyes last longer with a mordant even if they don’t need one to give a color.
Salt is not a fixative. It helps move (migrate) the color into the fabric. You are actually not fixing the dye into the fabric as that takes a chemical bond which you have not created.
Many plant dyes will fade or wash our over time because of this, cold water ONLY. Also many plant dyes are not sunfast, meaning light will fade them. Do not line dry these items as they will usually fade.
HI , I’m looking to make aorganic paint for my painting . I make dye for eggs ,but I do not know how to thickned to use for my painting . Thank you
Hi!
Wonderful post! 😀
Thanks!
I will try dying fabric with berry juice (got a lot of that in stock, but I didn´t know I can make my own organic dye with fruit).
@Norazart : You can mix any color out the three base colors red, yellow and blue (the internet will help for more info about the possibilities you have with those three colors).
To get green, just mix yellow with a bit of blue (for example, yellow from onion peels and blue from blueberries).
@Norazart : You can mix any color out the three base colors..
won’t work with natural dyes. if you want to mix colours then you have to use commercial dyes.
Pingback: The Fashionably Green Hannah
Pingback: Slow Cloth, Solar Cooking and Color! | blog on smog
Pingback: Day Program: The Great Outdoors | Talking Stick Learning Center
I would love to start doing this to make pigments for paint. I don’t want to start with anything toxic but I am looking for something plentiful and harmless to give me the prime colors and then I can use color theory to start mixing to get everything else. Much thanks to any and all suggestions!
I really love the color results that you got with the plums! Thanks for the pictures and directions. I have tried walnuts and turmeric, which require no mordants or fixatives, and they are beautiful. It looks like I will be locating some plums next….
Came across this when trying to find how to tie dye naturally. What a great colour you got from those plums.
I’ve done some natural dying in the past but in soy wax rather than with fabric, by placing the dying ingredient inside some cheese cloth then using it as a sort of tea bag in the melted wax.
It can be dificult to get a good strong colour though due to soy wax’s natural creamy colour, but it was fun trying.
Hello! i want to do tie dye on organic cotton dresses which are very expensive and by doing tie n dye on them they become even more expensive now my only question and concern is about fastness of these dyes on organic cotton, i don’t wish my clients come back with complain after few wash, can you plz share your expertise in this regard.
thank you
Pingback: Reduce Your Fabric Water Footprint
this is really cool, thank you Leslie!! I’m trying it with grape juice for a dark purple. Now that I think about it, pomegranate would be sooooo beautiful